Ever rush out the door, knock a stack of baseball caps off the coat rack, and wonder if there’s a smarter — and prettier — way to store hats? If you love hats but hate the clutter, you’re not alone. Turning a plain wall into a functional, stylish hat display is one of the easiest DIY home upgrades that both organizers and decorators can get excited about.
Why Use a Wall Ideas Hat Display?
A wall-mounted hat display saves floor space, protects your hats from being crushed, and turns your collection into an instant focal point. Whether you have a capsule wardrobe of classic fedoras or a shelf of wide-brim sun hats, these wall ideas double as storage and art. Below you’ll find practical DIY tips, step-by-step projects, and design inspiration to help you choose the best solution for your entryway, bedroom, or closet nook.
Quick Inspiration: Styles for Every Home
- Minimalist Pegboard — Clean, modern, and highly customizable for small spaces.
- Floating Hat Shelves — Great for wide-brim and vintage hats; creates layers of display.
- Individual Hooks or Pegs — Simple, budget-friendly, and ideal for entryways.
- Grid of Wall-Mounted Baskets — Soft, breathable storage for knitted caps and beanies.
- Repurposed Frames with Hat Clips — A creative gallery-style arrangement for a curated look.
Wall Ideas Hat Display: Step-by-Step DIY Projects
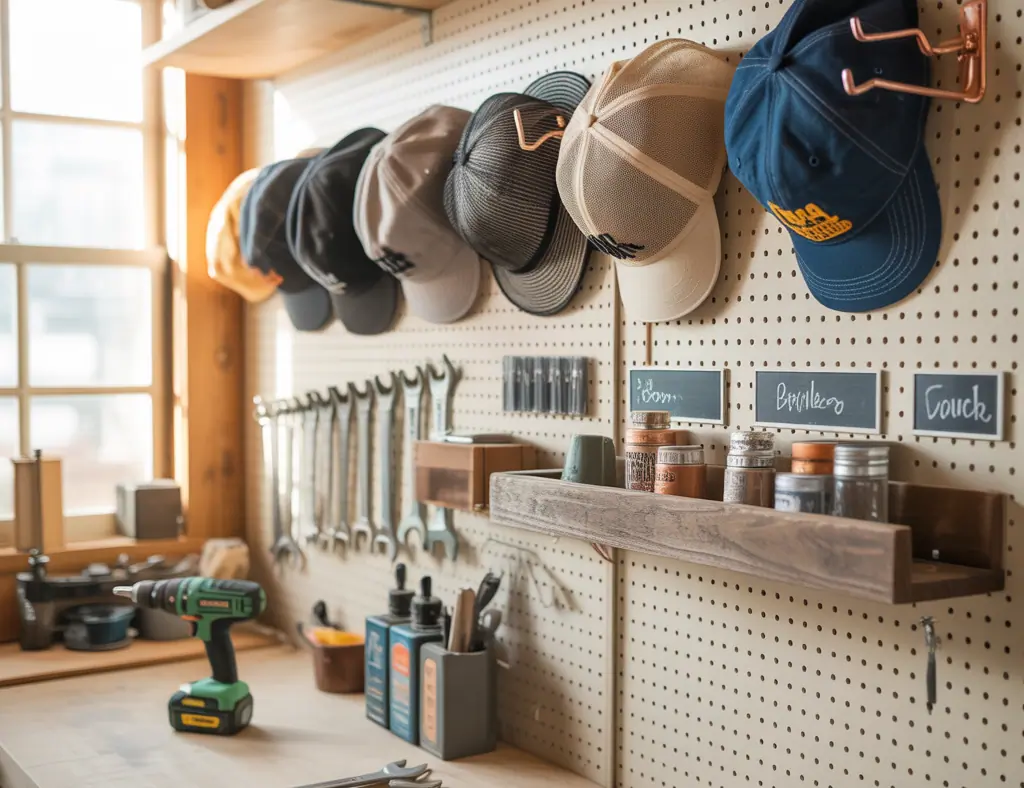
1. DIY Pegboard Hat Wall (Modern & Flexible)
Materials: pegboard panel, paint or stain, peg hooks of varying lengths, screws, wall anchors.
- Measure the wall area where you want the display. A 2×3 foot panel is a good starter size.
- Paint or stain the pegboard to match your room’s palette; allow to dry fully.
- Mark wall studs and use anchors or a French cleat for secure mounting if studs aren’t available.
- Mount the pegboard and arrange hooks to suit hat styles — shorter pegs for caps, longer for wide-brim hats.
- Rotate and rearrange hats seasonally to keep the display fresh.
Tip: Use a level to ensure neat rows. Add a small label or pinboard section for seasonal reminders like “winter hats” or “sun hats.”
2. Floating Shelf + Hat Stands (Gallery Look)
Materials: floating shelves, small hat stands or foam blocks, screws, stud anchors.
- Install shelves at staggered heights to create movement—higher for decorative pieces, lower for everyday hats.
- Use hat stands or shaped foam forms to support the crown and prevent warping.
- Group hats in odd numbers (3,5) for a more natural, curated look.
- Add a small ledge below for sunglasses, keys, or a catchall tray.
Tip: Choose shelf depth that fits the largest hat brim. 8–10 inches is often enough for most sun hats.
3. Rustic Hooks on a Reclaimed Wood Board (Budget-Friendly)
Materials: reclaimed wood plank, coat hooks or vintage knobs, sandpaper, sealant, mounting hardware.
- Sand and seal the board to prevent splinters and add durability.
- Layout hook spacing: 12–16 inches apart typically works for hats.
- Attach hooks with screws through pre-drilled holes and mount the board securely on the wall.
- Arrange hats by color or style for an intentional look.
Tip: Use different hook styles (metal, brass, ceramic) to add texture and personality.
Design Tips and Real-World Advice
- Balance form and function: Preserve hat shapes with stands for fedoras and fill the crowns of floppy hats with tissue when using hooks.
- Consider humidity: In moist climates, avoid sealed plastic containers on walls; opt for breathable baskets or hooks.
- Placement matters: Place displays near entryways, mudrooms, or dressing areas for easy access — but away from direct sunlight to prevent fading.
- Scale and spacing: Large hats need more horizontal clearance; draft a quick sketch to map spacing before drilling holes.
- Security: Use wall anchors or screw into studs for heavy displays or shelves with multiple hats to prevent pulling out.
Small Space Solutions
If you’re short on wall real estate, try a vertical stack of shallow shelves or a narrow rail with cascading pegs. Over-the-door hat racks also work for closets or behind bedroom doors. For renters, removable adhesive hooks or a tension-rod rail inside a closet provide non-damaging options.
Styling Your Hat Display Like a Pro
Think of your hat wall the same way you’d style a gallery: mix textures, repeat colors to create rhythm, and leave negative space so the display feels intentional, not cluttered. Add a small mirror, artwork, or a plant to break up rows of hats and create a lifestyle vignette.
Frequently Asked Questions
Q1: What is the best way to hang heavy hats on a wall?
A1: For heavy or structured hats, use sturdy hardware—screw-in hooks anchored into studs or heavy-duty wall anchors. Floating shelves with hat stands are also excellent for distributing weight safely.
Q2: How do I stop hats from losing shape when hung on the wall?
A2: Use hat stands, foam inserts, or crown supports when possible. For hung hats, choose wide, rounded hooks that support more of the crown rather than narrow hooks that create pressure points.
Q3: Can I create a hat display in a rental without drilling holes?
A3: Yes — removable adhesive hooks rated for your hat weight, tension rails inside closets, or leaning a narrow shelving ladder against a wall are renter-friendly solutions. Just follow weight limits on adhesive products.
Where to Start: A Practical Plan
- Inventory your hats by type and measure widths and crown heights.
- Pick a wall and select a style that fits your decor — pegboard for utility, shelves for display, or reclaimed wood for charm.
- Gather materials and tools; prioritize secure mounting hardware.
- Install, style, and photograph your finished display so you can replicate or adjust later.
If you want project ideas beyond hat displays, check out our DIY projects and refreshed spaces for more practical tutorials. For coordinating accessories or entryway upgrades, see our home design ideas and kitchen upgrades sections for complementary inspiration.
Conclusion: Make Your Wall Ideas Hat Display a Daily Delight
Transforming an underused wall into a beautiful, functional hat display is a quick win for any home. Whether you follow a pegboard plan, build floating shelves, or craft a rustic hook board, these wall ideas hat display solutions will keep your collection organized and on show. Ready to get started? Grab your tools, pick a design that suits your space, and create a display you’ll love coming home to.
Call to action: Share a photo of your finished hat wall or try one of our step-by-step projects — visit our DIY projects page to explore more tutorials and inspiration.