Ever walk into your bedroom and feel like something’s missing — the space looks fine, but it lacks personality? Maybe you’re fresh into a rental, renovating on a budget, or simply craving a cozy focal point. The wall behind your bed is one of the highest-impact areas you can update without gutting the room. In this post you’ll find practical, stylish, and budget-savvy wall behind bed ideas that any DIYer can tackle.
Why the Wall Behind Your Bed Matters
The wall behind the bed is the natural focal point of the bedroom. A well-designed headboard wall can change the perceived size of the room, add texture, and set the mood — from calm and minimal to dramatic and luxe. Whether you want a quick weekend project or a weekend-plus-hustle transformation, these ideas will help you pick a style, plan materials, and follow easy steps to execute.
Wall Behind Bed Ideas to Transform Your Bedroom
Below are stylish and practical concepts, each with DIY tips, materials, and difficulty levels so you can choose what fits your skill set and budget.
1. Painted Accent Wall (Simple & Budget-Friendly)
Color is the fastest way to change a room. A bold or moody paint color behind the bed creates instant drama.
- Materials: Primer, high-quality interior paint, painter’s tape, roller, angled brush.
- DIY tip: Use a shade 2–3 tones darker than the other walls for depth without making the room feel smaller.
- Step-by-step: 1) Repair holes and sand smooth. 2) Prime if switching from dark to light. 3) Tape edges and paint two coats. 4) Pull tape while paint is tacky for crisp lines.
2. Geometric Painted Feature Wall (Modern DIY Accent)
For a personalized look, create geometric shapes with painter’s tape and alternating hues. This adds visual interest without permanent changes — perfect for renters.
- Materials: Two or three coordinating paint colors, laser level or ruler, painter’s tape.
- Difficulty: Intermediate (requires patience for clean lines).
3. Wallpaper Behind Bed (Pattern & Texture)
Wallpaper is back — removable peel-and-stick options make it renter-friendly. Choose large-scale prints for a statement or subtle textures for a calming backdrop.
- DIY tip: Match pattern seams carefully; consider vertical paneling of wallpaper to avoid alignment headaches.
- Pro tip: Pair patterned wallpaper with a simple headboard to avoid visual overload.
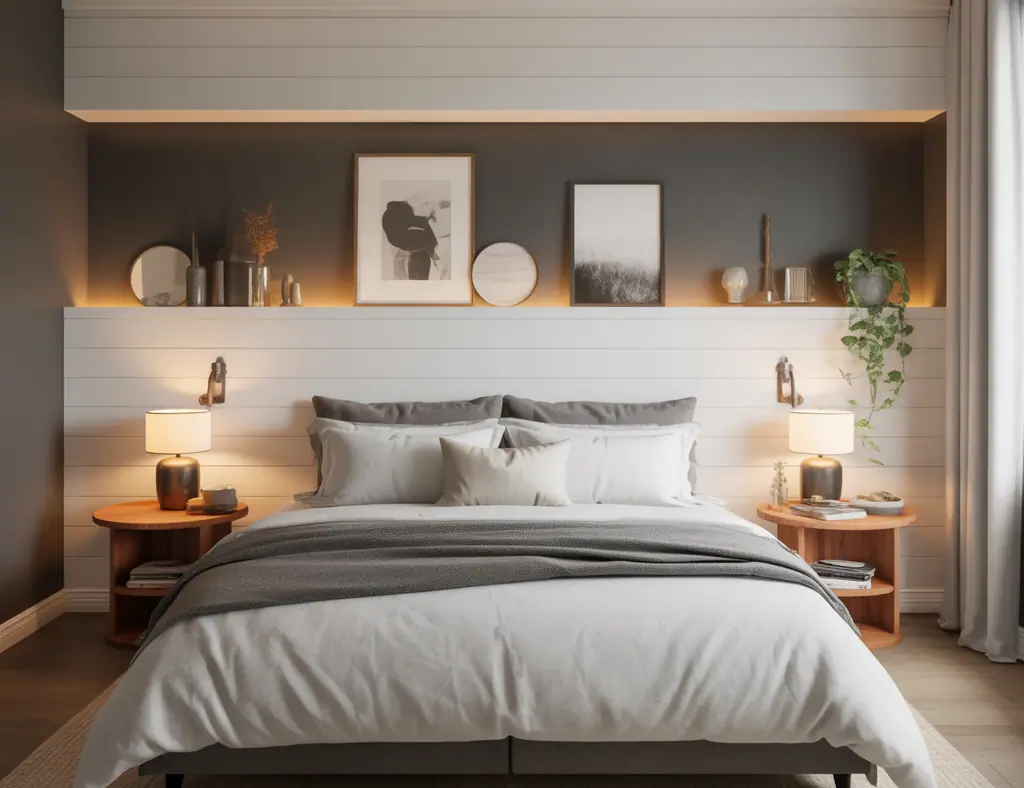
4. Wood Shiplap or Tongue-and-Groove Paneling (Cozy & Textural)
Shiplap and wood panels add warmth and depth. You can paint them white for coastal vibes or stain them for rustic charm.
- Materials: Plywood or shiplap boards, brad nailer, stud finder, finish nails, paint or stain.
- Step-by-step: 1) Find studs and mark. 2) Cut boards to fit. 3) Install from bottom up, nailing each board into studs. 4) Caulk seams and finish with paint or stain.
5. Oversized Headboard Wall (Upholstered & Luxurious)
Create an upholstered wall or a large padded headboard that spans the width of the bed wall for a hotel-like feel. Use plywood backing and foam, then wrap with fabric.
- DIY tip: Use indoor-outdoor fabric for durability and easy cleaning.
- Difficulty: Moderate; consider help for measuring and mounting.
6. Gallery Wall or Floating Shelves (Personal & Functional)
Arrange artwork, framed photos, or a mix of shelves and sconces to add personality. Floating shelves also create display space for books and plants.
- DIY tip: Lay frames on the floor to experiment with layouts before nailing holes into the wall.
- Real-world advice: Use picture-hanging strips for lighter frames to avoid drywall damage.
7. Accent Lighting & Sconces (Ambiance & Function)
Layered lighting — wall sconces, picture lights, or LED strips behind a floating headboard — transforms the mood and adds functionality for reading.
- DIY tip: Battery-operated or plug-in lights are easy for renters and avoid electrical work.
- Pro tip: Position sconces about 2/3 up the wall and 20–30 inches from the sides of the bed for balanced light.
8. Reclaimed Wood or Tile (Historic & Textural)
Reclaimed wood adds character; tile can create a modern, durable accent (great behind beds in guest suites or small studios with mixed-use walls).
- Materials: Adhesive mortar for tile, thin-set for wood planks, thin plywood backers for uneven walls.
- Real-world advice: Account for added wall thickness and door clearance if using heavy materials.
DIY Project: How to Create a Simple Shiplap Accent Wall (Step-by-Step)
- Measure the wall height and width. Buy 1×6 shiplap or MDF boards—add 10% for waste.
- Find studs and mark a bottom level. Use a chalk line to keep the first row straight.
- Cut boards to length, apply construction adhesive to the back, then nail into studs with a brad nailer.
- Caulk seams and nail holes, fill with wood filler, sand lightly, and paint or stain.
- Reposition your bed and switch on accent lighting to see the effect.
Approximate time: Weekend project. Difficulty: Beginner to intermediate. Cost: $100–500 depending on wood choice and room size.
Design Tips & Real-World Advice
- Scale matters: Make the accent wall proportionate to the bed size. King beds suit wider, bolder treatments; twin beds need subtler enhancements.
- Balance patterns: If you choose a busy wallpaper or pattern, keep bedding and curtains neutral to avoid visual clutter.
- Headboard integration: If your design includes a tall headboard, coordinate fabric or paint colors for cohesion.
- Renters: Opt for removable wallpaper, peel-and-stick panels, or lightweight, non-permanent headboards to protect deposits.
- Budget hacks: Paint, thrifted frames, and IKEA-style shelves deliver major style for small money.
Frequently Asked Questions
1. What is the best paint color for the wall behind the bed?
There’s no one-size-fits-all answer. Calming blues and warm greys work well for restful bedrooms. For drama, deep greens, navy, or charcoal make great accent walls. Consider lighting: darker colors need good natural light or layered lighting.
2. Can I install shiplap or wallpaper in a rental?
Removable peel-and-stick wallpaper is ideal for rentals. For shiplap, use temporary mounting systems where possible or build a lightweight panel that hooks over the wall to avoid permanent alterations.
3. How do I choose the right height for accent wall elements like panels or a headboard?
As a rule, the accent should start about 6–12 inches above the mattress top to visually anchor the bed. Tall headboards or panels can extend up to the ceiling for a dramatic, cohesive look. Keep proportions in mind relative to ceiling height and bed size.
Conclusion — Pick One Wall Behind Bed Idea and Start Today
Refreshing the wall behind bed ideas doesn’t need to be expensive or complicated. Pick one concept — a painted accent, peel-and-stick wallpaper, or a simple shiplap weekend project — and commit a weekend to install it. Small changes make a big difference: you’ll walk into your room and feel the upgrade immediately. Ready to try a project? Check out our DIY projects and home design ideas for step-by-step guides, or browse creative inspiration even if you also enjoy kitchen upgrades. Share your before-and-after photos — I’d love to hear how your wall behind bed transformation turns out!