Ever stare at the awkward triangular gap under your stairs and think, “This is wasted space—but what can I actually do with it?” Whether you’re juggling toys, books, or a mountain of shoes, the area beneath a staircase in the living room is one of the biggest overlooked opportunities in home design. With a few practical DIY skills and smart planning, you can transform that wasted cubby into a functional, beautiful part of your home.
Why transform under-stair space?
In many homes, the under-stair area becomes a catch-all for clutter. Reimagining it can add storage, improve flow, and even increase your home’s usable square footage. From built-in shelving and cozy reading nooks to mini home offices and entertainment centers, there are under stairs ideas in living room that suit every style and budget.
Top under stairs ideas in living room
1. Built-in storage cabinets and pull-out drawers
One of the most practical solutions is custom cabinetry that follows the stair angle. Use deep drawers for shoes and seasonal gear, and shallower drawers for games, remotes, and craft supplies. For a DIY-friendly option, install ready-made drawer systems into a framed box and finish with matching trim.
- Materials: plywood, drawer slides, handles, paint or stain.
- Tools: circular saw, drill, level, measuring tape.
- Time: 1–2 weekends for a simple installation.
- Tip: Use soft-close slides for a high-end feel.
2. Cozy reading nook or window seat
Create a small reading nook with a cushioned bench, built-in shelves, and layered lighting. Add a small curtain or sliding door for privacy and a plug-in for a reading lamp. This is perfect for apartments or open-plan living rooms that need intimate corners.
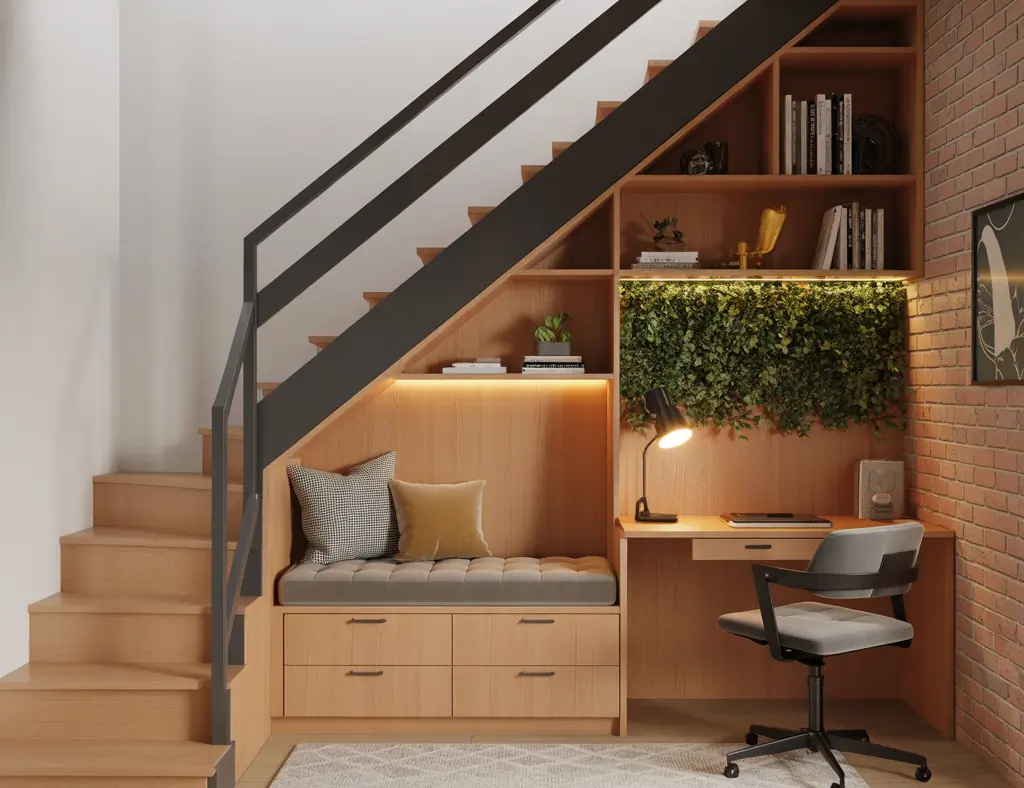
3. Home office or study pod
With remote work here to stay, a compact under-stair workstation can be a game changer. Install a floating desk, overhead task lighting, and cable management. Keep ergonomics in mind—use a comfortable chair and consider a vertical monitor mount if space is tight.
4. Entertainment center or media wall
Turn the area into a media hub with shelving for consoles, bins for controllers, and a recessed TV mount if the wall space allows. Soundproofing panels and hidden wiring keep the look clean.
5. Bar, wine cellar, or coffee station
For those who entertain, a mini bar with a wine rack, under-counter fridge, and glassware storage is a luxe upgrade. Alternatively, a coffee station with a drawer for pods and a small sink (if plumbing allows) creates daily delight.
6. Pet zone or kids’ playhouse
Design a dedicated pet bed or a playhouse for kids with washable cushions, toy storage, and a small door. It’s an easy way to keep toys contained and give pets their own territory.
Step-by-step DIY plan: Convert under-stair space into storage cabinets
- Measure the full triangular space—height at several points, depth, and width. Sketch a scaled plan.
- Decide on layout: full-height cabinets, drawers, or a mixed solution. Consider hidden doors for a seamless look.
- Build a simple frame using 3/4″ plywood to match the stair profile. Anchor to studs and level carefully.
- Install drawer boxes or shelf boxes, using drawer slides and adjustable shelving brackets.
- Finish with trim, paint or stain, and attach hardware. Add magnetic catches or soft-close hinges for durability.
- Organize with baskets, labeled bins, and dividers for long-term functionality.
Design tips and real-world advice
- Lighting is everything: install LED strips along shelves or puck lights in cubbies to highlight items and make the space usable.
- Think ventilation: if you store electronics or appliances, ensure airflow to prevent overheating.
- Match existing trim and finishes to make built-ins look custom and cohesive with your living room.
- Keep accessibility in mind: drawers are more user-friendly than deep cabinets for frequently used items.
- Childproof where necessary—use soft edges and cabinet locks if kids will be around.
- Consider moisture-prone areas—avoid wood finishes that might warp if the under-stair space is humid.
Budget-friendly vs. high-end executions
If you’re on a budget, paint, IKEA-style units, and thrifted knobs can transform the space for a few hundred dollars. For a high-end finish, hire a carpenter for custom millwork, integrate hidden lighting, and use solid wood or veneer. Planning and clever finishes can make a budget project look professional.
Materials and tools checklist
Common materials: plywood, MDF for painted surfaces, drawer slides, hinges, trim, paint, lighting fixtures, and hardware. Basic tools: circular saw, jigsaw, drill, orbital sander, screwdriver set, clamps, and safety gear. Rent specialty tools if needed to save cost.
Frequently Asked Questions
1. Can I install plumbing or electricity under the stairs?
Yes—but always consult a licensed plumber or electrician. Running electricity for lighting and outlets is common and typically straightforward. Plumbing for sinks or wet bars is possible but requires proper permits and drainage planning.
2. How do I deal with awkward sloped ceilings and low clearance?
Work with the slope: use shallow shelving where clearance is low and deeper storage where the ceiling is higher. Consider pull-out drawers that maximize lower-height areas and keep frequently used items where clearance is comfortable.
3. Is it worth hiring a pro for under-stair transformations?
It depends on scope. Simple shelving and paint can be DIY. For structural changes, electrical or plumbing work, or custom millwork for a seamless look, hiring a professional will save time and ensure safety and code compliance.
Conclusion: Start reimagining your under-stair space today
Transforming under stairs ideas in living room from wasted space into a purposeful, stylish feature is one of the most rewarding home upgrades you can do. Whether you choose built-in storage, a cozy reading nook, or a compact home office, small changes yield big improvements in functionality and appearance. Ready to tackle a project? Browse our DIY projects for step-by-step guides, or explore home design ideas and kitchen upgrades for more inspiration. Share your under-stair makeover, and start turning that awkward gap into your home’s next favorite spot.
Call to action: Pick one under-stair idea from this article, sketch a plan this weekend, and tag your before-and-after photos—small changes lead to big results!