Staring at that steep backyard and wondering how to make it usable, safe, and beautiful? Maybe you’ve tripped on uneven ground, avoided a flower bed because it’s hard to reach, or dream of a terraced garden that doesn’t wash away every spring. If your home backs onto a slope, these slope hillside landscape steps ideas will help you transform a tricky incline into an attractive, functional outdoor space—without necessarily calling in an expensive contractor.
Why Build Landscape Steps on a Slope?
Installing steps on a hillside does more than make the yard walkable. Properly designed landscape steps control erosion, create level planting areas, increase usable square footage, and boost curb appeal. Whether you choose stone, timber, concrete, or modular blocks, the right stair design can add character and long-term stability to your property.
Slope Hillside Landscape Steps Ideas
Here are practical, creative approaches for building outdoor stairs on a slope, from simple DIY to more advanced designs.
1. Timber Tread Steps with Gravel Backfill
Timber sleepers are budget-friendly and easy for DIYers. Use pressure-treated lumber or cedar for durability.
- Tools & materials: pressure-treated timbers, crushed stone, landscape fabric, rebar, level, circular saw, drill.
- Steps: mark the slope, dig level ledges for each timber, place landscape fabric, backfill with crushed stone, anchor timbers with rebar, check each riser for consistent height.
- Best for: gentle to moderate slopes, rustic or cottage-style yards.
2. Natural Stone Steps for Timeless Appeal
Flagstone or irregular boulders create a natural stairway that blends into the landscape.
- Tools & materials: flat stones or flagstone, gravel, sand, mason’s hammer, level, geotextile fabric.
- Steps: prepare a compacted base, set each stone into a bed of gravel and sand, pack around edges to prevent wobble, add low-growing plants between treads.
- Best for: homeowners who want a durable, long-lasting, high-end look.
3. Concrete or Poured-in-Place Steps for Heavy Traffic
Concrete offers stability and a clean modern aesthetic. It’s best for steep slopes or frequent use paths.
- Considerations: formwork, reinforcement, consistent riser height, coping with frost lines in cold climates.
- DIY tip: use pre-cast concrete treads if you want to avoid complex forms and curing.
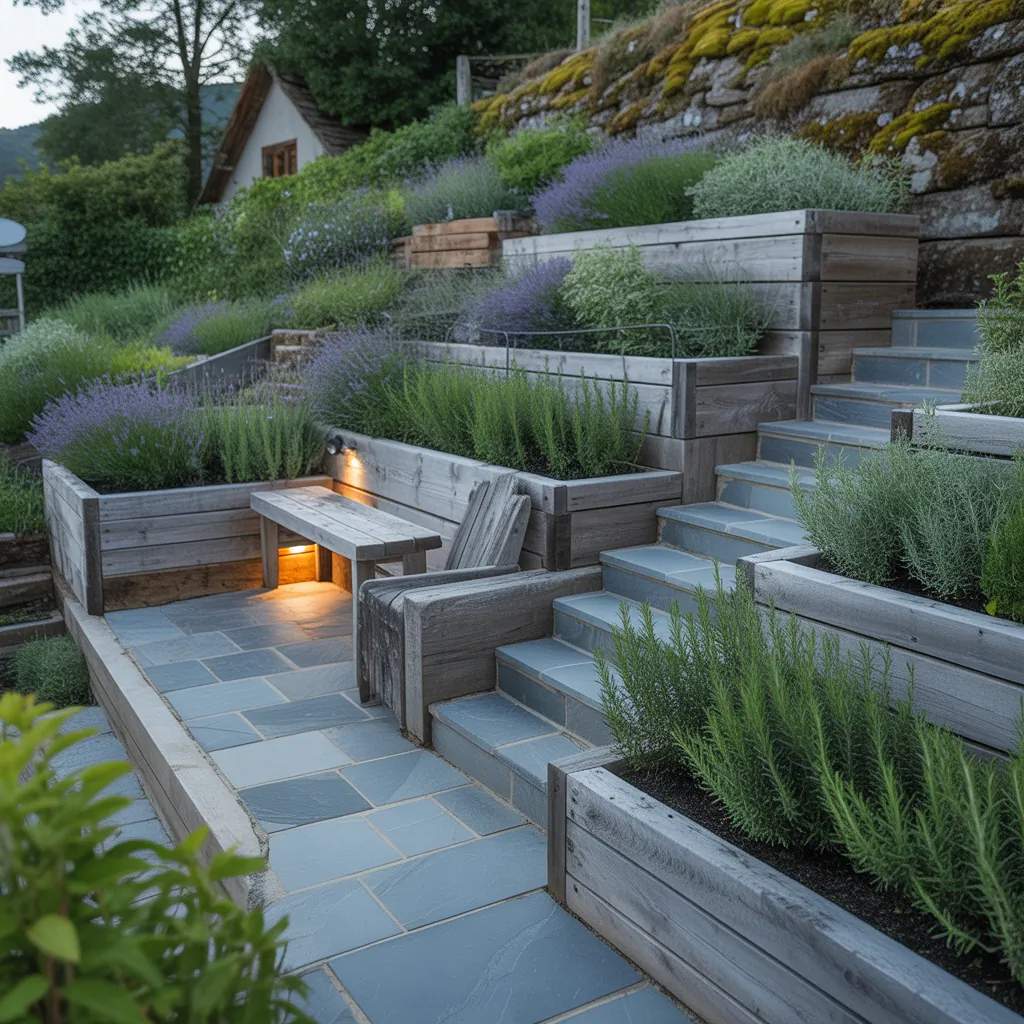
4. Modular Block Steps with Integrated Retaining Walls
Interlocking block systems are engineered for strength and are ideal where the steps must double as retaining walls.
- Advantages: precise look, built-in drainage channels, easier to stack than loose stone.
- Design perk: use different caps and riser textures to create contrast.
Design Inspiration: Combining Function & Style
Think beyond just the treads. Good hillside step design integrates landscaping, lighting, and usable landings:
- Terraced planters: Turn landing spaces into raised flower beds for color and erosion control.
- Path lighting: Solar or low-voltage step lights improve safety and extend usability into the evening.
- Seating landings: Wide, flat landings can double as casual benches or gathering spots.
- Switchbacks and wide steps: Gentle switchbacks reduce steepness and create visual interest.
Practical DIY Tips Before You Start
Planning is critical. Follow these real-world tips to ensure success.
- Assess slope severity: Measure rise over run to decide whether steps, terraces, or retaining walls are necessary. A slope steeper than 30 degrees often needs professional input.
- Check soil and drainage: Identify clay, sand, or loam. Add drainage pipes or gravel backfill where water collects to prevent frost heave and erosion.
- Consistency matters: Aim for a riser height between 6″–7″ and a tread depth of 11″–14″ for comfortable, code-friendly steps.
- Use a string line and level: Keep risers uniform and treads level; uneven steps are a trip hazard.
- Permits and codes: Check local building codes and any homeowners association rules—especially for significant retaining walls or deep excavation.
Step-by-Step: Simple DIY Timber Sleepers Steps
- Plan & measure: Walk the route, mark step locations, and calculate the number of steps using total rise divided by desired riser height.
- Gather materials: timbers, crushed stone, landscape fabric, rebar, gravel, tools.
- Prepare the grade: Remove vegetation and organic soil. Compact the base where each step will sit.
- Install first tread: Level a bed of compacted gravel, set the timber, and anchor with rebar driven at an angle through the timber into the ground.
- Backfill and compact: Add crushed stone behind each timber for drainage and support. Repeat for each step, checking levels often.
- Finish touches: Add gravel on treads or cap with pavers; install handrail if slope is steep; plant groundcover to soften edges.
Maintenance & Longevity
To keep your hillside steps looking good and functioning safely:
- Inspect annually for movement, loose stones, or rot in timber steps.
- Replenish gravel and compact soil every few years to maintain drainage.
- Trim plants to keep treads clear and maintain visibility of each riser.
When to Hire a Pro
If you’re dealing with a very steep hillside, poor soils, complex drainage, or building a retaining wall over 4 feet high, hiring a landscape contractor or structural engineer is wise. Professional help can prevent long-term failures and ensure your steps meet safety and building codes.
Frequently Asked Questions
Measure the total vertical rise from bottom to top. Divide that rise by your chosen riser height (commonly 6″–7″). Round to the nearest whole number to get the number of steps, and then fine-tune tread depth for comfort.
Use a combination: retaining structures (blocks, timber, stone), geotextile fabric, crushed stone for drainage, and deep-rooted plants or groundcover. Mulch and terraces further reduce runoff and soil loss.
Yes—solar lights are simplest and require minimal wiring. For consistent, high-quality lighting, low-voltage systems are a DIY-friendly option that requires trenching for cable and connecting to a transformer.
Conclusion: Start Your Slope Hillside Landscape Steps Project
Transforming a sloped yard with thoughtful slope hillside landscape steps ideas will make your outdoor space safer, more beautiful, and more usable. Start small with timber or modular blocks if you’re new to landscaping, or plan a stone or concrete stairway for long-term value. Ready to tackle a project? Browse our DIY projects for step-by-step guides or explore home design ideas to match finishes and lighting. If your kitchen needs a refresh while you’re making home improvements, check our kitchen upgrades for matching outdoor and indoor style.
Don’t let a slope hold you back—measure your rise, pick a material that fits your budget and style, and take the first step today.