Ever stood in a cramped shower and wished the space felt bigger, brighter, or more stylish? Maybe you painted the walls, replaced the curtain, and still feel boxed in. If you’re tackling a small bathroom makeover, the right tile can transform a tiny shower into a spacious-feeling sanctuary. In this post I’ll share practical design ideas, DIY-friendly installation tips, and real-world advice so you can update your compact shower without breaking the bank.
Why tile matters in small bathrooms
Tile is more than decoration—it’s a way to manipulate light, scale, and perception. The color, size, layout, and finish of your shower tile will determine whether your tiny bathroom feels cluttered or airy. Choosing the right tile design and grout can visually expand the shower area and make daily routines more enjoyable.
Shower tile ideas for small bathrooms
1. Go large and light
Large-format tiles with light, neutral tones reduce grout lines and create a seamless look that visually enlarges a compact shower. Use glossy or satin finishes to reflect light and make walls feel further away. Consider 12×24 or larger tiles for a modern, minimal appearance.
2. Vertical layout to add height
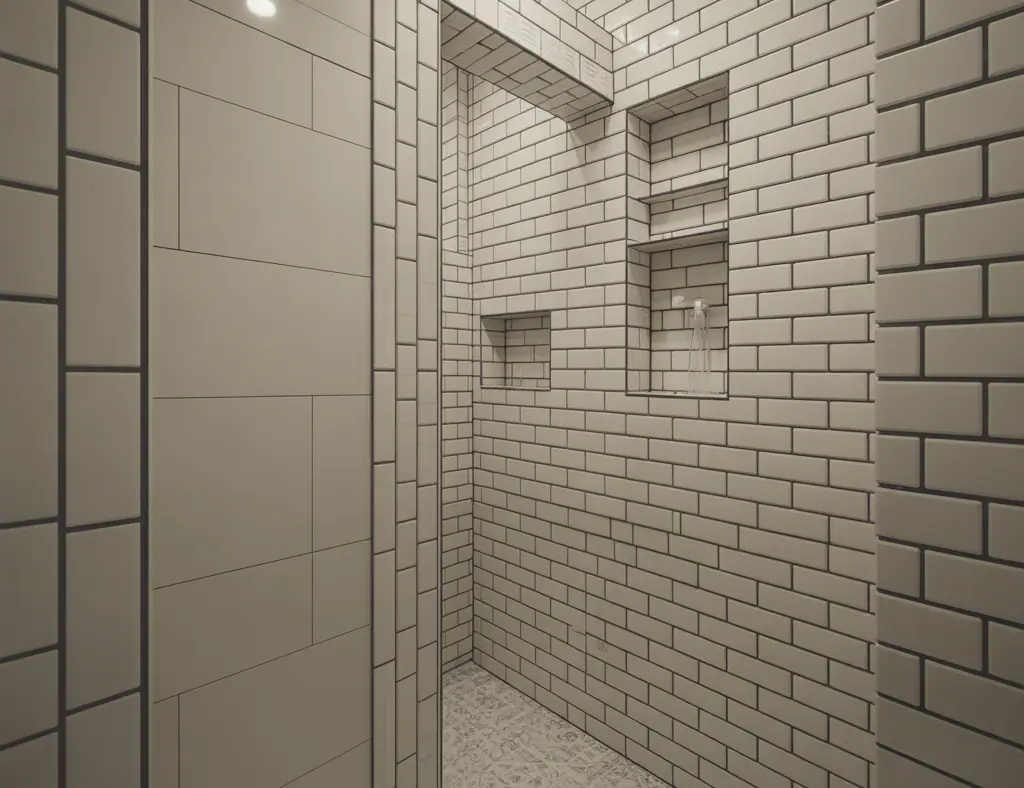
Stacking rectangular tiles vertically draws the eye upward and makes ceilings feel taller—perfect for small, low-ceiling bathrooms. A vertical subway tile installation is a simple change that packs a big visual punch.
3. Tiny mosaic accent wall or niche
Use a strip of mosaic tile or a tiled niche to add texture and interest without overwhelming the space. Small glass or ceramic mosaics work well as an accent on one wall or inside a recessed shower niche to highlight soaps and shampoo.
4. Herringbone or diagonal patterns for depth
Diagonal and herringbone patterns trick the eye into seeing more depth than there is. Use them sparingly—on a single wall or the shower floor—to create movement and visual space.
5. Match wall and floor tones
Using similar tones for shower walls and floors creates continuity that helps the shower read as one larger volume. Choose slightly different textures (smooth on walls, slip-resistant on floors) to keep the design functional.
Practical DIY tips and a step-by-step guide
If you’re comfortable with DIY projects, tiling a small shower is a manageable weekend project with the right preparation. Below are the essential steps and tips to get you started.
Tools and materials you’ll need
- Tile of your choice, spacers, and trim
- Thin-set mortar and a notched trowel
- Waterproofing membrane or liquid waterproofing
- Cement backer board or waterproof tile backer
- Grout and grout float, grout sealer
- Wet saw or tile cutter, sponge, level, tape measure
Step-by-step tile installation for a small shower
- Plan your layout: dry-fit tiles to determine starting lines and minimize tiny slivers at edges. Mark a level reference line.
- Prep walls and floor: remove old materials, install cement backer board, and ensure studs and framing are sound.
- Waterproof: apply a waterproofing membrane or liquid waterproofing to walls and floor—this is non-negotiable in wet areas.
- Apply thin-set: spread thin-set with a notched trowel, working one wall at a time.
- Set tiles: use spacers to maintain consistent grout lines. Check level frequently and use tile clips for large tiles if needed.
- Cut tiles as needed: use a wet saw for clean cuts around fixtures and edges.
- Grout: after thin-set cures, remove spacers and apply grout. Wipe excess with a damp sponge and allow to cure.
- Seal grout: apply grout sealer to prevent staining and mold, especially in small bathrooms with limited ventilation.
Design inspiration: styles that work best
Minimal modern
Choose large, neutral tiles, frameless glass shower doors, and hidden niches for a clutter-free, spa-like feel. Minimal fixtures and recessed lighting complete the look.
Classic subway with a twist
White subway tiles with a contrasting grout or a vertical installation give a tiny shower charming character while remaining timeless.
Textured or matte tiles for warmth
Matte, stone-look tiles create warmth without reflecting too much light. Combine with brass or black fixtures to add flair without shrinking the space visually.
Real-world advice and budget-friendly swaps
- Skip full retiling where possible: retile only the wet zone (shower walls and floor) rather than the whole room to save money.
- Use a glass partition instead of a door: a single glass panel makes the space feel open and is cheaper than a full glass door in many cases.
- Choose pre-made niches or shelf kits: these can be easier to install than building a niche from scratch.
- Buy remnant tile packs or clearance tiles for accent areas to cut costs without compromising style.
Maintenance tips for small shower tiles
Keep grout lines fresh with a regular cleaning routine. Use a squeegee after each shower to reduce soap scum and wipe down grout once a month. Re-seal grout annually in high-moisture bathrooms to prevent discoloration and mold.
Frequently Asked Questions
Q: What tile size is best for small shower spaces?
A: Large-format tiles (like 12×24 or bigger) reduce grout lines and visually enlarge the space, while vertical rectangular tiles add height. Choose a size that minimizes tiny leftover pieces along edges.
Q: Should I use dark grout or light grout in a small bathroom?
A: Light grout keeps the look bright and open, but a medium-toned grout can hide dirt better. For a cohesive feel, match grout color closely to tile color—high contrast can make the space appear busier.
Q: Is it okay to DIY waterproofing and tiling a shower?
A: Yes, many homeowners successfully DIY waterproofing and tiling, but follow manufacturer instructions carefully. If you’re unsure about waterproofing details or plumbing connections, consult a pro—water damage is costly.
Conclusion: Make your small bathroom feel bigger with smart tile choices
Shower tile ideas for small bathrooms can completely change the feel of your space—whether you want a bright, modern shower or a cozy, textured retreat. Start with light colors, thoughtful tile layouts, and proper waterproofing. If you enjoy hands-on upgrades, try a DIY tile project using the step-by-step tips above. For more inspiration, browse our home design ideas and check other DIY projects to pair your bathroom refresh with smart storage and lighting improvements.
Ready to transform your tiny shower? Pick one design element to try this weekend—whether it’s a new tile pattern, a glass panel, or a fresh grout color—and share your progress for feedback. Small changes lead to big results!