Picture this: you rush in from work, juggling groceries, your kids kick off rain boots in the doorway, and you trip over a stray sneaker because your entryway is basically a shoe pile. If that scene sounds familiar, you’re not alone — cramped mudrooms and tiny foyers often become shoe dumping grounds. Fortunately, a few smart, low-cost changes can transform that chaos into a tidy, stylish zone. In this post I’ll share practical shoe storage ideas small entryway owners can build or buy, with step-by-step DIY tips, design inspiration, and real-world advice you can use this weekend.
Why smart entryway shoe storage matters
Beyond aesthetics, organized shoe storage keeps floors safe and clean, extends shoe life, and creates a calmer welcome area. Small entryway shoe storage solutions make the most of vertical space, tuck shoes out of sight, and can even add seating. Before you pick a solution, take 10 minutes to measure your space, count daily-use shoes, and note how people move through the entry — that information will guide the best layout.
Shoe storage ideas small entryway
1. Under-bench cubbies (DIY bench with shoe slots)
Why it works: Combines seating and shoe storage for a functional landing zone.
- Measure depth (10–14″ is ideal) and width for your entry — bench seat height 16–18″.
- Build a simple box bench from 3/4″ plywood or use an IKEA bench hack. Divide the lower compartment into 3–5 vertical cubbies sized about 12″W x 12″H x 12″D for adult shoes (adjust for kids or large boots).
- Sand, paint, and add a cushioned top. Optional: baskets in cubbies for quick swap-out storage.
- Tip: Use a cleat and screws to secure the bench to the wall for safety in narrow spaces.
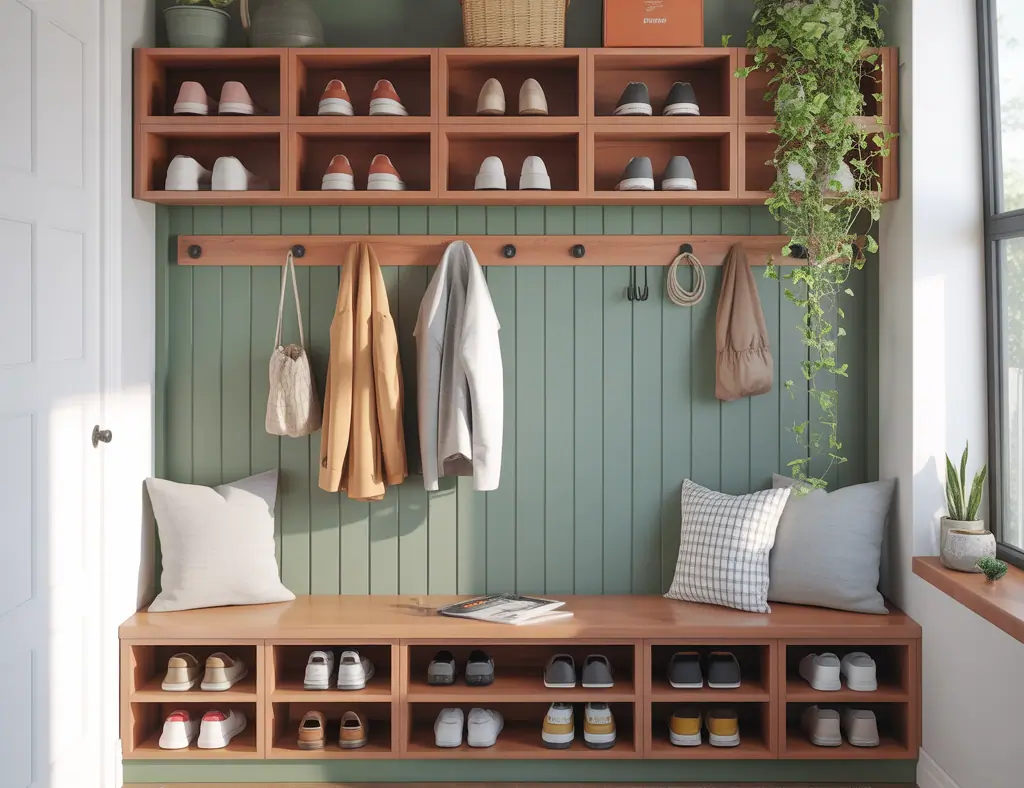
2. Vertical shoe storage: wall-mounted racks and slatted shelves
Why it works: Saves floor space by using vertical real estate.
- Install slim floating shelves spaced 6–8″ apart for flats and sneakers; keep 12–14″ spacing for boots.
- Use angled wall-mounted shoe racks to prevent shoes from slipping off.
- Mount a shallow slatted shelf high on the wall for seasonal shoes and baskets below for everyday pairs.
3. Over-the-door and hanging organizers
Why it works: Instant, low-cost solution for renters or temporary setups.
- Choose a slim hanging shoe organizer with clear pockets for visibility or fabric pockets for a softer look.
- Install it on the closet door or inside a pantry near the entry to hide shoes completely.
4. Narrow tiered shelves and stackable racks
Why it works: Fit into tight corners and allow quick access to multiple pairs.
Go for tiered metal shoe racks that are only 8–10″ deep. Stackable units are great for families — you can add a level as your collection grows.
DIY step-by-step: Build a simple floating shoe shelf in an afternoon
This quick project is great for narrow walls and costs under $50.
- Materials: 1×10 pine board, wall anchors or studs, L-brackets, wood screws, paint/stain.
- Cut board to length (24–36″ is typical). Sand and finish as desired.
- Attach L-brackets to the underside of the board, mark stud locations on the wall, and mount securely.
- Install two or three shelves vertically with 6–8″ between shelves for flats, 10–12″ for sneakers/boots at the bottom shelf.
- Add a small tray on the top shelf for keys and a hook below for coats — multi-function is key in small entryways.
Design inspiration: styles that work for tiny entries
Scandinavian minimal
Light wood, white walls, and a single bench with hidden storage. Keep decor spare: one mirror and a woven basket for umbrellas.
Farmhouse cozy
Painted plywood bench, labeled wire baskets for each family member, and a reclaimed wood shelf for character. Use hooks for hats and bags.
Modern industrial
Black metal shoe rack, concrete-look tiles, and a slim floating bench. Choose matte finishes and leather baskets to tie it together.
Real-world advice and maintenance tips
- Declutter first: Adopt a “one-in, one-out” rule for shoes and rotate seasonal footwear into storage elsewhere.
- Measure twice: Keep entryway depth under 36″ to avoid blocking walkways. A 10–12″ deep storage unit is often all you need for everyday shoes.
- Protect floors: Use boot trays or removable mats for wet weather to keep your shoe zone tidy.
- Label baskets or cubbies for kids to speed up cleanups and build routines.
- Anchor tall or heavy units to the wall and use drywall anchors rated for the load if studs aren’t available.
Budget ideas and quick wins
If you’re short on time or funds, try these low-cost options:
- Repurpose a bookshelf laid on its side as shoe cubbies.
- Use inexpensive wire racks or clear plastic boxes to stack shoes under a bench.
- Paint thrift-store crates and stack them vertically for a rustic modular shoe tower.
Frequently Asked Questions
Q: What’s the best shoe storage for a tiny entryway with boots?
A: Use a tall narrow cabinet or a bench with a deeper lower cubby (14–16″ depth) to accommodate boots upright. You can also store boots sideways on a lower shelf with boot shapers removed.
Q: How many pairs should I plan to store in a small entryway?
A: Plan for daily/seasonal pairs — generally 4–8 pairs per adult (everyday sneakers, work shoes, dress shoes, boots) and 2–4 per child. Store extras in a closet or under-bed storage to avoid overflow.
Q: Can these DIY shoe storage ideas work for renters?
A: Absolutely. Opt for non-permanent solutions like freestanding racks, over-the-door organizers, or wall-mounted shelves attached with removable anchors. Baskets and shoe boxes are renter-friendly and damage-free.
Next steps: make your entryway work for you
With a little planning and one or two DIY projects, your small entryway can become an organized, welcoming space instead of a daily source of frustration. Try one simple project this weekend — a floating shoe shelf or a bench with cubbies — and adjust as your household needs change. If you want more project ideas and plans, check out our DIY projects and browse styling tips on our home design ideas page for inspiration.
Ready to reclaim your foyer? Pick one of these shoe storage ideas small entryway solutions, measure your space, and start building — then share your before-and-after to inspire others!
For more inspiration on organizing small spaces, check out our Ideas Engagement Brunch.
For more decorative ideas for your entryway, check out our Decor Ideas Bread Bowl post.
For more home decor and organization ideas that can help you prepare for your housewarming party, check out our post on Shoe Storage Ideas Small Entryway: Clever, Space-Saving Solutions.
For more ideas on how to style your entryway, check out our Ideas Wrist Corsage post.
For more door ideas that can help you create a stylish and functional entryway, check out Door Ideas Hidden.
For more door ideas that can help you create a tidy and stylish entryway, check out our post on Hidden Door Ideas.
For more door ideas that can help you transform your entryway, check out Door Ideas Hidden.
For more ideas on how to decorate your desk area, check out Ideas for Desk Decor.
For more ideas on how to organize your walk-in closet, check out these ideas for walk in closet.
For more ideas on how to organize your walk-in closet, check out our post on Ideas for Walk in Closet
For more ideas on how to organize your walk-in closet, check out these ideas for a walk-in closet.
For more ideas on how to organize your walk-in closet, check out our post on Shoe Storage Ideas Small Entryway: Clever, Space-Saving Solutions.
For more home decor inspiration, check out our guide on Transforming Your Space.
For more ideas on how to make the most of vertical space, check out our post on Space Above Kitchen Cabinets
For more home organization solutions, check out our post on Transforming Your Bathroom