Have you ever stood in your backyard staring at bare soil, thinking a fresh look would transform your space—but you’re not sure where to start? If you love low-maintenance, natural textures and timeless curb appeal, river rock landscaping might be your answer. Whether you’re tackling a weekend DIY or planning a full yard refresh, these river rock landscaping picture ideas will spark inspiration and give you the practical steps to make it happen.
Why Choose River Rock for Your Landscape?
River rocks, river stones, and river pebbles offer a polished, organic look that works with modern and rustic design alike. They’re durable, great for drainage, resist erosion, and require far less upkeep than organic mulch. Use them to create dry creek beds, pathways, fire pit surrounds, or garden accents—each option produces striking visuals that photograph beautifully for before-and-after projects.
River Rock Landscaping Picture Ideas: Design Inspiration
Below are several picture-worthy design ideas—each idea includes styling tips so your finished photos will look professional and inviting.
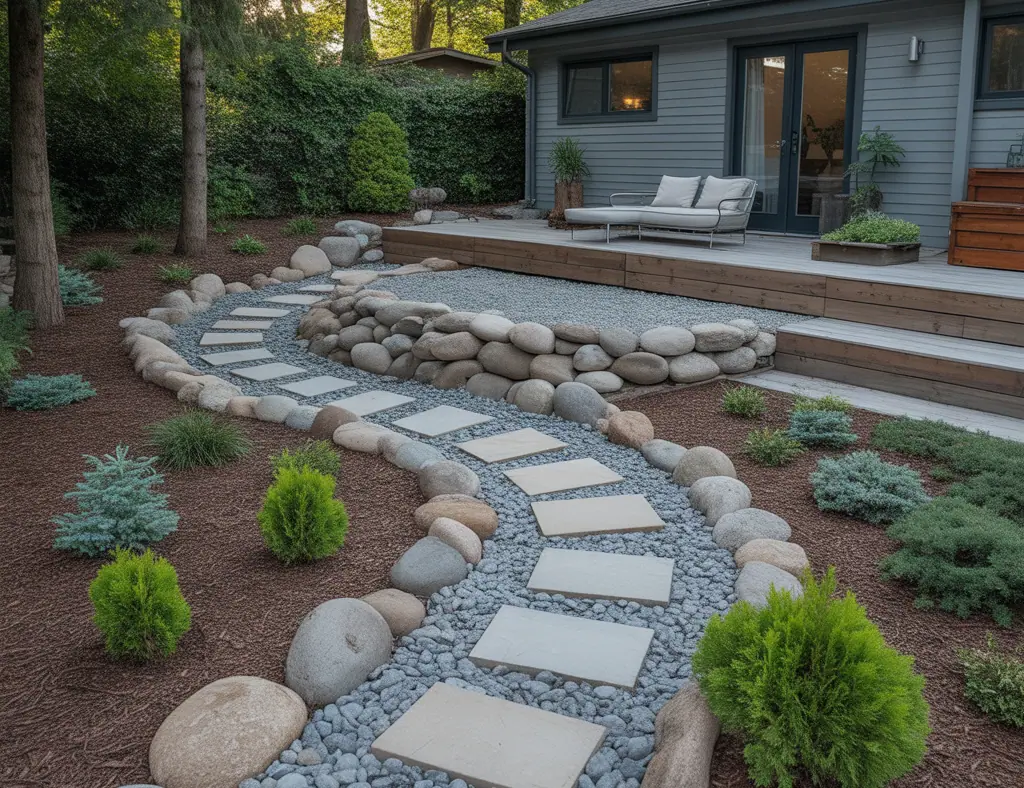
1. Dry Creek Bed for Drainage and Drama
- Design: Mimic a meandering creek using mixed-size river rocks and boulders.
- Look: Create natural curves and use larger stones at bends for realism.
- Photo Tip: Shoot from a low angle to emphasize depth and flow.
2. River Rock Walkway Ideas
- Design: Combine flagstones with pea gravel or small river pebbles between steps for contrast.
- Look: Keep edges defined with metal or stone edging to maintain crisp lines.
- Photo Tip: Capture the pathway during golden hour for soft shadows.
3. Rock Garden and Succulent Bed
- Design: Mix small river pebbles with larger accent rocks and drought-tolerant plants.
- Look: Vary textures—use planted pockets of sedum, agave, or ornamental grasses.
- Photo Tip: Use a shallow depth-of-field to highlight textures.
4. Patio Perimeter and Fire Pit Surround
- Design: Frame a patio with smooth river stones to create contrast against hard paving.
- Look: Build a tidy rock ring around a fire pit, topped with coarse river rock for safety.
- Photo Tip: Night shots with firelight create cozy lifestyle images.
Step-by-Step DIY: Install a Simple River Rock Border
Follow these practical steps to install a clean river rock border along a garden bed or walkway.
- Measure and plan: Mark the area with spray paint or string. Calculate the cubic yards of rock needed (length × width × depth).
- Prepare the ground: Remove grass, weeds, and roots. Grade for slight slope away from structures for drainage.
- Install edging: Use steel or plastic edging to keep rocks contained and maintain a clean line.
- Lay landscape fabric (optional): A breathable weed barrier reduces weeds but allows water through—avoid overusing non-breathable plastic.
- Place rocks: Start with larger stones for anchors, then fill with smaller river pebbles or gravel. Tamp lightly to settle them.
- Add finishing touches: Plant groundcovers or mulch edges to soften the transition. Add low-voltage lighting for evening appeal.
Practical Tips & Real-World Advice
- Mix sizes for realism: Combine cobbles, medium river rocks, and pea gravel. Too-uniform stone looks artificial in landscape photography.
- Mind the scale: Large boulders work in spacious yards; small pebbles suit tighter city gardens.
- Think about maintenance: Use landscape fabric under rocks in weedy zones; add a border to prevent rock migration.
- Budget-saving tip: Shop by the ton at local quarries or landscape suppliers rather than bagged stone from big-box stores.
- Safety and drainage: If using near foundations or slopes, consult basic drainage principles—river rock can direct water but shouldn’t trap it against structures.
- Photography tip: Before-and-after photos show scale—include a common object like a chair or wheelbarrow for reference.
Combining River Rock with Planting and Hardscape
To create balanced compositions, pair river rock with these complementary elements:
- Low-growing groundcovers (thyme, creeping thyme, or mondo grass)
- Succulents and ornamental grasses for texture contrast
- Wood or metal edging to frame the rock bed
- Decking, pavers, or stepping stones for mixed-material pathways
Lighting and Seasonal Styling
Layer in path lights or uplights to accent boulders and plantings. In colder months, keep rocks free of organic debris and avoid using rock beds where salt runoff from winter de-icing could be an issue for nearby plants.
River Rock Landscaping Picture Ideas: Visual Storytelling
When creating a gallery of your river rock projects, think like a photographer. Capture wide shots that show context, then detail shots that highlight texture and plant pairings. Use consistent editing (color balance and exposure) so your portfolio or social feed looks cohesive. These tips help your ideas come alive for friends, neighbors, or followers.
Frequently Asked Questions
1. How much river rock do I need per square foot?
Depth matters: for a decorative top layer plan on 1–2 inches, but for a stable cover or pathway you’ll want 2–4 inches. Use a volume calculator: (area in sq ft × depth in inches) ÷ 12 = cubic feet, then divide by 27 to get cubic yards.
2. Is river rock better than mulch?
River rock lasts longer and needs less frequent replacement than organic mulch. Rocks are better for drainage and erosion control, but they don’t add nutrients to the soil and can heat up in summer—so choose based on plant needs and microclimate.
3. Can I install river rock myself or should I hire a pro?
Smaller projects—borders, dry creek beds, pathways—are DIY-friendly with the right tools and planning. Large grading, drainage, or structural retaining walls are better handled by professionals to ensure long-term performance.
Conclusion — Try These River Rock Landscaping Picture Ideas This Weekend
River rock landscaping picture ideas are an accessible, beautiful way to upgrade your outdoor space with low maintenance and high impact. Whether you build a dry creek bed, create a pebble path, or frame your patio with smooth stones, the steps above will help you plan and execute a project that looks great in photos and works beautifully in real life. Ready to start? Check out our DIY projects page for tools and material lists, browse home design ideas for more inspiration, or if you’re also updating inside, see our kitchen upgrades guide for complementary indoor improvements. Share your before-and-after photos or ask a question below — I’d love to see what you build!