Have you ever stood in front of your tree on a cold December evening, lights on but something still feels off — like the decor needs a final, cohesive touch? You’re not alone. Whether you’re a DIY rookie fixing a last-minute look or a seasoned decorator refreshing a traditional scheme, ribbon can be the single element that transforms your tree from “nice” to “wow.” In this guide I’ll walk you through practical, real-world ribbon ideas for christmas tree decorating that are easy to do at home and look professionally styled.
Why ribbon matters: the design power of ribbon on a Christmas tree
Ribbon adds texture, color, and movement. It can be the unifying element that ties ornaments, garlands, and color palettes together. From rustic burlap ribbons to luxe velvet or metallic wired trims, the ribbon you choose affects the overall mood — farmhouse, minimalist, glam, or traditional.
Ribbon ideas for christmas tree: classic and modern looks
Here are several ribbon styles to try, each with a short description and the best use case.
- Spiral wrap — Wrap a wide wired ribbon in a continuous spiral around the tree for a neat, modern look. Great for slim trees or contemporary rooms.
- Cascade tails — Let long ribbon tails stream vertically from top to bottom for a romantic, cascading effect. Works well with layered ornaments.
- Looped garland — Create big loops (3–4 loops) and tuck them into the branches as you move down the tree. This creates volume and looks intentional without too much effort.
- Ruffled mesh — Use deco mesh for a fluffy, full garland-like ribbon that reads like movement on large trees.
- Buckled swags — Drape ribbon in soft swags and secure each dip with an ornament or floral pick for a classic, elegant appearance.
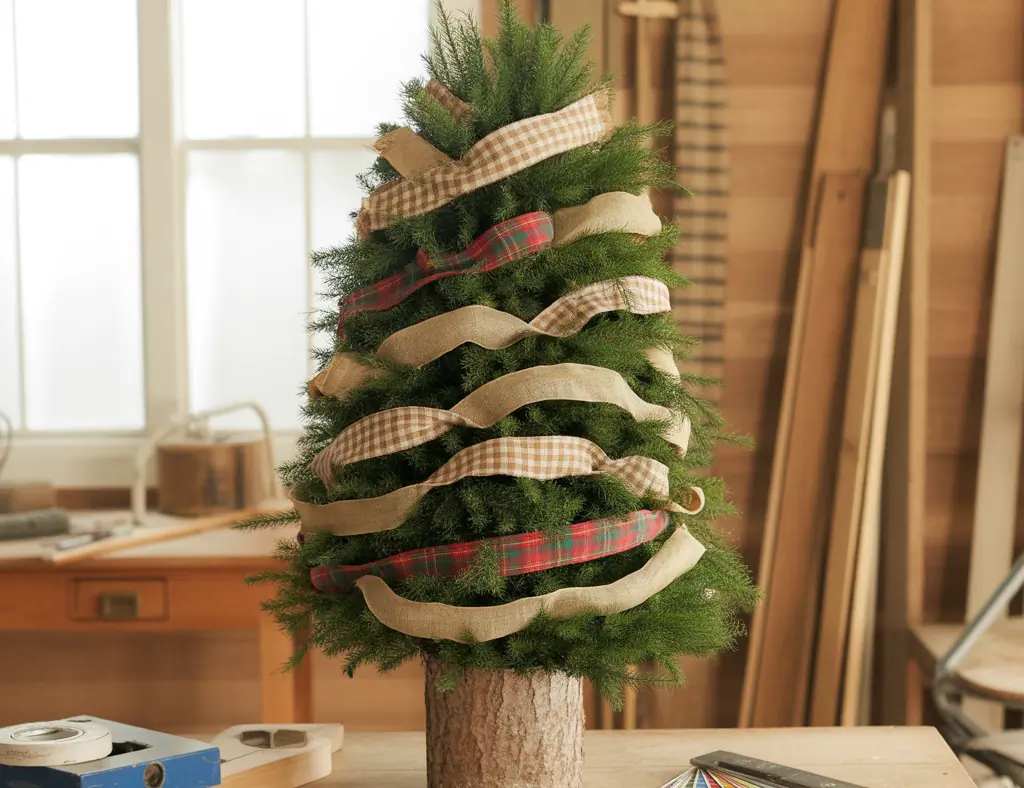
- Burlap + plaid combo — Pair rustic burlap ribbon with a patterned plaid for cozy, farmhouse charm.
- Velvet and metallic — Luxe velvet ribbons paired with thin metallic strands make a high-end, festive statement.
Materials and tools you’ll need
Before you start, gather these basics to save time and get clean results:
- Wired ribbon (1.5″–4″ widths depending on tree size)
- Unwired ribbon for delicate trims
- Scissors, floral wire, and floral picks
- Hot glue gun (optional, for durable bows)
- Measuring tape (helpful for longer strands)
Step-by-step ribbon techniques (DIY friendly)
Below are step-by-step instructions for three practical styling methods you can finish in 20–45 minutes depending on tree size.
1. Spiral Wrap (clean and contemporary)
- Choose a ribbon width that’s roughly 1/4 to 1/3 the tree diameter. For a 4–5 ft tree, 2.5″–3″ wired ribbon is ideal.
- Secure the ribbon at the top of the tree with floral wire or tuck it into the top branches.
- Gently bend the wired edges to shape as you spiral down, keeping the ribbon slightly loose for depth.
- Tuck the end into the bottom branches and trim excess. Fluff as needed for even spacing.
2. Vertical Cascade (soft and romantic)
- Cut multiple lengths of ribbon, from 2–6 feet depending on your tree height.
- Attach each ribbon to a branch near the top using floral wire or a simple knot.
- Let them hang straight, occasionally twisting or adding a bow where you want visual interest.
- Mix textures — thin satin with wider velvet — for depth.
3. Looped Garland (big, full look)
- Cut 3–4 foot sections. Make large loops and pinch the center.
- Tuck the pinched centers into the tree branches, working from top to bottom, overlapping slightly.
- Secure with floral wire or wrap the center around a sturdy branch.
- Add picks or small ornaments to the loop centers to create focal points.
Color schemes and pairing tips
Choosing the right ribbon color and pattern is as important as placement. Consider these pairings:
- Traditional: deep red, hunter green, gold — use velvet and metallic wired ribbons.
- Scandinavian/minimal: neutrals, white, linen ribbon — go with flat, unwired ribbon or thin satin for a subtle effect.
- Modern glam: black, gold, rose gold — use metallic mesh or foil-lined ribbon for shimmer.
- Rustic farmhouse: burlap, plaid, twine accents — combine wired burlap with plaid for layered interest.
Real-world tips from a DIY perspective
These practical tips will keep your project smooth and budget-friendly:
- Always buy wired ribbon for shaping — the wire edge makes bows and loops hold their form.
- Test ribbon width against a small section of your tree before committing — you can tape a sample in place to see how it reads with lights and ornaments.
- Layer ribbons: use a wide base ribbon plus a thinner contrasting ribbon to create depth without extra bulk.
- Use curtain clips or clear ornament hooks to secure heavier bows instead of glue that can damage faux branches.
- For outdoor trees, use weather-resistant ribbon or seal edges with a fabric glue to prevent fraying.
Mix-and-match decorations for a complete look
Once ribbon is in place, enhance the effect by coordinating ornaments, tree picks, and a topper. For example, if you choose metallic ribbons, echo that metal in your tree topper and a few statement ornaments. If using burlap, add wooden or linen ornaments to keep the theme cohesive.
Frequently Asked Questions
1. What type of ribbon is best for a Christmas tree?
Wired ribbon is the most versatile choice because it holds shape for bows, loops, and structured spirals. For delicate, drapey looks you can use satin or organza, but expect less control. For a rustic look, burlap is great but choose wired burlap to avoid sagging.
2. How do I attach ribbon to a real or flocked tree without damaging branches?
Use floral wire wrapped gently around the branch or use small curtain clips/ornament hooks to clip the ribbon in place. Avoid hot glue on real or heavily flocked branches because it can cause permanent damage.
3. Can I reuse ribbon from last year?
Yes — ribbons in good condition can be reused for several years. Store them flat or rolled around a tube to prevent creases. Replace any frayed or discolored ribbon to keep your tree looking fresh.
Conclusion — Try one ribbon technique tonight
Ribbon is one of the fastest ways to elevate your holiday tree. Pick one technique — spiral, cascade, or looped garland — and try it this evening. Start with wired ribbon and a neutral color to practice, then layer pattern and texture in future years. If you love hands-on projects, explore more step-by-step ideas on our DIY projects page, or get inspiration for coordinating room décor on our home design ideas and kitchen upgrades pages. Ready to make your tree sing? Gather your ribbon and tools, and enjoy the transformation — then share your before-and-after to inspire others!
Happy decorating — and may your ribbon bring the finishing touch your holiday tree deserves.