Have you ever opened a lower cabinet only to have a clanging avalanche of pots tumble out when you pull the drawer? If your cookware is a daily battle rather than a kitchen asset, you’re not alone. Transforming cluttered cabinets into an organized, functional space is one of the most satisfying DIY wins. In this post you’ll find practical pan and pot storage ideas that are budget-friendly, renter-safe, and stylish enough to inspire a full kitchen refresh.
Why good cookware organization matters
Beyond aesthetics, proper storage protects your investment, speeds up meal prep, and reduces frustration. Whether you cook five nights a week or just enjoy an organized space, the right cookware storage solutions—like drawer dividers, hanging pot racks, and vertical pan holders—can make a huge difference.
Quick checklist before you start
- Audit your cookware: donate duplicates and damaged pieces.
- Measure cabinet depths, door widths, and ceiling joist spacing for overhead racks.
- Decide between visible displays (hanging racks, pegboards) or hidden storage (pull-out drawers, cabinet organizers).
- Consider weight limits and hardware for heavy cast-iron pans.
Top pan and pot storage ideas
Below are several approaches organized by space and style. Pick one or combine multiple options for the best results.
1. Pull-out drawers and tiered inserts (best for deep cabinets)
Convert deep lower cabinets into accessible storage with roll-out drawers or tiered pan organizers. This prevents stacking and makes each pan reachable.
- Materials: heavy-duty slide-out drawer kit or pre-built pan organizer, felt liners.
- DIY steps: mark cabinet interior, install drawer slides level, mount drawer box, fit dividers so pans stand vertically.
- Tip: Add rubber or felt strips where pans meet the divider to prevent scratches.
2. Vertical storage and slot dividers (space-saving)
Vertical pot racks and slot dividers turn a messy stack into neat slots. This is ideal for baking sheets, skillets, and lids.
- Materials: plywood or store-bought divider racks, screws, adhesive bumpers.
- DIY steps: cut divider pieces to cabinet height, space 1–2 inches apart depending on pan handles, secure base and back with screws, add soft pads.
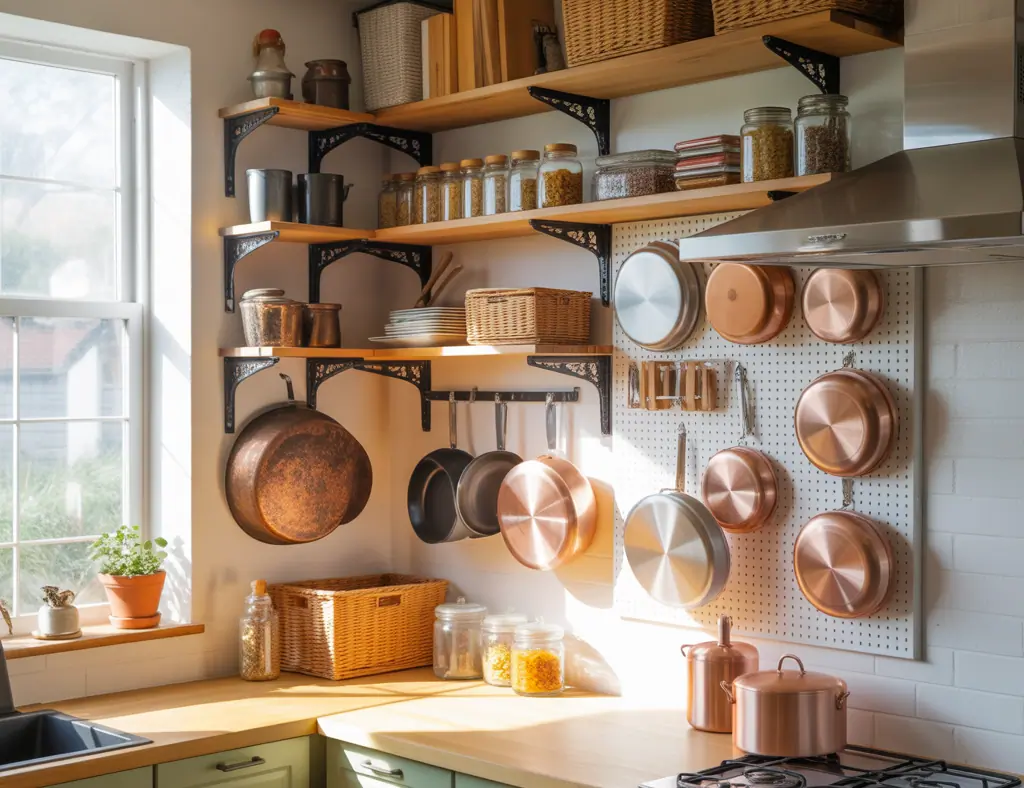
3. Ceiling or wall-mounted hanging pot rack (stylish and functional)
Hanging racks free cabinet space and make cookware part of the kitchen design. They suit open-plan kitchens and farmhouse or industrial looks.
- Materials: metal or wooden rack, heavy-duty hooks, lag bolts.
- DIY steps: locate ceiling joists with a stud finder, measure placement, pre-drill, secure rack with lag bolts, hang pans by handles.
- Safety tip: double-check weight limits and use multiple joists for long racks.
4. Pegboard wall system (customizable and affordable)
Pegboards are versatile—add hooks, baskets, and shelves to suit your cookware mix. They’re great for renters if mounted lightly or used on a freestanding frame.
- DIY steps: mount pegboard to plywood backer for sturdiness, paint for a cohesive look, add an assortment of hooks and holders.
5. Over-the-cabinet and door-mounted organizers (renter-friendly)
If you can’t drill into walls, over-the-cabinet racks and door-mounted lid holders are perfect. They keep lids tidy and pots accessible without permanent alterations.
Design inspiration: match storage to your kitchen style
Think of storage as part of your kitchen design:
- Farmhouse: reclaimed wood hanging racks, copper hooks, open shelving for vintage pans.
- Modern minimalist: sleek sliding drawers, hidden dividers, neutral-tone liners.
- Small kitchens: vertical rails, stacking inserts, magnetic knife-like racks for lids.
- Rental solutions: freestanding racks, tension rods in cabinets for dividers, adhesive hooks for lightweight lids.
Step-by-step DIY: build a simple under-shelf sliding pan organizer
This small project is perfect for weekend DIYers and fits inside most cabinets.
- Measure the inside width and depth of your cabinet.
- Buy a shallow drawer slide kit rated for the weight of your cookware.
- Cut a plywood base to cabinet width minus slide clearances; sand and finish.
- Attach slides to cabinet sides and drawer base; test smooth movement.
- Add vertical dividers using 1/4″ plywood spaced to fit pans upright; glue and screw in place.
- Line with non-slip shelf liner and load pans.
Result: easier access, less stacking damage, and a professional feel without a full cabinet overhaul.
Real-world tips and mistakes to avoid
- Don’t overload: follow weight ratings for drawers and racks—cast iron can be heavy!
- Protect finishes: place felt or silicone between pans to avoid scratching stainless or nonstick surfaces.
- Allow breathing room: don’t cram lids tightly; moisture buildup can cause odors and warping.
- Label zones: keep baking sheets, skillets, and saucepans in dedicated zones for quicker cooking flow.
Tools and materials checklist
Common items you’ll need for most projects:
- Measuring tape, stud finder, level
- Power drill, screws, and anchors or lag bolts
- Saw for plywood cuts (hand saw or circular saw)
- Drawer slide kits or pre-built organizers
- Adhesive bumpers, felt pads, and non-slip shelf liners
Frequently Asked Questions
How do I store lids and save space?
Use a vertical lid organizer or an over-the-cabinet rack. You can also mount a tension rod inside a cabinet to keep lids upright. Lids stored vertically are easier to access and reduce scratching.
Are hanging pot racks safe for heavy pans?
Yes, if installed correctly. Locate ceiling joists with a stud finder and use heavy-duty lag bolts. For cast-iron or large Dutch ovens, ensure the rack and anchoring system are rated for the combined weight.
What are inexpensive pan and pot storage ideas for renters?
Opt for freestanding racks, over-the-cabinet organizers, pegboard on a freestanding frame, or adhesive-backed door hangers. These solutions avoid permanent changes and still boost organization.
Conclusion: make your cookware a joy to use
With a little planning and some clever pan and pot storage ideas, you can turn kitchen chaos into calm. Whether you prefer a visible hanging display, hidden pull-out drawers, or vertical organizers, there’s a solution that fits your space, budget, and style. Start by auditing your cookware, pick one small project (try the under-shelf sliding organizer above), and build momentum from there. Ready to tackle more home improvements? Check out our DIY projects and kitchen upgrades for step-by-step guides and design tips, or browse home design ideas to match your new storage to the rest of your decor.