Imagine a warm Saturday evening: family and friends gathered, the grill sizzling, and you serving drinks from a compact, stylish outdoor counter you built yourself. Sounds dreamy — but you think, “I don’t have the time or money for an expensive build.” If that sounds like you, this guide on outdoor kitchen DIY on a budget will show how to turn that backyard dream into reality with practical steps, cheap materials, and design ideas anyone can follow.
Why a budget-friendly outdoor kitchen is worth the effort
Creating an outdoor cooking area doesn’t require a full contractor or a mortgage-sized budget. A smart, small-scale build can increase your home’s living space, improve entertaining flow, and even boost property value. Plus, the satisfaction of tackling a DIY outdoor project is hard to beat. Whether you want a compact grilling station, a pizza oven corner, or a bar-style prep area, a little planning and elbow grease go a long way.
Outdoor kitchen DIY on a budget: quick plan and priorities
Before you hammer the first nail, set a clear budget and list priorities. Decide which features matter most: a built-in grill, work surface, storage, or a mini-fridge. Prioritize essentials to avoid scope creep — the most affordable outdoor kitchens focus on function first, aesthetics second.
- Budget cap: decide your total spend and stick to it.
- Must-haves vs nice-to-haves: pick 1–2 splurge items (e.g., a quality grill) and save on the rest.
- Phased build: break the project into stages so you can upgrade later.
Plan your space: layout, permits, and safety
Sketch the area and measure carefully. A common budget-friendly layout is an L-shaped or linear counter near the house for easy access to utilities. Check local codes for gas, electrical, and permit requirements — DIY is fine for simple builds, but some installations require licensed professionals for safety.
Key layout tips
- Keep the cooking triangle compact: grill, prep surface, and storage within a few steps.
- Place the grill at least a few feet from combustible surfaces and overhead structures.
- Think about wind and sun exposure; a pergola or umbrella can be added later for shade.
Materials and tools that save money
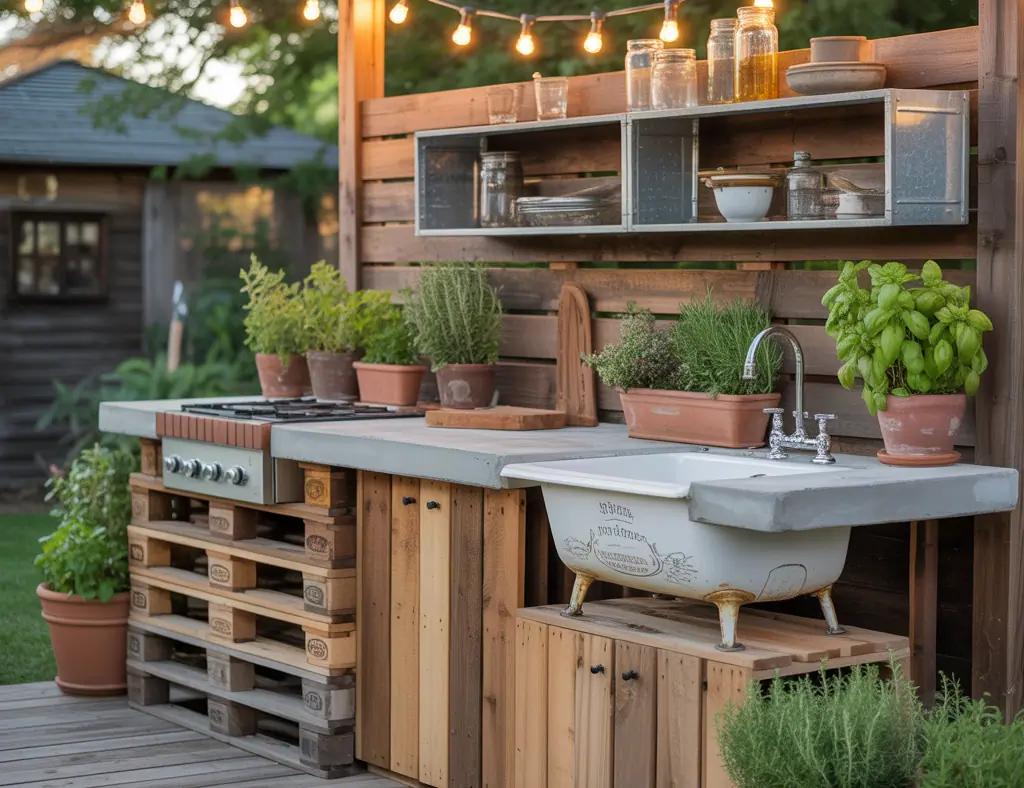
Choosing materials strategically will dramatically reduce costs. Reclaimed wood, concrete block, and pavers are inexpensive and durable. Look for leftover or surplus building materials at local yards for great deals.
- Countertops: use concrete countertops (DIY poured) or repurposed butcher block sealed for outdoor use.
- Base: concrete cinder blocks or pressure-treated lumber skids are budget-friendly and easy to assemble.
- Finishes: exterior paint, stucco, or leftover tile can give a high-end look for less.
- Appliances: buy a standalone grill and portable electric appliances instead of built-in units to save money.
Step-by-step: build a simple, cheap outdoor kitchen
Here’s a straightforward project plan for a starter outdoor kitchen that includes a grill, countertop, and storage — realistic for DIYers with basic tools.
Step 1 — Prepare the site
- Level a small pad using compacted gravel or pavers for a stable base.
- Mark the footprint of your counter and grill to visualize scale.
Step 2 — Build the base
- Stack concrete blocks to the desired counter height (standard counter height: 36 inches).
- Secure blocks with mortar or construction adhesive for a solid structure.
Step 3 — Install the countertop
- Lay a simple pre-cut butcher block or pour a DIY concrete slab over a plywood mold.
- Seal with exterior-grade polyurethane or a concrete sealer to protect from weather.
Step 4 — Fit the grill and storage
- Place a freestanding grill into a cut-out or next to the countertop. Use a removable grill to avoid costly built-in frames.
- Add weatherproof cabinets, or make simple shelf storage with treated plywood and outdoor paint.
Step 5 — Add finishing touches
- Install hooks for utensils and a magnetic knife strip to save space.
- Use outdoor-rated lights or solar fixtures for evening use.
Design inspiration: style on a shoestring
Small design choices can elevate a cheap build. Mix textures like wood and stone, use bold paint for contrast, and add inexpensive accessories like outdoor rugs and potted herbs for a cozy vibe.
- Industrial-chic: concrete counter, metal stools, and hanging pendant lights.
- Rustic farmhouse: reclaimed wood counters, open shelving, and enamelware accessories.
- Modern minimal: clean lines, monochrome palette, and compact appliances.
For more ideas, check our internal resources on home design ideas and browse similar DIY projects for inspiration.
Money-saving tips and real-world advice
- Buy used — a good-quality used grill can save hundreds and perform nearly as well as new.
- Phase the project — start with the core (grill and prep) and add a sink, fridge, or pizza oven later.
- DIY countertops — poured concrete or refurbished wood is cheaper than stone and can look custom with simple finishing techniques.
- Shop seasonal sales on appliances and hardware, and compare prices at multiple suppliers.
- Invite friends — many hands make light work; swap skills or time instead of paying for labor.
Finishing touches and maintenance
Seal materials properly and store cushions and electronics when not in use to extend the life of your outdoor kitchen. Regularly re-seal wood and concrete, clean grills after each use, and inspect gas lines or electrical fixtures annually.
Frequently Asked Questions
Do I need a permit to build an outdoor kitchen?
Permit requirements vary by location. Small countertop and grill setups often don’t need permits, but adding gas lines, plumbing, or permanent electrical wiring may require licensed professionals and permits. Check local codes before you begin.
Can I make an outdoor kitchen that’s weatherproof on a tight budget?
Yes. Use weather-resistant materials like treated lumber, exterior-grade sealers, and galvanized hardware. Cover appliances with fitted covers and consider a simple pergola or awning for added protection without a large expense.
What’s the most cost-effective grill option for a DIY outdoor kitchen?
A freestanding gas grill or a charcoal kettle grill offers strong value. They’re cheaper than built-in units and can be placed into a DIY counter with a cutout or used beside the countertop. Buying used or looking for last-season models also saves money.
Conclusion: start your outdoor kitchen DIY on a budget today
Building an outdoor kitchen DIY on a budget is absolutely achievable with planning, smart material choices, and phased upgrades. Start small, prioritize functionality, and use creative finishes to get a high-end look for less. Ready to get started? Sketch your layout, set a budget, and try the simple build steps above. If you enjoyed these ideas, explore more kitchen upgrades and DIY projects to keep improving your home — and share your progress to inspire others.