Ever stood in front of your tired kitchen wall, coffee in hand, wondering how one simple change could make the whole room pop? Whether you’re tackling a weekend DIY projects sprint or planning a full refresh, a fresh backsplash is one of the fastest, most impactful kitchen upgrades you can do. In this article you’ll find modern kitchen backsplash ideas, step-by-step DIY tips, design inspiration, and real-world advice to help you get started — even if you’re a beginner.
Why update your backsplash?
A backsplash protects walls from splashes and stains, but it also sets the tone for the whole kitchen. The right material and pattern can visually expand the space, introduce color or texture, and give a small kitchen a high-end feel. From budget-friendly peel-and-stick options to dramatic full-height tile installations, there’s a modern backsplash idea for every skill level and budget.
Modern kitchen backsplash ideas: trending materials and looks
Below are contemporary materials and finishes that are both stylish and practical.
1. Classic subway tile with a twist
Subway tile remains a modern favorite because it’s versatile. Try elongated subway tiles, stacked patterns, or contrasting grout (black or charcoal) for a modern, graphic look.
2. Large-format tiles for fewer grout lines
Big tiles create a clean, minimalist surface and are easier to maintain — ideal for modern and industrial kitchens. Use porcelain or large ceramic slabs for durability and moisture resistance.
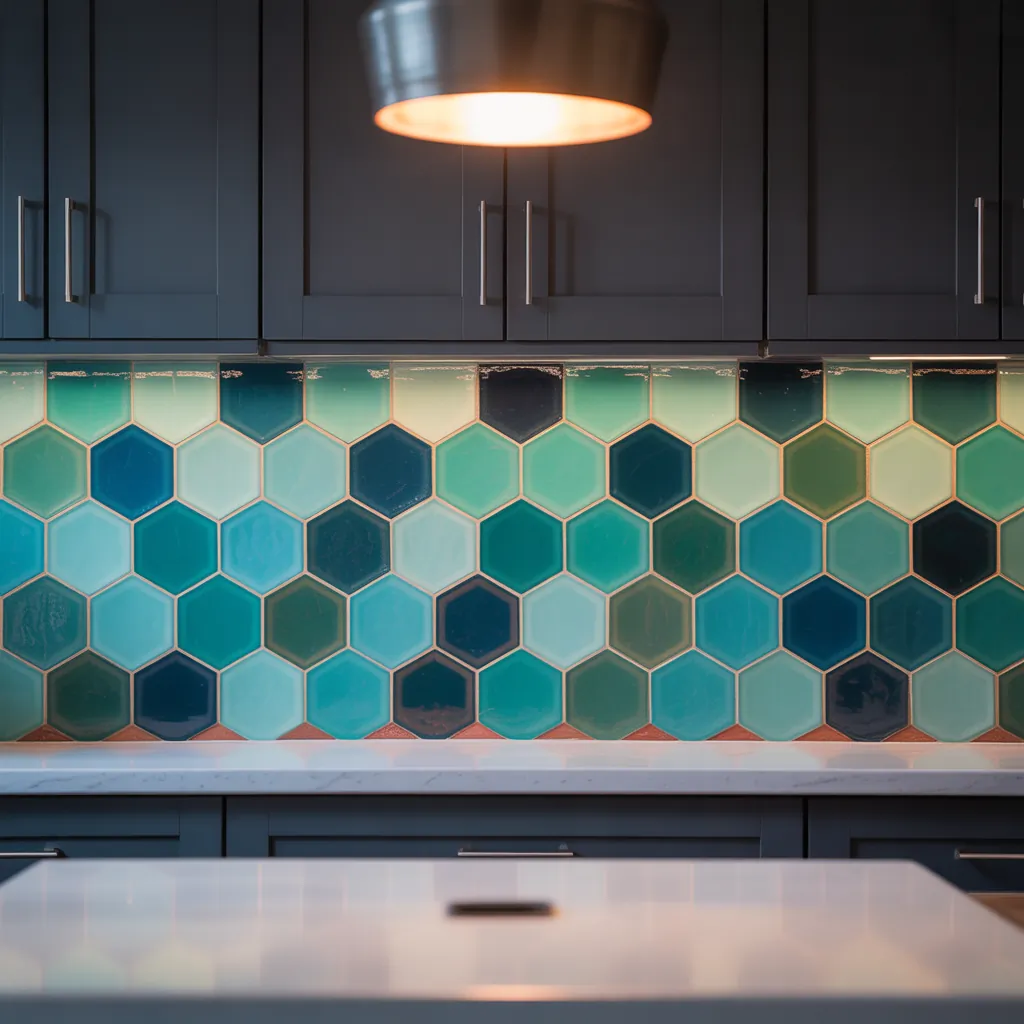
3. Herringbone and chevron patterns
These patterns instantly elevate a backsplash, adding movement and visual interest without loud colors. They work well with marble, ceramic, or glass tiles.
4. Glass and mirrored backsplashes
Glass reflects light and makes small kitchens feel bigger. Tempered glass panels behind the cooktop are also easy to wipe clean and come in custom colors.
5. Metallic and stainless steel
For a sleek, professional look, stainless steel or brushed metal tiles are heat-resistant and perfect behind stoves. They pair well with contemporary appliances.
6. Peel-and-stick tiles — renter and budget-friendly
Peel-and-stick vinyl or tile veneers replicate the look of ceramic or metal at a fraction of the cost and with minimal tools. They’re ideal for renters or quick weekend upgrades.
7. Full-height or ceiling-height statement backsplashes
Extending the backsplash to the ceiling or covering the entire wall behind open shelving creates a dramatic focal point and gives a cohesive, designer look.
Design tips for a cohesive modern look
- Pick a focal point: Make the area behind the stove or sink your feature wall with a bold pattern or material.
- Balance color and texture: If your cabinets are bold, choose a neutral backsplash; for plain cabinets, pick a textured or patterned tile.
- Consider grout color intentionally: Matching grout for a seamless look, or contrasting grout to emphasize the pattern.
- Coordinate finishes: Tie metal tones (faucet, cabinet pulls, and backsplash accents) together for a polished look.
Step-by-step DIY backsplash installation (for tile)
This is a simplified guide for installing ceramic or porcelain tile backsplash on an existing wall.
- Measure and plan: Measure the area, buy 10–15% extra tile for cuts and waste, and lay out tiles on a table to map pattern placement.
- Prepare the wall: Ensure the wall is clean, dry, and flat. Remove outlet covers and fix any loose drywall. If needed, install cement backerboard or a waterproof membrane behind high-splash areas.
- Transfer guidelines: Use a level and pencil to mark a straight starting line about 1/2″ below the bottom of cabinets or countertop seam.
- Apply adhesive: Use a notched trowel to spread thinset adhesive. Work in small sections so the thinset doesn’t skin over.
- Set tiles: Press tiles firmly and use spacers for consistent gaps. Cut tiles as needed with a wet saw or tile cutter for clean edges.
- Grout: After adhesive cures (usually 24 hours), remove spacers and apply grout with a rubber float. Wipe excess with a damp sponge and let cure.
- Seal: Apply sealant to grout and porous tiles to protect from stains. Reinstall outlet covers and caulk joints where tile meets countertop or cabinetry.
Quick DIY tips
- If you’re renting or want the fastest update, peel-and-stick is a great choice — cut with a utility knife and smooth with a squeegee.
- For behind-the-stove areas, choose heat-resistant materials like metal or tempered glass.
- Use painters’ tape to visualize edges and height before committing.
- Work from a flat, solid substrate; avoid installing tile directly over wallpaper or flaking paint.
Real-world advice: budgeting, timelines, and common pitfalls
Expect a weekend for a small backsplash or several days for a larger or complex pattern. Budget varies widely: peel-and-stick can be under $200 for a small area, while high-end stone or full-height glass panels can cost thousands. Common mistakes include poor wall prep, rushing cutting tiles, skimping on thinset, and not allowing proper cure time for grout.
Small kitchen backsplash ideas and space-saving tips
In small kitchens, reflective finishes (glass or glossy tiles), light colors, and vertical patterns (stacked tiles) help create a sense of height. A continuous backsplash that ties into countertops visually enlarges the space.
Maintenance and cleaning
Non-porous materials like glazed ceramic, porcelain, and glass are easiest to clean — just mild soap and water. Use a grout sealer annually for porous tile or grout, and avoid abrasive cleaners on metal finishes.
Frequently Asked Questions
A: The “best” material depends on style, budget, and maintenance needs. Porcelain and glazed ceramic offer durability and many modern finishes. Glass gives a sleek reflective look, while stainless steel provides professional, heat-resistant performance. For renters, high-quality peel-and-stick offers a quick and affordable modern update.
A: Standard height is 4″–6″ above the countertop behind open counter space, but many modern designs extend to the bottom of upper cabinets (backsplash height of 18″–20″) or all the way to the ceiling for a dramatic full-height backsplash.
A: Yes — beginners can successfully install tile or peel-and-stick backsplashes. Start with simpler projects (straight-set tile or peel-and-stick) and allow extra time. Read instructions, practice cutting tiles, and follow the step-by-step checklist above. For complex cuts or materials like natural stone, consider hiring a pro.
Conclusion — ready to transform your kitchen?
A modern kitchen backsplash is one of the most rewarding DIY upgrades: it protects your walls, boosts resale value, and adds personality. Whether you choose timeless subway tile, a bold geometric pattern, heat-resistant stainless steel, or quick peel-and-stick panels, there are modern kitchen backsplash ideas for every kitchen and skill level. Start by picking a material and layout, gather the right tools, and try a small section if you’re unsure. For more project ideas and inspiration, check out our kitchen upgrades and home design ideas pages — then roll up your sleeves and get to work.
Call to action: Ready to try a backsplash makeover this weekend? Choose one idea from this post, make a materials list, and set aside a day to test it — you’ll be surprised how much change a single wall can make.
For those who prefer a sleek, modern look, consider checking out metallic and stainless steel backsplashes.