Have you ever stared at a chaotic fridge full of mismatched notes and thought, “There has to be a prettier way to organize this”? Whether you’re refreshing a playroom, creating a cheerful classroom display, or designing a family command center, a ladybug bulletin board concept is an easy, budget-friendly makeover that blends function with whimsical style.
Why a Ladybug Bulletin Board Works (Design + Function)
Ladybugs are instantly recognizable, gender-neutral, and friendly—perfect for kids’ spaces, nurseries, or any room that needs a pop of color. A ladybug-themed bulletin board serves as a functional pinboard or magnetic notice center while doubling as wall art. This insect-themed bulletin board concept works for preschool bulletin boards, hallway message centers, or kitchen organization for busy families.
Design Benefits
- High visual contrast (red and black) makes notes and photos stand out.
- Scalable: create a single large ladybug or a series of smaller ladybugs across a wall.
- Customizable: use cork, fabric, felt, or magnetic sheet depending on needs.
Where to Use It
- Playrooms and kids’ bedrooms
- Classrooms and daycare centers
- Home office or family command center
- Entryway message station near the kitchen
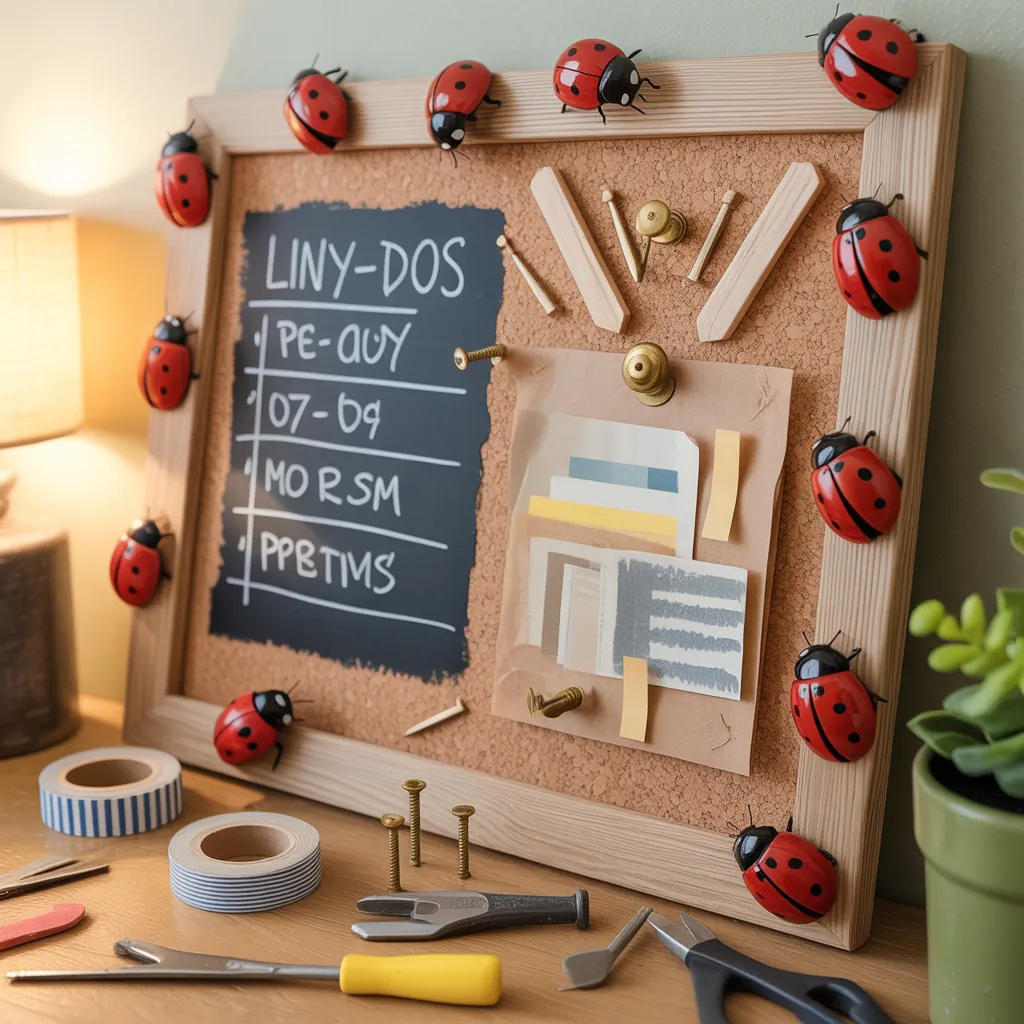
Ladybug Bulletin Board Concept: Step-by-Step DIY
Below is a straightforward tutorial for a medium-sized ladybug cork bulletin board (approx. 24″ diameter) that can be completed in an afternoon. Adjust dimensions to make a larger centerpiece or multiple small pinboards.
Materials
- Round corkboard or circular MDF board with cork sheet (24″ diameter suggested)
- Red chalk paint or red fabric (enough to cover the board)
- Black vinyl, paint, or felt for the head and spots
- Scissors, craft knife, ruler, pencil
- Spray adhesive or fabric glue
- Command strips or picture-hanging hardware
- Optional: magnetic sheet (if you want a magnetic board), googly eyes, pipe cleaners for antennae
Step-by-Step
- Prep the board: If using cork sheets, glue them to the MDF circle and let dry. If already cork, wipe clean.
- Cover with red: Paint 2 coats of red chalk paint for a matte finish, or adhere red fabric with spray adhesive for a textured look.
- Create the head: Cut a semicircle of black felt or paint the top third of the circle black. For a more 3D effect, glue a foam semicircle.
- Add spots: Use a template to mark evenly spaced spots and cut black vinyl or felt circles. Glue them down symmetrically.
- Finish details: Add antennae with black pipe cleaners, glue on googly eyes or paint eyes, and seal painted surfaces with a clear matte spray if desired.
- Mount: Use heavy-duty command strips or picture-hanging hardware. If the board will hold heavy items, secure to studs or use anchors.
Time & Cost Estimate
Plan for 2–4 hours including drying time. Expect to spend $20–$60 depending on materials (cork is affordable; magnetic sheet increases cost).
Practical Tips & Variations
Here are useful real-world tips to make your ladybug pinboard durable, kid-safe, and multi-functional.
Material Choices
- Use cork for traditional push-pin functionality. Choose 1/4″ or thicker for durability.
- For a magnetic board, glue a thin magnetic sheet under fabric or vinyl. This creates a versatile notice board for magnets and pins.
- Fabric covering gives a softer, more decorative finish and prevents cork dust.
Safety & Durability
- For kids’ rooms, use round-head push pins or plastic tacks to reduce sharp edges.
- Seal painted surfaces with non-toxic, low-VOC sealers if used in nurseries.
- Reinforce the mounting hardware if you plan to hang heavier items like keys or clipboards.
Creative Variations
- Create a “ladybug family” by making a cluster of small boards in different sizes for photos and reminders.
- Combine with a small chalkboard section for scribbles and grocery lists.
- Seasonally update the board—add felt flowers for spring or tiny paper pumpkins for fall to keep the display fresh.
Design Inspiration: Color Palettes & Layouts
Keep the core palette of red, black, and white, then layer neutrals or pastels depending on your space. For modern homes, use matte finishes and streamline the ladybug silhouette. For a nursery or preschool, add whimsical elements like cloud-shaped frames or alphabet cards attached around the edges.
Layout Ideas
- Single large statement ladybug above the desk or command center.
- Grid of three smaller ladybug boards for meal plans, to-do lists, and a calendar.
- Long hallway display with alternating ladybug and plain cork circles for rotating student work.
Maintenance & Troubleshooting
Keep these simple maintenance tips in mind so your ladybug bulletin board stays fresh and functional:
- Rotate and lift pins occasionally to avoid permanent holes in the cork.
- If fabric loosens, reapply spray adhesive in small sections rather than removing the whole cover.
- To remove stains from painted surfaces, gently wipe with a damp cloth and mild soap.
Frequently Asked Questions
1. Is a ladybug bulletin board safe for toddlers?
Yes, if you use child-safe materials and avoid small, detachable pieces that could pose a choking hazard. Opt for large fabric-covered surfaces, round-head pins, and securely attach decorative elements like antennae.
2. Can I make a magnetic ladybug notice board?
Absolutely. Glue a thin magnetic sheet or magnetic primer onto the board before covering with fabric or vinyl. This allows you to use magnets for lightweight notes and photos while keeping a clean, decorative finish.
3. How do I hang a large ladybug pinboard securely?
For boards larger than 24″, use wall anchors or mount to studs using screws and D-rings. Heavy-duty command strips can work for medium weights, but always check weight ratings and test before hanging heavy items.
Conclusion — Try This Ladybug Bulletin Board Concept Today
If you’re ready to replace that cluttered notice area with something that’s both functional and delightful, the ladybug bulletin board concept is an excellent weekend DIY. It’s inexpensive, customizable, and can grow with your family or classroom decor. Start small with one board or create a whole “ladybug garden” wall for an eye-catching display. For more project ideas and step-by-step guides, check out our DIY projects, browse related tips in home design ideas, or pair this board with a family command center from our kitchen upgrades collection. Ready to build? Gather your supplies and make a cheerful, useful piece that everyone will love.
Call to action: Share a photo of your finished ladybug bulletin board or try a variation and post it to your project album—your next home improvement could be a fun, simple DIY away!
For more home maintenance tips that can help you prepare for the wet season, check out Dont Let the Rain Catch You Off Guard Home Maintenance Tips for the Wet Season.
If you’re a landlord looking to organize your property-related notes, you might find our article on Company Let vs Ast for Landlords helpful.
For landlords looking to spruce up their rental properties, you might find our article on Company Let vs Ast for Landlords helpful.