Ever stood in front of a bathroom mirror, late for work, rifling through a tangle of necklaces and mismatched earrings? You’re not alone. A crowded jewelry box or a drawer stuffed with bracelets can turn a simple morning routine into a frustrating scavenger hunt. If you want to reclaim time and style, these jewelry DIY ideas for organizing will help you transform chaos into an attractive, functional system—on a budget and with a personal touch.
Why make your own jewelry organizers?
Buying ready-made jewelry storage can be expensive and generic. DIY jewelry organizers let you:
- Customize size and layout for your collection (rings, necklaces, earrings, brooches).
- Reuse materials you already have—saving money and reducing waste.
- Create decor-forward solutions that match your room’s style.
Jewelry DIY Ideas for Organizing: Quick & Easy Projects
Below are practical, step-by-step projects from minimalist to decorative. Each includes materials, steps, and design tips so you can pick one that fits your skill level and decor.
1. Wall-mounted necklace display (prevents tangles)
Materials: wooden board or picture frame, small hooks or cup hooks, paint or stain, hanging hardware.
- Measure and mark evenly spaced spots for hooks—leave at least 2 inches between each for chunky chains.
- Pre-drill small pilot holes and screw in hooks.
- Paint or stain for a finished look, then mount on the wall at eye level near your dresser or closet.
Tip: Use a grid of hooks to separate long and short necklaces to avoid overlap.
2. Earring organizer from a picture frame
Materials: old frame, piece of chicken wire or mesh, staple gun, spray paint (optional).
- Remove the glass and backing from the frame.
- Staple the mesh to the back of the frame so earrings can hook through.
- Paint the frame and hang it—perfect for statement studs and dangly pairs.
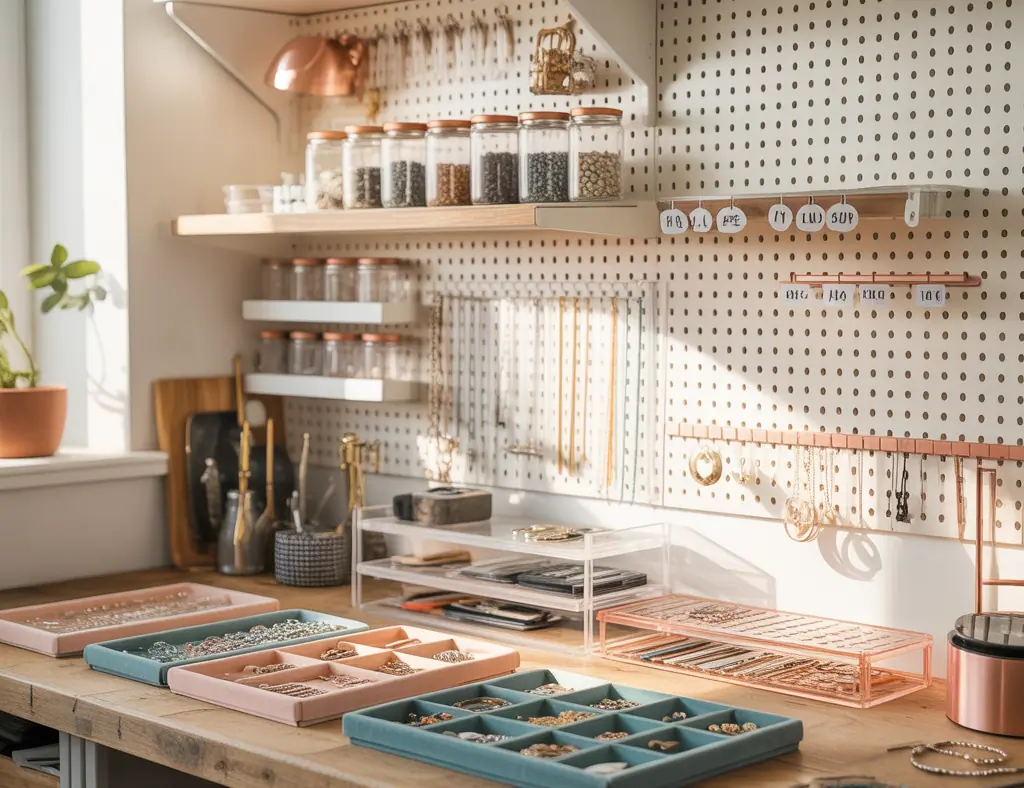
3. Repurposed drawer dividers for rings and bracelets
Materials: cardboard, fabric scraps, hot glue, velvet (optional).
- Cut cardboard inserts to fit your drawer and wrap them in fabric or velvet.
- Create small cubbies for rings and narrow rows for stacked bracelets.
- Label sections for quick access.
4. DIY ring roll from foam and fabric
Materials: upholstery foam, fabric, needle and thread or hot glue.
- Cut foam to a comfortable length and wrap in fabric.
- Stitch or glue seams, then compress rings into rows for travel-friendly storage.
5. Vintage silver tray for everyday pieces
A simple repurposed tray on your dresser provides an elegant landing spot for daily jewelry—mix it with small bowl or ring cone for variety.
Step-by-step: Build a multi-level jewelry board
This is a slightly bigger project but yields a beautiful, gallery-style organizer.
- Materials: large pegboard or wooden board, small shelves, hooks, knobs, fabric backing, mounting hardware.
- Plan zones for rings, earrings, bracelets, and sunglasses. Sketch a layout before attaching anything.
- Paint or cover the board with fabric. Attach small shelves and hooks for larger items.
- Install knob holders for bracelets and trays for delicate pieces.
- Mount securely to the wall and arrange pieces by frequency of use.
Design tip: Group by color or metal finish to make outfit matching faster in the morning.
Design inspiration and styling tips
Make your jewelry organization part of the room design:
- Minimalist: Use matte black hooks on a white board for a gallery look.
- Boho: Reclaimed wood and macramé pockets give a relaxed, textured display.
- Glam: Mirror-backed trays and gold hooks add luxury without a huge budget.
Placement matters—mount organizers near your dressing area or inside a closet door to protect delicate pieces from humidity in the bathroom.
Tips for long-term care and preventing damage
- Store sterling and silver separately or with anti-tarnish strips to slow oxidation.
- Use airtight containers or zip bags for semi-precious stones that react to moisture.
- For travel, keep necklaces in straw sections or wrap in tissue to prevent tangles.
- Label boxes and drawer compartments—spending 10 minutes organizing saves hours in the future.
Budget-friendly materials and upcycling ideas
You don’t need expensive supplies to create effective storage:
- Use cardboard tubes (from wrapping paper) to organize bracelets or bulk necklaces.
- Turn spice racks into ring and earring stands.
- Repurpose ice cube trays or muffin tins for small studs and beads.
Frequently Asked Questions
How do I stop necklaces from tangling?
Hang necklaces separately on a wall-mounted board or use a straw trick: thread the chain through a drinking straw and clasp to keep it straight. For storage, keep chains of different lengths on individual hooks.
What’s the best DIY earring organizer for small spaces?
A picture-frame mesh earring board is compact and vertical, saving countertop space. Alternatively, magnetic strips inside a cabinet door work great for metal studs and hoops.
Can I make a jewelry organizer that fits my bedroom design?
Absolutely. Choose finishes and materials that match your decor—painted pegboards for modern rooms, reclaimed wood for rustic spaces, or mirrored trays for a glam look. Personalize with hooks, shelves, and fabric to integrate with your room’s palette.
Conclusion
Whether you’re tackling a messy drawer or building a gallery wall for your necklaces, these jewelry DIY ideas for organizing give you practical, stylish solutions you can complete in an afternoon. Start with one small project—like a framed earring board or a repurposed tray—and expand your system as you discover what works for your routine. Ready to make your mornings easier and your jewelry part of the room’s design? Try one of these projects this weekend and share the results.
Want more hands-on inspiration? Check out our collection of DIY projects and explore related home design ideas to match your new jewelry storage with the rest of your space.
Call to action: Grab a frame, a few hooks, and 60 minutes—you’ll wonder why you didn’t start sooner. If you try a project, snap a photo and post it to inspire others!