Ever pulled back your curtains only to find a neighbor, a passerby, or curious street traffic peeking in? Whether you’re sprucing up a city apartment, creating a cozier bedroom, or protecting your bathroom from prying eyes, finding the right balance between light and seclusion can feel frustrating. This guide brings practical, creative ideas for window privacy that look great, save money, and many you can do yourself in a weekend.
Why window privacy matters — and what to consider
Before you pick a solution, consider these real-world factors: how much natural light you want to keep, whether ventilation is necessary, the room’s design style, your budget, and whether you need a temporary or permanent fix. You’ll find solutions that range from peel-and-stick window films to built-in shutters, each with pros and cons for privacy, light control, insulation, and aesthetic impact.
Top ideas for window privacy: quick wins and long-term solutions
1. Frosted or patterned window film (fast and inexpensive)
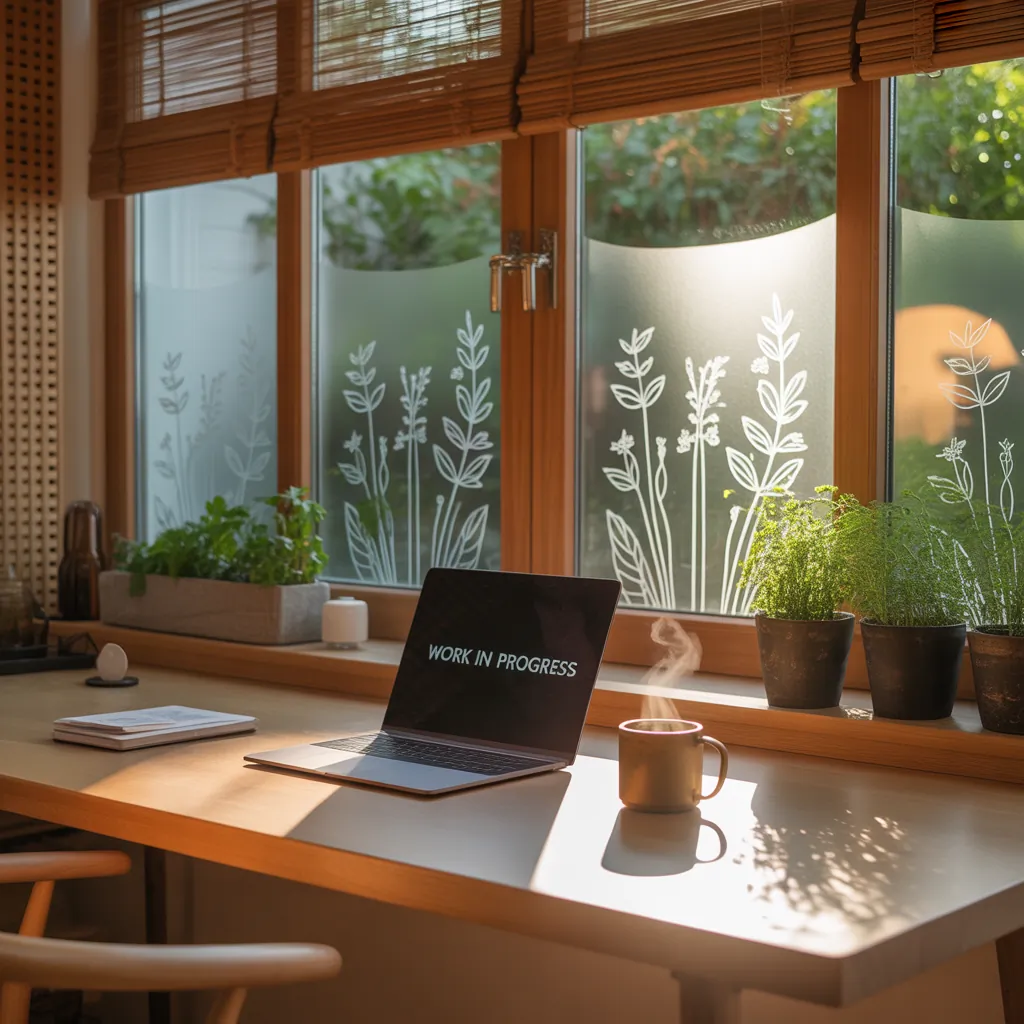
Window privacy film is one of the fastest ways to obscure views while keeping daylight. It comes in frosted, etched, or decorative patterns and can be applied directly to glass.
- Clean the glass thoroughly with vinegar and water; remove dust and residue.
- Measure and cut the film slightly larger than the pane.
- Spray the glass with soapy water, peel backing, position the film, then squeegee out bubbles from center to edges.
- Trim edges with a utility knife and let it dry 24–48 hours.
Good for bathroom windows, street-level living rooms, or glass doors. Long-tail phrase: DIY privacy window film installation for bathroom windows.
2. Sheer panels + layered curtains (privacy without shutting out light)
Layer a sheer curtain for daytime privacy with heavier drapes for evening. Use a double rod or a single rod with clip rings for easy switching. This technique is perfect for bedrooms and living rooms where you want soft light and flexible coverage.
3. Cafe curtains and half-window treatments (charming and functional)
Cafe curtains cover the bottom half of a window, preserving light through the top while blocking views at eye level—great for kitchen windows above sinks or street-facing dining areas. Install with tension rods for a no-drill option.
4. Plantation shutters and interior blinds (durable and elegant)
For a long-term upgrade, consider plantation shutters or interior blinds. They offer excellent control over sightlines and light, add resale value, and come in a range of finishes. Installation requires measurements and tools, but many homeowners do it themselves.
5. Privacy glass and etched glass decals (permanent, high-end finish)
If you’re renovating, privacy glass or etched designs can be installed into window units. While more expensive, these solutions are seamless and low-maintenance—ideal for modern bathrooms or front doors.
6. Plants and window boxes (natural, decorative privacy)
Tall indoor plants, hanging planters, or an exterior window box full of herbs and trailing plants can create a living privacy screen. Use fast-growing varieties like bamboo, snake plants, or tall grasses for quick coverage.
7. Decorative screens and room dividers (flexible and portable)
Folding screens allow you to add privacy when needed and tuck away when not. They’re great for renters and for rooms where you want temporary solutions, like guest rooms or open-plan spaces.
DIY ideas for window privacy: step-by-step projects
Project A — Quick frosted film for a bathroom window (under 30 minutes)
- Tools: spray bottle, soapy water, squeegee, utility knife, measuring tape.
- Measure window and cut film to size with 1/4″ overlap.
- Spray window, peel backing, adhere film, and smooth bubbles with squeegee.
- Trim excess and allow to cure. Tip: warm, dry room speeds drying.
Project B — No-sew cafe curtains on a tension rod (1 hour)
- Measure lower half of window; buy fabric and an iron-on hem tape.
- Fold edges and iron to create hems using the tape—no sewing required.
- Insert rod and hang. Works well for renters and quick kitchen upgrades.
Project C — Build a simple outdoor privacy planter box
- Build a shallow box to fit beneath the window sill (use cedar for rot resistance).
- Line with landscape fabric, add potting soil, and plant a mix of tall and trailing plants.
- Secure with brackets if needed. Water regularly and choose plants suited to sun exposure.
Design inspiration: match privacy to your style
- Minimal/modern: frosted film with geometric patterns or motorized shades.
- Boho/eclectic: macramé hangers, bamboo shades, and layered sheers.
- Classic/traditional: plantation shutters, roman shades, or linen drapes.
- Urban/rental-friendly: tension rods, removable film, and freestanding screens.
Real-world tips and budget considerations
- Start small: test film or a tension rod solution before investing in expensive shutters.
- Light vs. privacy trade-off: frosted film and sheer panels keep light; solid blinds and shutters block more light.
- Energy efficiency: insulated blinds and cellular shades also improve thermal performance.
- Maintenance: consider cleaning and durability—plants and fabrics require regular care.
Frequently Asked Questions
Peel-and-stick window film and tension-rod curtains are among the cheapest, renter-friendly options. Both are easy to install and reversible.
Yes—use frosted or patterned window film, sheer curtains, or top-down/bottom-up shades that let light in while covering eye-level views.
Most consumer-grade privacy films are removable. Heat (a hairdryer or heat gun) can soften adhesive for easier removal, but always follow manufacturer instructions to avoid residue or glass damage.
Conclusion — Try one idea for window privacy this weekend
From budget-friendly films to more permanent shutter installations, there are ideas for window privacy to fit every room, style, and skill level. Pick one practical project—like applying frosted film or installing cafe curtains—and transform your view in a day. Want more hands-on inspiration? Check out our pages on DIY projects, kitchen upgrades, and home design ideas to spark your next improvement. Ready to start? Grab your tools, choose a project, and reclaim your privacy.
Call to action: Tried one of these ideas? Share a photo or a question in the comments and I’ll help troubleshoot your project!