Have you ever been halfway through sanding a scratched farmhouse table and thought, “This would be perfect for our wedding head table”? If you’re juggling paint fumes, a tight budget, and a Pinterest board full of inspiration, you’re not alone. Transforming reclaimed wood, burlap, and string lights into a beautiful centerpiece for your reception is one of the most rewarding DIY projects you can tackle. In this article, I’ll walk you through practical, hands-on ideas for rustic wedding head table designs that are budget-friendly, customizable, and totally doable for eager DIYers.
Why choose a rustic head table?
Rustic wedding head table decor works well in barns, backyards, and even repurposed halls because it feels warm, personal, and unpretentious. Materials like reclaimed wood, mason jars, and greenery are inexpensive and easy to source. Plus, a rustic look is forgiving—small imperfections add character rather than looking like mistakes. If you love farmhouse style, boho vibes, or vintage antiquing, a rustic head table is a perfect fit.
Creative ideas for rustic wedding head table
Below are practical design approaches and DIY tips you can adapt to your venue and style. Each idea includes simple steps you can take this weekend.
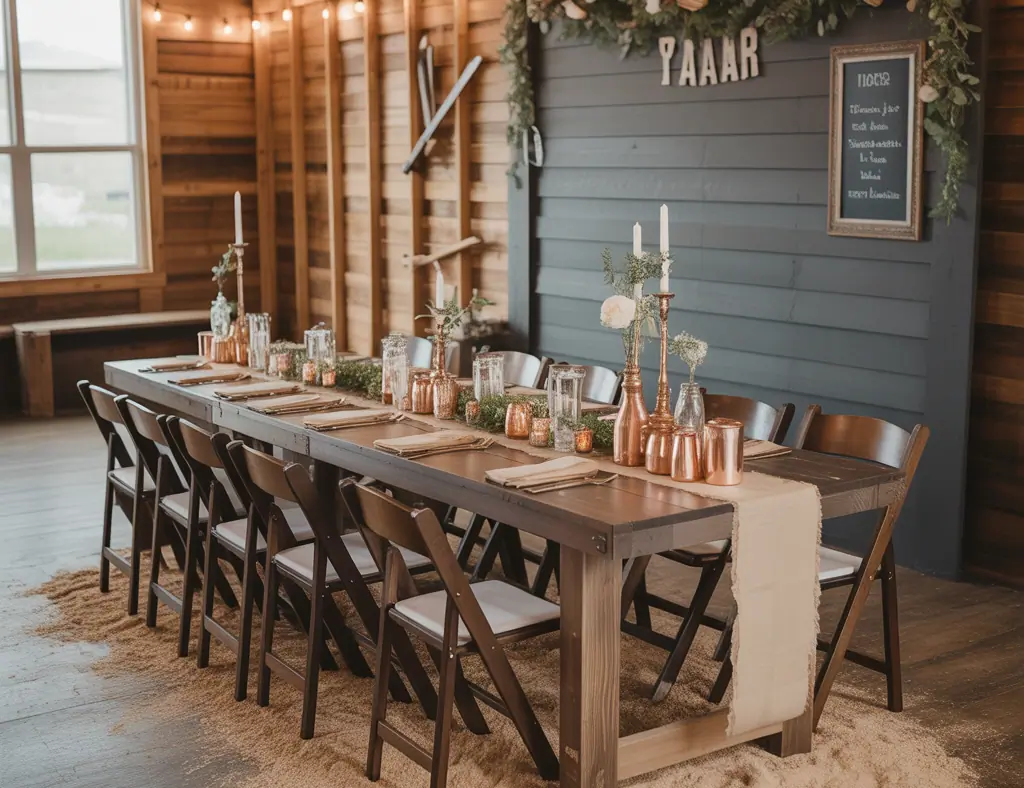
1. Reclaimed wood table with a soft runner
Materials: reclaimed wood slab or pallet table, sandpaper, wood stain, neutral linen runner.
- Sand the top to remove rough spots and splinters.
- Apply a light stain or clear sealant—leave some raw texture for character.
- Lay a neutral linen or lace runner down the center to soften the look.
Tip: Use felt pads under centerpiece vases to prevent scratches and wobble.
2. Mason jar and milk-glass centerpieces
Cluster mason jars and small milk-glass vases along the table, alternating heights and filling them with seasonal blooms, baby’s breath, or dried wheat. Wrap twine or lace around jar necks for easy customization.
3. Greenery garland with candle accents
Create a lush, low garland using eucalyptus, ivy, and ferns. Intermix battery-operated candles or hurricane votives for soft ambient light. This is an ideal DIY centerpiece that’s travel-friendly—assemble on-site to keep foliage fresh.
4. String light canopy and hanging decor
Hang warm string lights in a scallop or grid pattern above the head table. Add hanging mason jars with tea lights or small floral clusters for a magical overhead display. Use S-hooks and lightweight anchors suitable for your venue (ask the venue manager if in doubt).
5. Barn door or pallet backdrop
Repurpose an old barn door or vertically arranged pallet boards as a backdrop. Paint a soft color or leave it weathered, then add signage, a monogram, or a wreath for focal interest.
6. Layered textures: burlap, lace, and leather
Mix rough burlap with delicate lace runners and leather-wrapped accents for contrast. Layering textures adds depth and a tactile quality that photographs beautifully.
7. Personalized signage and escort table integration
Incorporate a small wooden sign with the couple’s name and wedding date at the head table. Coordinate escort cards or a welcome board with the same hand-painted lettering for cohesive design.
DIY step-by-step: Build a simple reclaimed wood head table
Here’s a straightforward build you can complete in a weekend.
- Materials: two 8-ft 2×8 boards (tabletop), four 4×4 posts (legs), screws, wood glue, sandpaper, stain/sealant, basic tools (circular saw, drill).
- Cut the tabletop boards to your desired length (6–8 ft is common for a head table).
- Join boards edge-to-edge with wood glue and pocket-hole screws, or use cross battens underneath for stability.
- Attach legs 8–10 inches in from each end for sturdy support.
- Sand, stain, and seal. Allow full cure before transport.
Real-world tip: Build the table in a garage and deliver it to the venue a day before—you’ll have time to touch up scratches and secure any loose screws on-site.
Budget-friendly materials and sourcing
Look for pallet wood, thrifted frames, secondhand furniture, and leftover flooring for inexpensive materials. Local salvage yards and community buy/sell groups often have great finds. For florals, consider silk options for distant venues or filler stems mixed with a few fresh blooms for authenticity without the full cost.
Setup checklist and timeline
- Month out: Finalize overall design and list materials.
- 3 weeks: Build or source table; order or gather decor items.
- 1 week: Paint, stain, and prep small details like signage and jar wraps.
- Day before: Transport table (fully cured) and store decor neatly. Assemble garlands and keep florals cool.
- Day of: Set up centerpieces, test lights, and secure everything against wind if outdoors.
Frequently Asked Questions
1. How do I protect a rustic wood table from spills and stains?
Seal the surface with a durable clear coat—polyurethane or spar urethane works well. For a more natural matte look, use a satin water-based sealant. Also keep coasters, cloth napkins, and small trays nearby to protect high-use areas.
2. What’s the easiest centerpiece for a rustic head table?
A greenery garland with a few battery candles is both simple and elegant. It’s low-profile for photos, easy to assemble on-site, and relatively cheap if you use locally sourced foliage.
3. Can I reuse my head table decor after the wedding?
Absolutely. Many rustic elements—wood signs, mason jar vases, string lights, and even the head table—make great home decor or garden furniture post-wedding. Consider repurposing the table as a console or entry table to keep the memory alive.
Conclusion
Whether you’re aiming for a barn wedding head table, farmhouse head table decor, or a simple DIY head table centerpiece, these ideas for rustic wedding head table designs will help you plan a memorable, budget-friendly focal point. Start small—refinish a tabletop, craft a greenery garland, or make a few mason jar arrangements—and build from there. If you want step-by-step projects and material lists, check out our DIY projects and browse related inspiration in home design ideas or even rustic touches that work well alongside kitchen upgrades for cohesive style in your home after the wedding.
Ready to start your rustic head table project? Tell me your venue and budget in the comments and I’ll suggest a tailored plan to get you started — and don’t forget to share photos when you’re finished!