Ever stood on your lawn with a weed-whacker in hand, watching soil slump away from your flower beds and thinking, “There has to be a prettier, more permanent fix”? If you’re ready to replace messy plastic borders or uneven pavers, rock edging can give your yard a clean, natural look that lasts. This guide shares practical, DIY-friendly ideas for rock edging that fit any style—from rustic cottage beds to modern minimalist landscapes.
Why Choose Rock Edging?
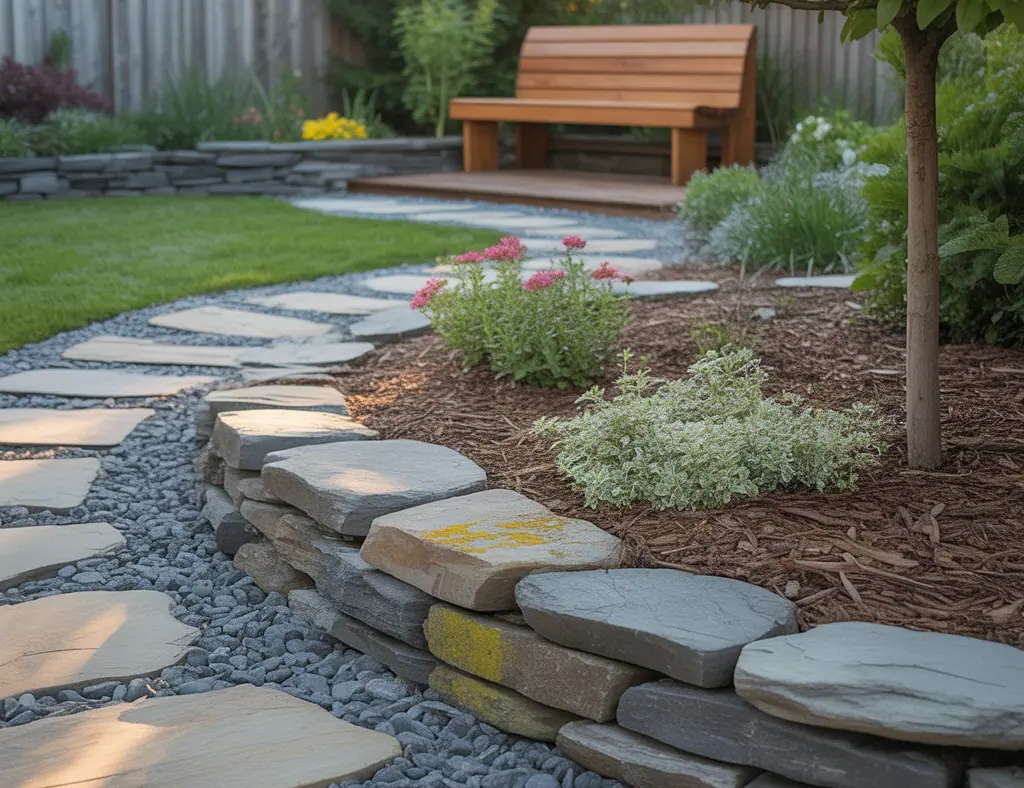
Rock edging and stone borders are durable, low-maintenance, and versatile. They keep mulch and soil in place, create crisp lawn lines, and add textural interest to garden beds and pathways. Whether you pick river rock, flagstone, or dry-laid boulders, stone edging pairs well with plants and hardscapes while resisting weather and mowing damage.
Top Ideas for Rock Edging (Design Inspiration)
1. Dry-Stacked Natural Stone Border
Stack flat stones without mortar for a classic, handcrafted look. Ideal for raised beds and short retaining walls, dry-stacked edges are easy to repair and can follow curved lines for a natural flow.
2. River Rock Edge
Use smooth river stones to create a soft, rounded border perfect for cottage gardens and pathways. River rock works well when set slightly into bedding sand to keep stones from rolling.
3. Flagstone Cobbled Edge
Flat flagstones laid vertically or on edge give a refined, contemporary border. They’re great for separating patios from garden beds and for creating a stepping-stone effect along walkways.
4. Boulder Accents
Place a few large boulders at focal points along a bed for a natural, rugged aesthetic. Boulders also double as micro-retaining walls for sloped terrain.
5. Pebble and Gravel Transition Strip
Combine crushed gravel with a line of larger stones to create a low-profile edge that improves drainage and prevents soil washout. This is a practical choice for xeriscapes and modern landscapes.
6. Mortared Stone Border for Long-Term Stability
If you want permanence—especially for driveways or high-traffic areas—set stones in mortar. This creates a sturdy curb that won’t shift under pressure.
7. Slate Tile Edge
Thin, ribbon-like slate can create a sleek, linear edge ideal for contemporary gardens. Slate’s dark color contrasts well with bright foliage and light mulches.
8. Mixed-Material Rock Edging
Blend stone with timber or metal edging for layered texture. For example, short steel edging behind a low row of cobbles gives a clean lawn line with natural stone character.
9. Mosaic Rock Border
Use colorful remnant stones or broken pavers to create a whimsical mosaic edge. This is a fun weekend DIY project that lets you repurpose materials.
10. Plant-Integrated Rock Edge
Interplant groundcovers like thyme, sedum, or creeping phlox between and around rocks to soften the hard edge and add seasonal color.
DIY Step-by-Step: Basic Dry-Laid Rock Edging
- Plan & Measure: Outline your border with string or spray paint. Measure length to estimate stone quantity.
- Choose Stones: Pick stones that match the scale of your plants and home. Flat stones are easiest to stack.
- Dig a Trench: Dig a trench 4–6 inches deep and slightly wider than the stones. For higher stability, make it deeper for larger stones.
- Create a Base: Add 1–2 inches of crushed stone or sand and compact. This helps level and drain the edge.
- Place Stones: Set stones snugly, interlocking where possible. Tap with a rubber mallet to level.
- Backfill & Compact: Fill gaps with soil, small gravel, or sand. Pack firmly to reduce shifting.
- Finish: Mulch the bed side to lock the edge visually, and trim lawn turf flush against the stones.
Tools, Materials, and Budget Tips
- Basic tools: shovel, wheelbarrow, rubber mallet, level, garden rake, tamper.
- Materials: stones (by size), crushed gravel or sand, landscape fabric (optional), edging spikes for added stability.
- Budget tip: Use locally sourced fieldstone or reclaimed masonry to lower costs; rent a compactor for larger projects.
Maintenance and Practical Advice
- Weed control: Use landscape fabric under stone or pull weeds regularly to keep a neat appearance.
- Prevent shifting: For areas with freeze-thaw cycles or vehicle traffic, consider mortared or concrete footings.
- Drainage: Keep rock edges slightly sloped away from foundations to direct water flow safely.
- Seasonal care: Reset any sunk or shifted stones after heavy rains and top up gravel as needed.
Design Tips: Match Stone to Home Style
- Rustic homes: Choose rough fieldstone or large boulders.
- Modern homes: Use straight-cut slate or concrete-look stone for clean lines.
- Cottage gardens: River rocks and mixed pebbles soften the beds for a romantic feel.
Frequently Asked Questions
1. What are the best rocks for edging a garden bed?
Flat stones like flagstone and slate are easiest to work with, while river rocks and cobbles provide a softer, natural look. Choose stone size relative to the bed: small pebbles for delicate borders, larger stones or boulders for focal points or retaining needs.
2. How long does DIY rock edging typically last?
Properly installed rock edging can last many years. Dry-laid stone usually lasts decades with occasional resetting, while mortared stone is effectively permanent. Regular maintenance—like fixing shifted stones and topping gravel—extends longevity.
3. Can I install rock edging myself, or do I need a pro?
Many rock-edge projects are DIY-friendly if you have basic tools and patience. Simple dry-laid borders and river-rock edges are great starter projects. For large retaining walls, areas with heavy loads, or if you plan to mortar stone, hiring a professional is recommended for structural safety.
Final Thoughts & Call to Action
Ideas for rock edging range from simple pebble borders to elegant mortared stone curbs—each adds structure, personality, and durability to your landscape. Pick a style that complements your home, follow the step-by-step installation tips, and you’ll be amazed at the transformation. Ready to start your next weekend project? Browse our DIY projects for more hands-on guides, or get inspired by related home design ideas to match your new stone edging with the rest of your outdoor aesthetic.
Share a photo of your finished edge or ask a question in the comments—let’s build something beautiful together.