Ever stood in a bland kitchen or bathroom and wished a simple update could add depth and character without a full remodel? Relief tile—the textured, raised, or sculpted tiles that catch light and create shadow—can transform a room overnight. If you’re wondering what relief tile can do for your home and whether it’s a doable weekend project, you’re in the right place.
What is relief tile and why use it?
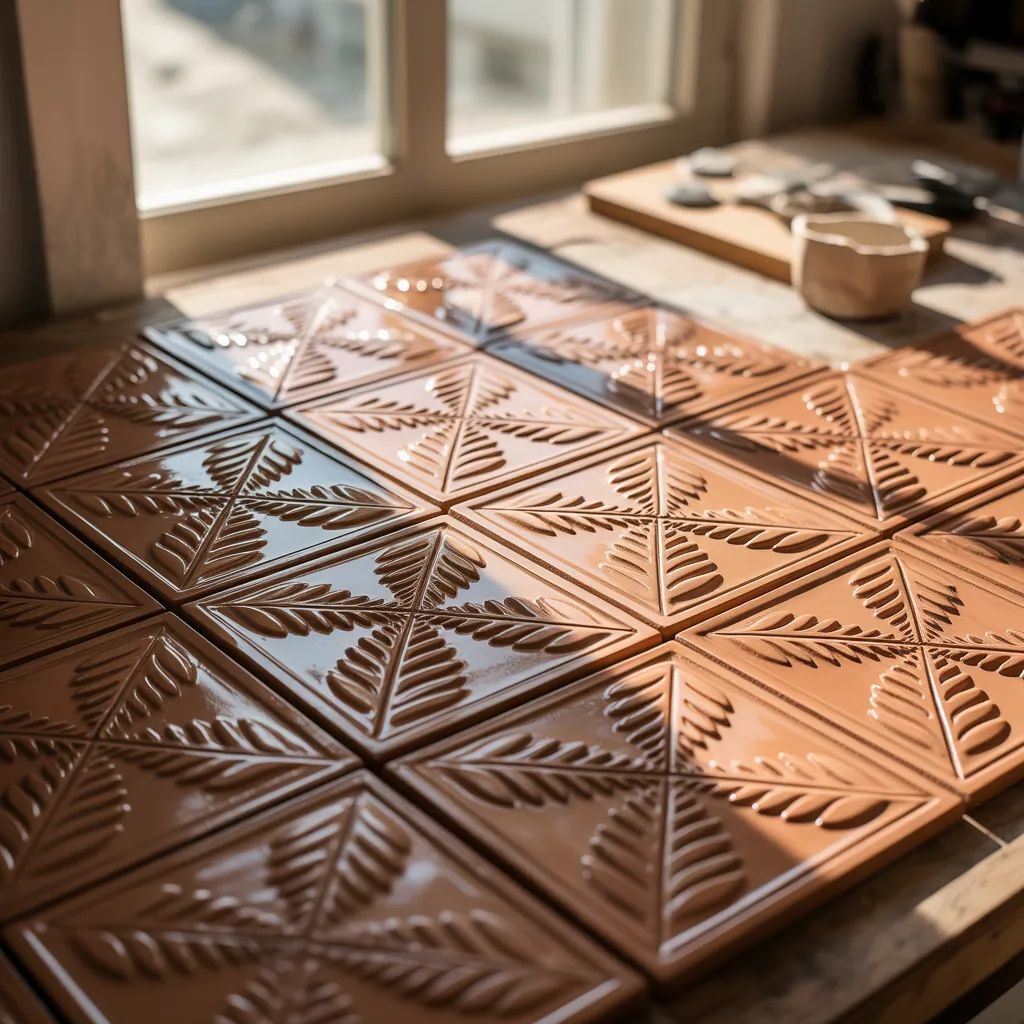
Relief tile refers to tiles with raised or recessed patterns—anything from subtle ridges to dramatic 3D motifs. Also called textured tile, 3D tile, or sculpted ceramic, relief tile adds visual interest, tactile appeal, and depth to a space. Designers use it for backsplashes, feature walls, fireplace surrounds, stair risers, and exterior accents.
Common materials and finishes
- Ceramic and porcelain: durable, wide variety of shapes and glazes.
- Terracotta and cement: earthy textures, great for rustic or industrial looks.
- Glass and metal relief tiles: reflective, modern takes on texture.
- Handmade and artistic tiles: custom relief for unique installations.
Top ideas for relief tile to try this year
Here are practical, inspiring concepts that suit different skill levels and design styles.
1. Subtle wave or ripple backsplash
- Where: Kitchen or bathroom backsplash.
- Why: Adds movement without overwhelming a small space.
- DIY tips: Choose a neutral glaze and pair with matte countertops. Install horizontally to accentuate width. Use a non-sanded grout if tiles are glazed and delicate.
2. Statement 3D geometric feature wall
- Where: Living room, entryway, or behind a bed.
- Why: Creates an architectural focal point and plays with light.
- DIY tips: Start with a dry layout on the floor to plan placement. Use medium-bed mortar for larger relief tiles to ensure full bedding of adhesive.
3. Floral or botanical relief for a powder room
- Where: Powder room or small accent wall.
- Why: Adds charm and becomes a conversation piece.
- DIY tips: Consider hand-painted relief tiles for a bespoke look. Seal porous tiles to prevent staining near sinks.
4. Raised subway tile for classic-modern contrast
- Where: Kitchen or laundry backsplash.
- Why: Keeps the classic subway look but gives it contemporary texture.
- DIY tips: Mix smooth and relief subway tiles in a random pattern to avoid monotony. Use a contrasting grout color to highlight the raised edges.
5. Stair riser relief tiles for unexpected flair
- Where: Stair risers.
- Why: Small vertical surfaces are perfect for detailed patterns that you’ll notice on each step.
- DIY tips: Use thinner relief tiles to avoid creating a tripping hazard. Ensure consistent overlap and seal grout to prevent dirt build-up.
6. Fireplace surround with sculpted tiles
- Where: Fireplace facade or hearth wall.
- Why: Heat-resistant relief tiles create a cozy, artisanal look.
- DIY tips: Verify tile heat ratings and use appropriate fire-rated adhesives and grout. Keep grout joints minimal for a seamless appearance.
7. Outdoor facade or garden wall
- Where: Exterior walls, planters, or outdoor kitchens.
- Why: High-relief tiles add shadow and texture to landscaping and curb appeal.
- DIY tips: Choose frost-resistant, outdoor-rated tiles and polymer-modified thinset. Consider sealing to protect against mildew and staining.
8. Mixed-media mosaic accents
- Where: Shower niche, backsplash bands, or tabletop inlays.
- Why: Combine smooth, metallic, and relief tiles for contrast and sparkle.
- DIY tips: Use mesh-backed mosaics for easier layout. Triangulate colors and finishes to keep the design cohesive.
How to install relief tile: step-by-step guide
- Plan and measure: Sketch the area, calculate tile quantity (buy 10–15% extra for cuts/ mistakes), and do a dry layout when possible.
- Prepare the substrate: Ensure walls are flat, clean, and primed. Use cement backer board in wet areas like showers.
- Choose the right adhesive: For thick or highly textured tiles use a medium- or large-bed mortar. For lighter ceramic relief tiles, a standard thinset may suffice.
- Apply mortar and set tile: Use a notched trowel sized to the tile’s back. Press firmly and twist slightly to fully seat relief tiles—check backs for voids.
- Maintain consistent joints: Use spacers where possible; with textured tiles you may prefer minimal grout lines for a seamless look.
- Grout and seal: Use the appropriate grout (sanded vs. unsanded) and follow with a sealer if the tile or grout requires protection.
- Clean and finish: Remove haze and excess grout, then let everything cure per manufacturer instructions.
Pro tip: When working with relief tile, occasional dry-fitting and photographing the layout helps visualize the final shadow patterns and avoids surprises after installation.
Design inspiration and pairing tips
Relief tile works best when balanced with simpler surfaces. Here are pairing ideas that are easy to apply:
- Pair textured walls with matte countertops and gloss-free cabinetry to avoid competing reflections.
- Use warm grout tones with earthy relief tiles and crisp white grout with modern relief designs to emphasize geometry.
- Illuminate textured tiles with directional lighting (wall washers or under-cabinet lights) to accent shadows and depth.
For more comprehensive projects that mix materials and finishes, check out our internal pages on home design ideas and kitchen upgrades.
Maintenance and durability
Cleaning textured surfaces requires a gentler approach to avoid grinding dirt into crevices:
- Regularly dust or vacuum textured tiles to remove loose debris.
- Use a soft brush and pH-neutral cleaner for deeper cleaning; avoid aggressive scrubbing pads on glazed relief tiles.
- Reseal porous tiles and grout annually if located in wet or high-traffic areas.
With correct installation and upkeep, relief tile can last decades and remain a standout design element.
Ready for a weekend project? Quick DIY ideas
- Install a relief tile backsplash behind your stove—typically a 1–2 day job for an intermediate DIYer.
- Add relief tile stair risers—remove one riser at a time, measure and adhere for a low-risk update.
- Create a framed relief tile accent above a console table—mount tiles onto a plywood backer and hang as art if you don’t want a permanent install.
If you’re tackling installation yourself, explore our DIY projects resources for tool lists, safety tips, and technique tutorials.
Frequently Asked Questions
Relief tiles can be more challenging because their profiles require stronger adhesives and more careful bedding to avoid voids behind raised areas. However, with the right thinset (medium-bed for thicker tiles) and patience, many homeowners can successfully install them.
Yes—provided the tile is rated for wet locations and you use proper substrates (cement backer board), waterproofing membranes, and suitable grout/sealant. Porcelain and glazed ceramic relief tiles are common choices for showers.
Regular dusting and gentle brushing with a soft bristle brush and pH-neutral cleaner will keep relief tiles clean. Avoid harsh acids or alkaline cleaners on sensitive glazes, and reseal porous tiles and grout periodically to prevent staining.
Conclusion: Bring depth and personality to your home with ideas for relief tile
Relief tile is one of the most effective ways to add texture, drama, and design personality to a space without a full renovation. From subtle ripples behind a sink to bold 3D feature walls, the possibilities are vast—and many projects are achievable for weekend DIYers. Ready to try relief tile? Start with a small backsplash or framed tile art, gather the right tools and adhesive, and see how texture transforms your home.
Want to dive deeper into project plans and tools? Check out our DIY projects page for step-by-step guides and material checklists—and then pick a relief tile idea to start this weekend.