Ever stood in your kitchen holding a cup of coffee, staring at tired cabinet fronts and thinking, “If only the cabinets had a new look, this whole room would feel refreshed”? You’re not alone. Swapping out cabinet knobs and pulls is one of the fastest, most affordable home improvement moves that creates a major visual impact—often in an afternoon. If you’re ready to tackle a small weekend project that pays big style dividends, here are practical, stylish, and budget-friendly ideas for kitchen cabinet hardware to inspire your next makeover.
Why cabinet hardware matters (and why it’s a great DIY upgrade)
Cabinet hardware is the jewelry of the kitchen: it punctuates cabinetry style, complements fixtures, and can transform a dated space without replacing a single door. Changing hardware addresses both function and design—better ergonomics, updated finishes, and improved durability. For DIYers, it’s low risk, low cost, and high reward.
Top design directions: hardware styles that make a statement
1. Modern minimalism — bar pulls and slim handles
Straight, slim bar pulls in matte black, brushed nickel, or satin brass create a streamlined, contemporary vibe. They work especially well on flat-panel and shaker-style cabinets for a clean, cohesive look.
2. Timeless classics — round knobs and cup pulls
Round knobs in ceramic, glass, or polished brass add an approachable, traditional touch. Cup pulls are ideal for drawers and evoke a cozy farmhouse or vintage aesthetic.
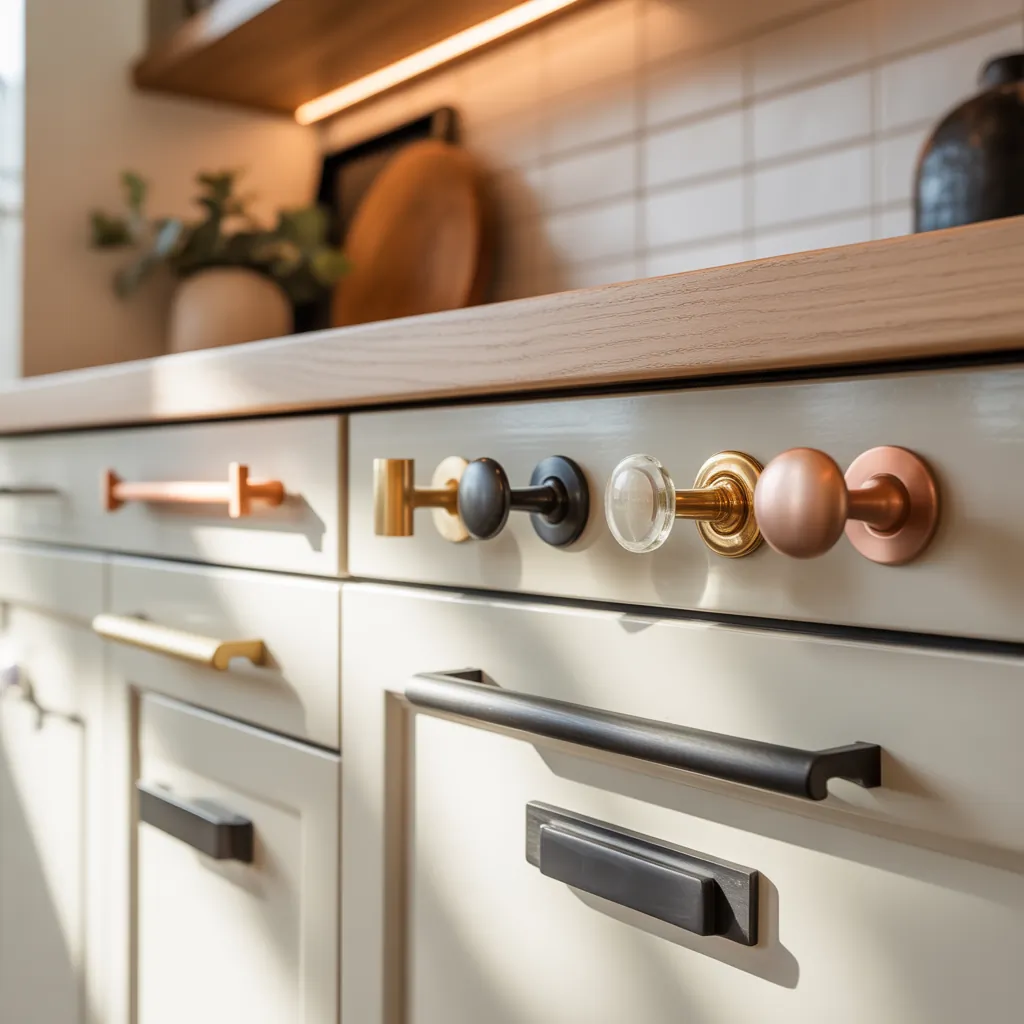
3. Mixed metals and accents
Don’t be afraid to mix finishes—use brass knobs on upper cabinets and matte black pulls on lower cabinets to create layered interest. Balance is key: pick one dominant finish and use a secondary finish as an accent.
4. Unique materials — leather, rope, and ceramic
Leather straps or rope pulls are perfect for adding texture in cottage or coastal kitchens. Ceramic and glass knobs bring color and personality to neutral cabinets.
How to choose the right hardware: practical tips
- Consider scale: larger, chunky pulls suit flat-front or large cabinets; small knobs fit delicate or inset doors.
- Measure center-to-center (C-C): this is the distance between screw holes—common sizes are 3″, 3-3/4″, and 96 mm. Matching C-C avoids drilling new holes.
- Coordinate with finishes: tie hardware finish into faucet, light fixtures, and appliances for a cohesive look.
- Mind ergonomics: choose handles that feel comfortable to grip and are mounted at a practical height.
Step-by-step DIY installation guide
Replacing cabinet hardware is straightforward. Follow this step-by-step plan for a neat, professional result.
Tools and materials
- New knobs/pulls and screws (check lengths)
- Measuring tape, pencil, and template (or masking tape)
- Drill with appropriate bit and countersink if needed
- Wood filler (for old holes), sandpaper, and touch-up paint
- Screwdriver and level
Installation steps
- Remove old hardware and set aside screws to compare lengths.
- Clean the cabinet face and inspect for extra holes; fill unwanted holes with wood filler and sand smooth.
- Use a template or make a jig from cardboard to mark new hole locations consistently across all doors and drawers.
- Drill pilot holes carefully; use a countersink if the screw head needs to sit flush.
- Attach the new knobs or pulls, ensuring screws are the correct length for door thickness.
- Wipe down and check alignment; adjust if needed. Use thread locker if screws loosen over time.
Creative upgrade combos and inspiration
Try these curated ideas to elevate your kitchen style:
- Matte black bar pulls on white shaker cabinets + brass faucet for a modern-transitional blend.
- Antique brass knobs paired with ceramic white knobs on accent cabinets for a curated, collected look.
- Oversized statement pulls on a pantry or island to create a focal point.
- Reclaimed wood or leather strap pulls on lower cabinets for a warm, rustic touch.
- Recessed pulls for minimalist kitchens and handle-free illusion.
Budget-friendly swaps and quick wins
If funds—or time—are tight, try these fast improvements:
- Spray paint or electroplate existing hardware for a fresh finish.
- Replace only the lower cabinet hardware to ground the room and add drama.
- Use thrifted or vintage knobs mixed with new pulls for an eclectic, affordable look.
Ideas for kitchen cabinet hardware: maintenance and longevity
Choose durable finishes (brushed nickel, stainless steel, or solid brass) in high-traffic kitchens. Clean regularly with mild soap and soft cloths. Tighten screws periodically and swap out stripped screws to prevent wobble. For painted cabinets, avoid harsh abrasives that can damage the finish near hardware.
Frequently Asked Questions
Pick hardware proportional to cabinet size—3″ to 5″ center-to-center pulls work well on standard drawers, while smaller knobs (1″–1.5″) suit cabinet doors. Always measure the existing center-to-center before ordering to avoid extra drilling.
Yes. Match the new hardware to the current screw hole spacing (C-C measurement). If you want a different spacing, you’ll need to fill old holes with wood filler and drill new ones, then repaint or touch up the area.
Choose one dominant finish for major fixtures (faucet, lighting) and use hardware as an accent. Complementary finishes (e.g., brass and matte black) can work well; just maintain visual balance and repetition to keep the look cohesive.
Real-world advice from pros
Home pros recommend buying one set of hardware first and installing it on a few doors to see how it reads in real life before committing to the whole kitchen. Keep a spare set of screws and extra knobs on hand for future repairs. If you have inset doors or frames, consider backplates to cover any old holes and add detail.
Conclusion: start small, enjoy a big impact
Ideas for kitchen cabinet hardware range from simple knob swaps to ambitious mixed-metal statements—but every change can refresh your kitchen and boost your confidence as a DIYer. Pick a style that complements your home, follow the steps above, and you can complete most projects in a weekend. Ready to try it? Explore more project inspiration on our DIY projects page or browse other kitchen upgrades and home design ideas for bigger transformations. Share your before-and-after photos and let us help with tips for installation and finishing touches.
Call to action: Grab a handful of sample pulls or knobs, make a simple cardboard template, and test three looks on your cabinet doors this weekend—then pick your favorite and make the switch. Your refreshed kitchen is closer than you think.