Ever stared at your dated bathroom and wondered how to make it feel more modern, safer, and spa-like without tearing down walls? If you’re imagining a sleek, level-entry shower that blends seamlessly with your floor, you’re in the right place. In this article we’ll explore practical ideas for curbless showers that work for DIYers and homeowners planning a remodel—covering design inspiration, step-by-step tips, and real-world advice to help you get started.
Why Choose a Curbless Shower?
Curbless showers (also called barrier-free, zero-threshold, or level-entry showers) create a clean look and improve accessibility. They’re ideal for aging-in-place, wheelchair-friendly bathrooms, and contemporary wet-room styles. Beyond aesthetics, a well-designed curbless shower can increase resale value and make daily routines easier.
Benefits at a glance
- Seamless floor transitions—no tripping over a curb
- Accessible design for all ages and mobility levels
- Modern minimalist look that expands visual space
- Flexible design: glass enclosures, open wet rooms, or partial screens
Curbless Shower Ideas for Every Style
Whether you want a spa-like retreat or a simple accessible upgrade, these design ideas will inspire your project.
1. Minimal Glass Walk-In
- Single-pane frameless glass panel to keep water contained while preserving openness.
- Large-format tiles for smooth visual flow from bathroom floor into shower.
- Linear drain hidden near the wall to maintain a flat floor surface.
2. Wet Room with Full Tiling
- Entire bathroom functions as a waterproofed shower area—great for small spaces.
- Multifunction shower heads and recessed niches for toiletries.
- Floor slope and drain placement are critical—plan this with precision.
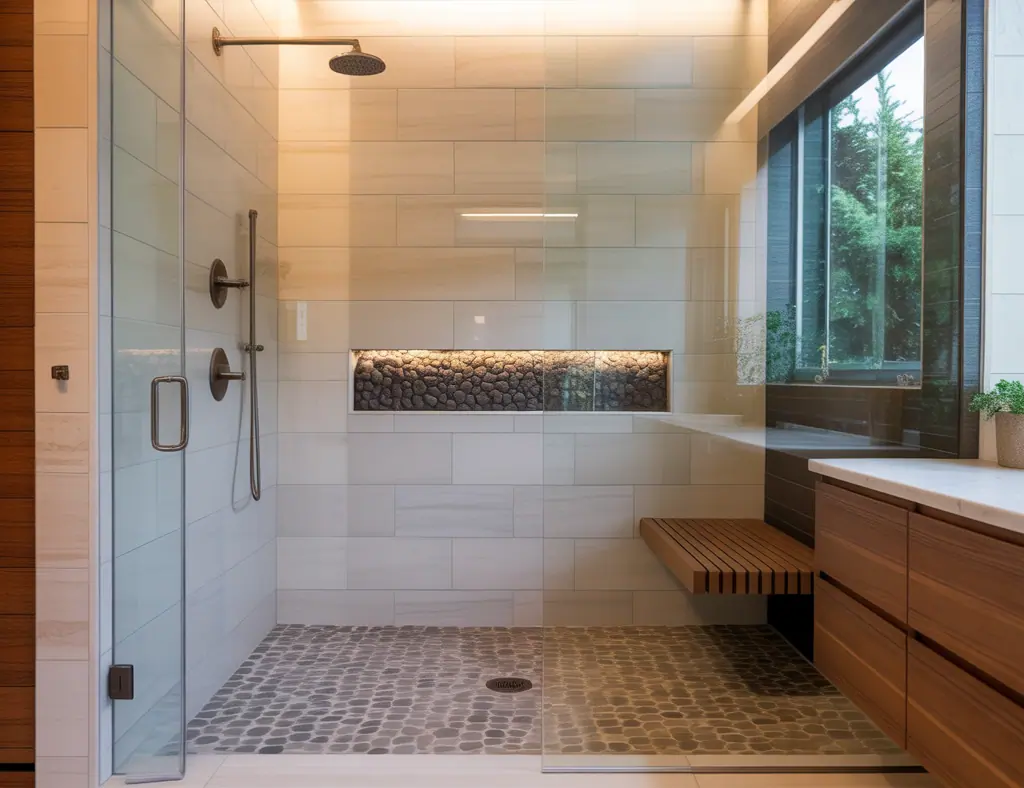
3. Pebble-Floor Curbless Shower
- Textured pebble tiles offer natural slip resistance and a spa vibe.
- Combine with warm wood-look tiles outside the shower for contrast.
- Consider a linear drain to avoid interrupting the pebble pattern.
4. Accessible Shower with Built-In Bench
- Fold-down seat or built-in bench for comfort and safety.
- Grab bars, thermostatic valve, and non-slip tiles for accessibility compliance.
- Open layout for wheelchair maneuverability if required.
Step-by-Step DIY Tips for Installing a Curbless Shower
Installing a curbless shower is doable for capable DIYers, but it requires attention to waterproofing, slope, and drainage. Below is a practical step-by-step guide to give you an overview.
Plan the slope and drain position. Aim for a minimum slope of 1/4 inch per foot toward the drain. Linear drains allow a single-direction slope and cleaner tile layout.
Choose the right drain system. Linear drains are popular for curbless showers; center drains work too but may require more complex pan shaping.
Prepare the subfloor and framing. Ensure joists can support a mortar bed if needed. Reinforce if the shower will be a wet room or heavy tiled area.
Install a waterproofing membrane. Use a trusted liquid or sheet membrane system (e.g., polypropylene or thin-set bonded membranes). Proper waterproofing is non-negotiable.
Create a pre-slope and mortar bed. A pre-slope ensures water flows to the drain under the waterproof membrane. Then install the liner and a final slope mortar bed.
Tile installation. Start with floor tiles, then walls. Large-format tiles reduce grout lines and enhance the seamless look.
Seal grout and test. Use quality grout sealer and run a water test for 24–48 hours to confirm drainage and waterproofing.
Real-World Advice: Common Pitfalls and How to Avoid Them
Curbless shower projects can stall on technical details. Here’s how to avoid common mistakes:
- Underestimating slope needs: If slope is too shallow, water will pool. Measure carefully and test slope with a straight edge and level.
- Poor waterproofing: Skipping proper membrane installation leads to leaks and costly repairs. Follow manufacturer instructions and consider a membrane system designed specifically for wet areas.
- Wrong tile choice: Slick tiles can be hazardous. Use textured or small-format tiles on floors for grip, and seal grout regularly.
- Ignoring local codes: Plumbing and accessibility codes may dictate drain types and ramp slopes—check before you start.
Budget-Friendly vs. Premium Curbless Shower Features
Decide where to splurge and where to save:
- Save on aesthetics: paint, simple glass panels, and open layouts.
- Invest in critical systems: linear drains, quality waterproof membranes, and professional plumbing if needed.
- Mid-range upgrades: heated floors, built-in niches, and hand showers offer luxury without excessive costs.
Design Details That Make a Difference
Small elements elevate a curbless shower from functional to memorable:
- Matte black or brushed brass fixtures for contrast.
- Recessed LED niches and overhead rain shower combined with a handheld wand for versatility.
- Continuous tile across floor and shower to visually enlarge the space.
- Underfloor heating to keep tiles warm and comfortable in wet rooms.
Ideas for Curbless Showers: Final Design Inspiration
Combine styles: pair a pebble floor with linear drain and frameless glass for a modern-retreat feel, or go full minimal with monochrome large tiles and hidden drains for a ultra-modern bathroom. Accessibility-focused households can include grab bars, thermostatic controls, and a flush transition to the hallway.
Frequently Asked Questions
1. Are curbless showers more expensive to install?
Initial costs can be higher because of the need for proper waterproofing, pre-slope mortar beds, and linear drain systems. However, long-term benefits like accessibility and aesthetics often justify the investment. You can manage costs by doing non-structural work yourself and hiring professionals for plumbing and waterproofing.
2. Can I convert a standard shower to a curbless shower?
Yes, but conversions typically involve removing the curb, reworking the subfloor, and installing a new drainage solution. Expect to address framing, waterproofing, and possibly adjust joists. For many homeowners, hiring a pro for structural and waterproofing work is recommended.
3. What flooring is best for a curbless shower?
Textured porcelain or small-format tiles offer good slip resistance and are easy to slope. Pebble tiles provide traction and a spa look but may require more maintenance. Avoid large, extremely smooth tiles on the shower floor unless they have an anti-slip finish.
Conclusion
Ideas for curbless showers range from simple walk-in glass panels to fully tiled wet rooms—with options that suit every budget and skill level. Prioritize waterproofing, proper slope, and safe flooring, and consider hiring experts for plumbing and structural work. Ready to design your curbless, zero-threshold shower? Start with a simple plan, explore materials, and try one of the DIY upgrades listed here. For more remodeling inspiration, check out our DIY projects, kitchen upgrades, and home design ideas pages. If you’d like, describe your bathroom layout and I’ll help sketch a curbless shower plan you can start on this weekend.