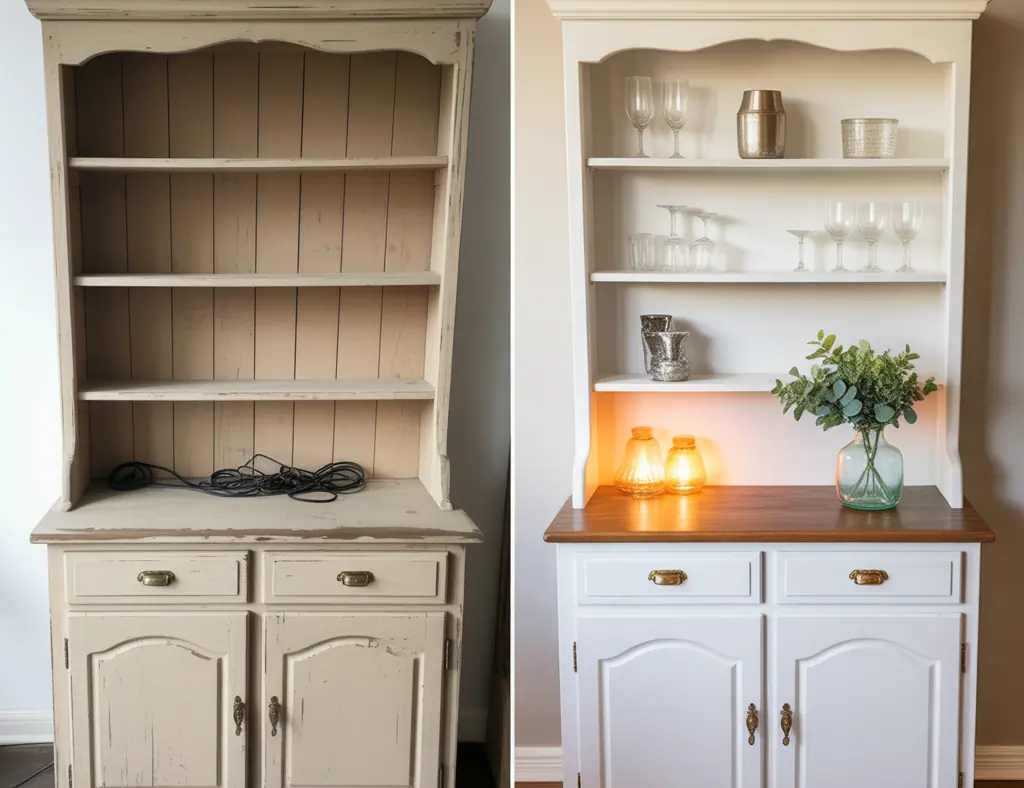
Have you ever stood in front of a tired family hutch and imagined a fresh, modern version of it — but felt overwhelmed by where to start? Whether it’s a handed-down antique, a thrift-store find, or a builder-grade cabinet, a hutch makeover before and after can completely change the look of a dining room or kitchen without breaking the bank. In this post I’ll walk you through realistic, step-by-step ideas, practical DIY tips, and inspiring design options so you can confidently tackle your own hutch transformation.
Why a Hutch Makeover is One of the Best DIY Upgrades
Refinishing or repainting a hutch is high-impact, low-cost home improvement. It’s a perfect weekend project that updates storage, showcases your style, and increases resale appeal. You’ll learn how to repair, paint, update hardware, add lighting, and style the finished piece for that dramatic before-and-after reveal.
Hutch Makeover Before and After: Step-by-Step Transformation
Below is a practical walkthrough you can adapt to any size or style of hutch.
1. Assess and Plan (30–60 minutes)
- Decide the purpose: display pieces, storage, or a bar cart replacement.
- Measure height, width, shelf depth for materials and accessories.
- Take “before” photos from several angles — great for progress shots and inspiration.
2. Gather Materials and Tools
Typical supplies:
- Sandpaper (120–220 grit) and sanding block or orbital sander
- Primer (shellac or bonding primer for glossy finishes), paint (chalk or latex), topcoat (polycrylic or satin polyurethane)
- Brushes, small foam roller, painter’s tape, drop cloth
- New hardware (knobs, pulls), LED puck lights or tape lighting
- Wood filler, wood glue, screwdriver, masking paper
3. Prep and Repair (1–3 hours)
- Remove doors, drawers, and hardware; label pieces so reassembly is easy.
- Fill chips/cracks with wood filler and sand smooth. For veneer issues, glue and clamp where possible.
- Degloss glossy finishes with light sanding or a liquid deglosser. Wipe clean with a tack cloth.
4. Prime and Paint (2–6 hours, plus drying)
Priming ensures adhesion and hides stains. Use a bonding primer for laminate or a shellac primer for tannin bleed on old wood. For paint choices:
- Chalk paint: minimal sanding, matte vintage look, easy to distress.
- High-quality latex: durable and smooth finish for modern looks.
- Milk paint: great for authentic antiquing when paired with a bonding agent.
Apply 2 thin coats of paint, sanding lightly between coats for a professional finish. Protect flat surfaces with polycrylic (water-based) if using latex or chalk paint for durability in a dining area.
5. Update Hardware and Lighting
Switching out knobs and pulls transforms the piece more than you’d expect. For mood and function, add under-shelf LED strips or battery puck lights — they’re easy to install and highlight dinnerware and décor.
6. Add Backing and Styling Touches
Replacing or painting the back panel can create contrast — try beadboard, wallpaper, or a dark stain for depth. Finish by staging with curated pottery, stacked books, and greenery. Take your “after” photos from the same angles as the originals to fully appreciate the change.
Design Ideas and Inspiration
Here are styling and color directions that work well for different aesthetics:
- Modern farmhouse: soft white or muted sage with black hardware and open shelving.
- Scandinavian: pale gray or cool white, simple knobs, minimal styling.
- Coastal: sea-glass greens or light blues, wicker accents, and natural textures.
- Glam: deep navy or emerald with gold pulls and mirrored or metallic back panel.
- Vintage chic: distressed chalk paint, antique brass knobs, layered plates and lace.
Practical Tips to Ensure a Successful Hutch Transformation
- Test paint colors in several lighting conditions before committing.
- Work in a ventilated area and use a respirator when sanding or using shellac prime.
- Label pieces and hardware so reassembly is quick and error-free.
- If the hutch is heavy, do painting in place for the top section and move base separately.
- Consider hiring an electrician for hardwired lighting; otherwise use battery-operated or plug-in options to keep it DIY-friendly.
Cost and Time Estimates
A typical hutch makeover before and after project can cost anywhere from $50 (paint and small hardware) to $400 (new hardware, lighting, premium paint). Most makeovers take one to three weekends depending on drying times and complexity.
Before and After Ideas for Different Budgets
Budget-Friendly Refresh ($50–$150)
- Clean, sand, paint with chalk paint, new knobs, and styling.
Mid-Range Upgrade ($150–$300)
- Quality primer and paint, new hardware, LED lighting, painted back panel.
High-End Transformation ($300+)
- Custom shelving, professional finish or spray painting, real wood veneer, and hardwired lighting.
Frequently Asked Questions
Q: Can I paint a hutch without sanding?
A: You can skip heavy sanding if you use a liquid deglosser and a bonding primer, or choose chalk paint that adheres well to many surfaces. However, light sanding between coats improves durability and finish.
Q: What paint is best for a hutch used in a dining area?
A: Use a durable paint like premium latex with a satin or semi-gloss topcoat, or chalk paint sealed with polycrylic. These finishes resist stains and are easier to wipe clean.
Q: How do I preserve an antique hutch’s value while updating it?
A: If the piece is a true antique, consider reversible updates: strip and refinish only if necessary, or use removable shelf liners and hardware. Document the original finish with photos and keep original hardware stored safely.
Final Thoughts: Embrace Your Own Hutch Makeover Before and After
A hutch makeover before and after isn’t just about paint — it’s about envisioning how a simple piece of furniture can shift the personality of a room. With a clear plan, the right materials, and a few afternoons of focused work, you can create a showpiece that looks professional and reflects your style. Ready to start? Browse project ideas and supplies, and try one small change this weekend.
Want more step-by-step projects and design inspiration? Check out our DIY projects, browse smart kitchen upgrades, or get fresh ideas from our home design ideas page.
Call to action: Grab your measuring tape and take that “before” picture — then commit to one small change this weekend. Share your hutch makeover before and after photos and tips to inspire others!