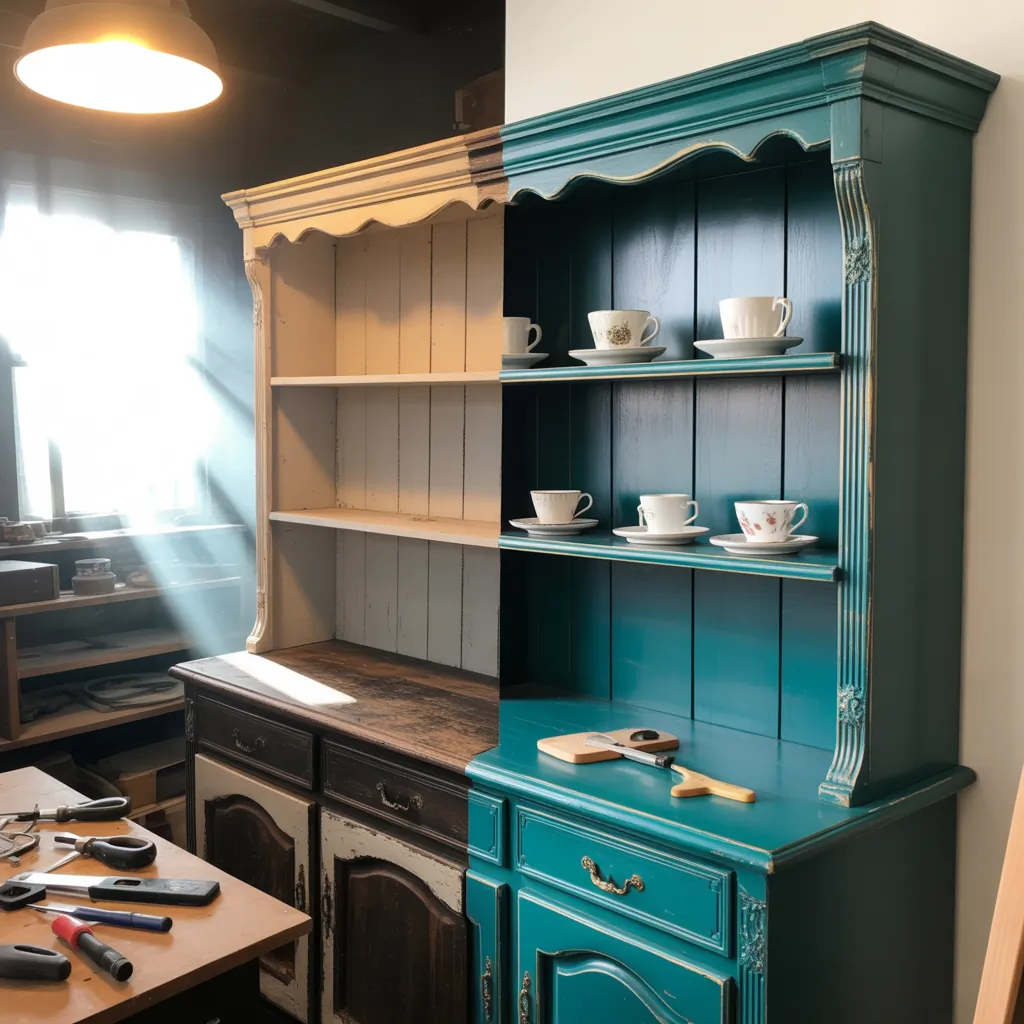
Ever stood in front of a dated hutch and wondered whether it’s worth keeping or tossing? Maybe it’s a family heirloom that doesn’t match your modern kitchen, or a thrift-store find that’s crying out for a refresh. If you’ve ever hesitated because the task seemed too big, you’re not alone. In this post you’ll see how a hutch makeover before and after can turn an eyesore into a showpiece with a few affordable steps, practical tips, and real-world DIY know-how.
Why a Hutch Makeover Before and After Is a Homeowner’s Best bang-for-buck
Updating a hutch is one of the highest-impact home improvement moves: it changes the room’s focal point, boosts storage functionality, and can dramatically improve resale appeal. Whether you’re aiming for a modern farmhouse revival, a sleek mid-century look, or a colorful statement piece, a well-executed hutch transformation gives you big visual returns for relatively low cost.
Common goals for a hutch transformation
- Modernize finishes and hardware
- Improve storage and organization
- Add lighting or glass doors for display
- Create a two-tone or accent piece for visual interest
Step-by-Step Hutch Makeover: From Before to After
Below is a practical, actionable plan to guide a successful hutch makeover, including materials, time estimates, and safety tips.
1. Prep and assess (1–2 hours)
- Empty the hutch and take clear “before” photos for comparison.
- Check the structure: tighten screws, glue any loose joints, and decide if doors or shelves need replacement.
- Remove hardware and glass shelves (label parts so reassembly is easy).
2. Surface prep and repair (2–4 hours)
- Sand glossy finishes lightly to create a tooth for paint; use 120–150 grit for initial sanding, then 220 grit for smoothness.
- Fill dents and holes with wood filler, let dry, then sand smooth.
- Wipe down with a tack cloth to remove dust.
3. Paint, stain, or glaze (4–8 hours, including dry time)
Choose your finish based on the look you want:
- Chalk paint for a quick, no-primer option that sands back nicely for a distressed look.
- Milk paint for authentic vintage vibes.
- Latex paint with a bonding primer for high-traffic pieces and durability.
- Stain and polyurethane for a classic wood finish.
4. Hardware, lighting, and shelving updates (1–3 hours)
- Swap dated knobs for metal or ceramic pulls to instantly modernize.
- Install LED strip lights or puck lights to highlight display items and create a warm after-dark glow.
- Consider glass or mirrored backs to make items pop and visually enlarge the space.
5. Styling the after (1–2 hours)
Group items in odds, layer with trays, and mix textures. Use matching sets for cohesion and a few statement pieces to draw the eye. Photograph your finished hutch for the full “before and after” reveal—this is a great motivator and helpful for sharing your work.
Design Ideas and Inspiration for Your Hutch Makeover
Here are some popular directions to inspire your project and fit different budgets and styles.
Two-tone hutch
Paint the exterior a neutral shade and the interior a bold color to create depth. This “accented interior” method works well for showcasing dishware or collectibles.
Modern minimalist
Slim hardware, matte black or soft gray paint, and open shelving make an old hutch feel contemporary. Add concealed LED lighting for a museum-quality display.
Rustic farmhouse
Distress chalk paint lightly, add weathered hardware, and replace shelves with reclaimed wood for cozy charm.
Practical Tips and Real-World Advice
- Test paint colors on an inconspicuous area and view them at different times of day.
- If selling later, keep hardware you remove—originals can increase value for collectors.
- Use painter’s tape and drop cloths to protect floors and adjacent furniture.
- Invest in a good bonding primer if the current finish is glossy—this prevents peeling.
- For a budget-friendly refresh, swap knobs and add new lighting before committing to paint.
Before and After: Measuring Success
Beyond the visual satisfaction, measure your makeover’s success by:
- Functionality: Are drawers and shelves more usable?
- Durability: Does the finish stand up to daily use?
- Room cohesion: Does the updated hutch enhance the overall design of the space?
Hutch Makeover Before and After — Common Mistakes to Avoid
- Skipping prep: Paint adheres poorly to glossy surfaces without proper sanding or primer.
- Using the wrong brush: Foam rollers and high-quality angled brushes give smoother results than cheap brushes.
- Ignoring scale: Oversized hardware can overwhelm a delicate piece—measure before you buy.
Frequently Asked Questions
1. How long does a typical hutch makeover take?
Most DIYers can complete a basic paint-and-hardware update in a weekend (2–3 days with drying time). More extensive repairs, staining, or added lighting may extend the project to a week.
2. Can I paint a hutch without stripping it?
Yes—if you properly sand glossy finishes and use a good bonding primer. Chalk paint also adheres well with minimal prep, but solid adhesion and longevity are best achieved with proper sanding and priming.
3. What are inexpensive ways to get a dramatic before-and-after?
Swap hardware, paint a pop-color interior, add lighting, or apply decorative wallpaper to the back panels. These small changes create a big visual impact without breaking the bank.
Conclusion — Ready to Reveal Your Own Hutch Makeover Before and After?
Transforming a hutch is one of the most satisfying and cost-effective DIY projects. With the right prep, paint, and styling choices you can produce a dramatic hutch makeover before and after that elevates your entire room. If you want more project ideas, check out our DIY projects page for step-by-step tutorials or browse home design ideas and kitchen upgrades to match your new hutch to a refreshed space. Ready to start? Take your before photo, pick a paint swatch, and let your creativity lead the way—then share your reveal to inspire others!