Have you ever stared up at your plain dining-room chandelier and wondered how to turn it into a show-stopping Halloween focal point without rewiring the house or spending a fortune? The right halloween chandelier concept can transform an ordinary room into a moody, memorable haunted scene with just a few supplies, smart lighting choices, and some creative flair. Whether you’re prepping for a Halloween party, setting the mood for trick-or-treaters, or staging seasonal home decor, this guide will walk you through practical DIY tips, design inspiration, and real-world advice to get the job done.
Halloween chandelier concept: design ideas and inspiration
Before you start, pick a style that fits your space and skill level. Below are a few spooky-but-stylish concepts that work well for entryways, dining rooms, and porches.
Spooky styles to consider
- Victorian Gothic: Dark ribbons, faux crows, and candle-style LED bulbs for an elegant haunted-mansion vibe.
- Spider Web Centerpiece: Stretch fake cobwebs across the frame, add plastic spiders, and hang a few dangling spider ornaments for drama.
- Ghost Mobile: Lightweight cheesecloth ghosts suspended from the chandelier arms for a whimsical, floating effect.
- Pumpkin & Harvest Chic: Mini faux pumpkins, dried leaves, and warm amber string lights for a cozy autumnal aesthetic.
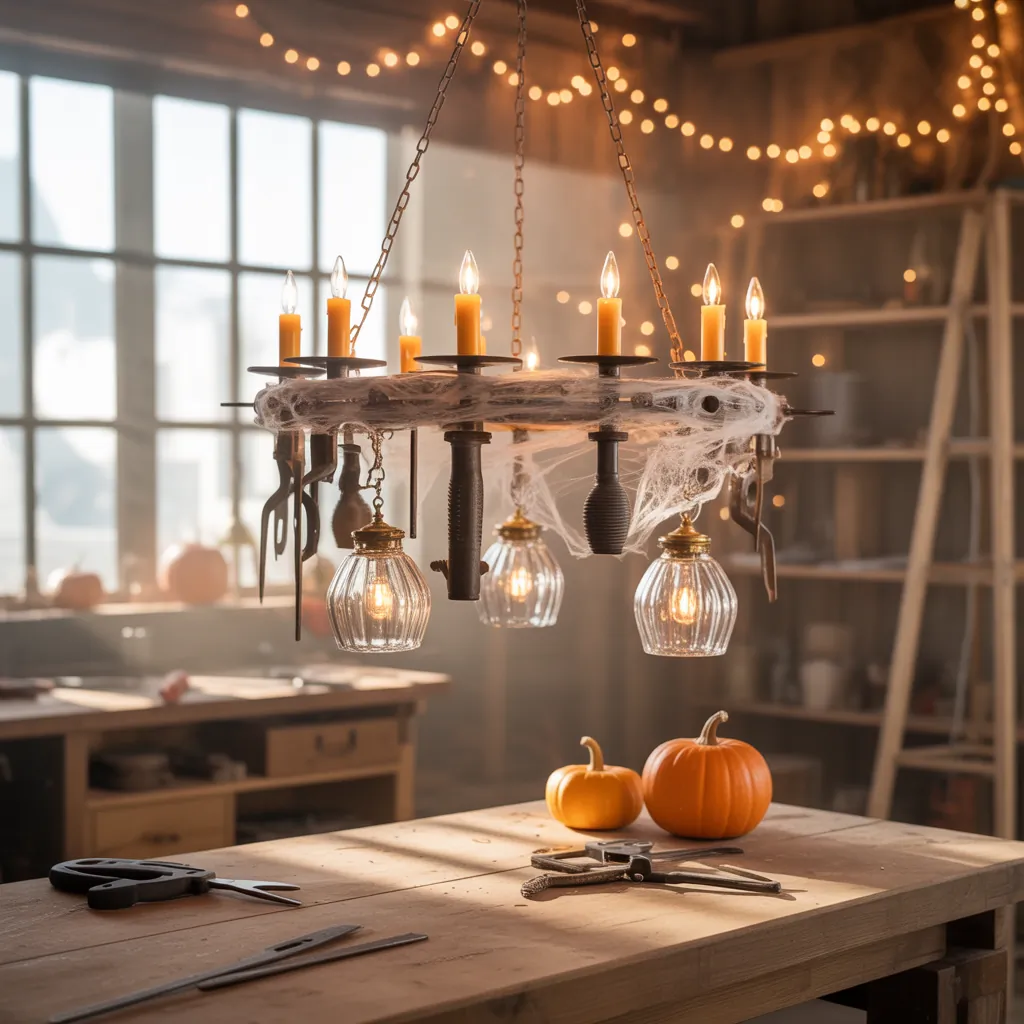
- Industrial/Upcycled: Swap glass shades for mason jars, add Edison bulbs, and incorporate rusted metal accents for an eerie industrial look.
DIY Halloween chandelier: step-by-step tutorial
This easy step-by-step will walk you through a safe, removable Halloween chandelier makeover suitable for renters and homeowners alike.
Materials (budget-friendly options)
- Battery-operated LED candle bulbs or LED string lights (warm white or colored)
- Battery packs or portable dimmer (avoid cutting into fixtures)
- Fake cobwebs, faux spiders, faux ravens/ghosts
- Zip ties, floral wire, or fishing line
- Hot glue gun and glue sticks (use sparingly — see removal tips)
- Lightweight ornaments: mini pumpkins, skulls, plastic bats
- Optional: spray paint (matte black, pewter) for upcycled thrift chandeliers
Step-by-step process
- Plan your design: Sketch a simple layout—what will hang from each arm, where lights will sit, and how heavy items will be. Keep decorations lightweight to avoid stressing the fixture.
- Power down: Turn off power at the switch before adding anything near live bulbs. For safety and simplicity, favor battery LED bulbs or clip-on lights.
- Attach primary elements: Use floral wire or zip ties to secure larger decorations to chandelier arms. Wrap wire neatly and tuck ends to prevent scratching the finish.
- Add atmospheric lighting: Replace existing bulbs with warm LED candle bulbs or weave micro-LED string lights around the canopy. Use a remote or battery pack to control brightness.
- Layer texture: Drape a bit of fake cobweb strategically—less is more. Stick spiders into the web with thin wire or glue dots rather than hot glue on the fixture itself.
- Final safety check: Ensure nothing touches hot bulbs, cords are secure, and decorations don’t swing into walls or people walking beneath.
- Test the impact: Dim the main lights, switch on your chandelier, and tweak placement until the shadows and highlights create the desired spooky effect.
Placement, lighting tips, and decorating hacks
How you light and place your chandelier decorations makes all the difference in mood and safety.
Lighting tips
- Use LED bulbs to minimize heat. LEDs allow you to use fabric and lightweight materials safely around light sources.
- Opt for warm amber for classic ambiance, cool blue or green for eerie effects, or colored bulbs for playful themes.
- Consider a dimmer or remote-controlled battery packs to vary intensity throughout the evening.
- Layer additional uplights or spot lamps to create spine-tingling shadows on the ceiling and walls.
Placement hacks
- Hang a bold Halloween chandelier over your dining table to anchor a themed dinner party—coordinate centerpieces with the fixture for a cohesive look (see kitchen upgrades for dining area ideas).
- For entryways, keep elements at least seven feet above floor level to avoid low-hanging hazards for guests and kids.
- On a covered porch, use weatherproof materials and secure decorations against wind. Battery-powered lights are your friend here.
Budget-friendly and upcycled variations
You don’t need to buy a brand-new fixture to create a stunning Halloween chandelier. Upcycling and thrifty finds are perfect for creative concepts.
- Thrift-store makeover: Spray paint an old brass fixture matte black and add faux bones and spider accents for a pirate-ship look.
- Embroidered hoop chandelier: Use 3–4 embroidery hoops wrapped with black tulle and hung from a central fixture to create a layered ghost effect.
- Wine bottle pendant cluster: Clean empty wine bottles, insert string lights, and cluster them together for a rustic, haunted-vineyard chandelier.
For step-by-step inspiration and other weekend-friendly transformations, check out more DIY projects and home design ideas that pair well with seasonal decor.
Frequently Asked Questions
Yes—if you follow basic safety rules. Use only cool LED bulbs, keep fabric and flammable materials away from direct bulb contact, and secure all decorations so they won’t fall. Avoid permanent adhesive on the fixture’s finish; use removable options like wire, zip ties, or adhesive putty.
Absolutely. Battery-operated LED candles and string lights make it easy to achieve dramatic lighting without any electrical modifications. You can also retrofit plug-in fairy lights with a hidden battery pack for cordless operation.
Work slowly: cut zip ties, unwind floral wire, and peel off adhesive gently. Use a soft cloth to remove residue and a mild cleaner for stubborn spots. If you’re worried about finishes, test cleaners on an inconspicuous area first.
Conclusion — Bring your halloween chandelier concept to life
Transforming your overhead light into a memorable Halloween centerpiece is an affordable, high-impact way to boost seasonal curb appeal and host unforgettable gatherings. With a clear design plan, safe lighting choices, and a few DIY techniques—like upcycling, layering LEDs, and securing elements properly—you can create a spooky chandelier that fits your style, space, and budget. Ready to try it this season? Grab some LEDs, raid the thrift store, and start building your own halloween chandelier concept today. If you want more project ideas, browse our DIY projects and home design ideas pages for inspiration.