Ever stood in your backyard on a sunny Saturday, holding a cold drink and thinking, “I wish my grill setup was actually enjoyable to cook from”? Whether you struggle with cramped counter space, soggy charcoal storage, or a lackluster entertaining area, transforming a corner of your yard into a functional and beautiful grill station is one of the best DIY upgrades for home life.
Why a dedicated outdoor grill station matters
A well-designed outdoor grill station changes summer cookouts from chaotic to effortless. It gives you prep space, storage for tools and fuel, better flow between kitchen and patio, plus a focal point for gatherings. From a budget-friendly cart to a full built-in backyard kitchen, there are grill station outdoors ideas for every skill level and lot size.
Top grill station outdoors ideas for any backyard
Use these practical ideas and step-by-step tips to plan a functional setup that matches your style and budget.
1. Compact grill cart for small spaces
Perfect for apartment patios or small yards. A DIY grill cart gives mobility and base storage without major construction.
- Materials: treated lumber or exterior-grade plywood, marine-grade casters, stainless steel top or sealed butcher block, paint or sealant.
- Steps: measure grill footprint → build a sturdy frame → add shelves and hooks for tools → install weatherproof top → seal and paint.
- Tip: Add a roll-out drawer lined with a shallow tray to store charcoal or grilling tools neatly.
2. Built-in stone or brick grill island
For a durable, permanent solution that ups your home value. Use concrete block core with a natural stone or brick veneer for a professional look.
- Layout: plan for a grill insert, prep counter, storage cabinet, and trash pull-out.
- Construction tips: build a level concrete pad first, use metal framing around the grill cutout, seal stone with outdoor-rated sealer.
- Pro tip: add a sink or mini-fridge if plumbing and electricity are accessible—this elevates the space into a true outdoor kitchen.
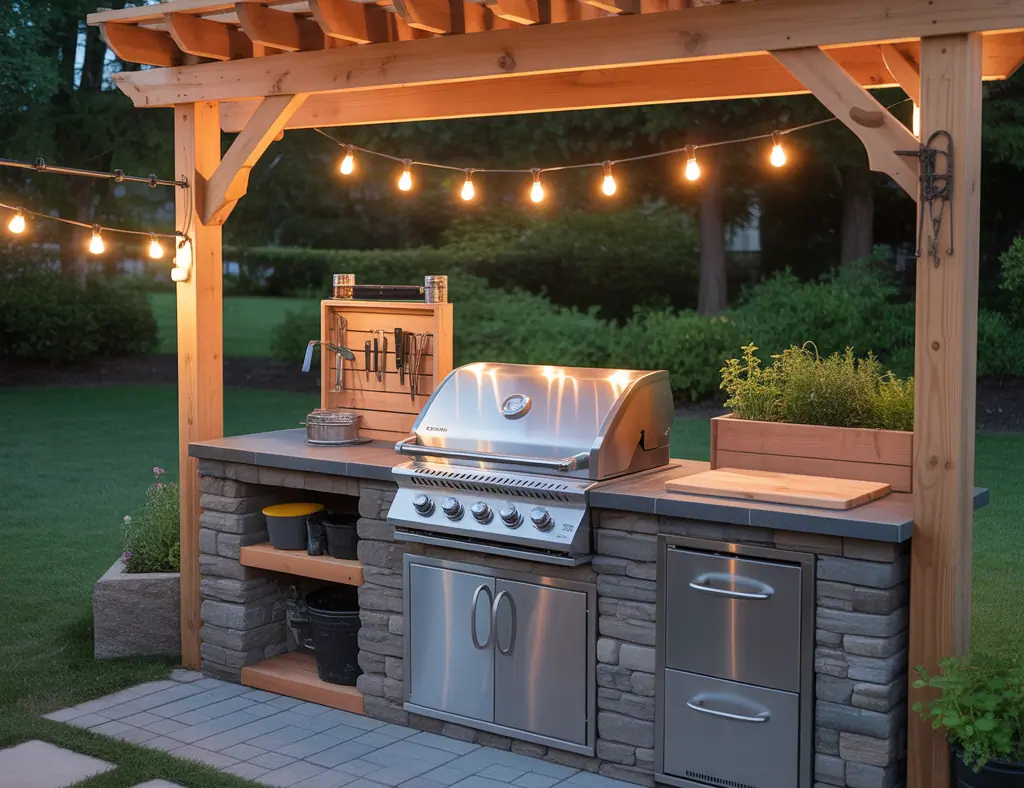
3. Pergola-covered grill station with lighting
Create a shaded, cozy grilling area with a pergola or overhead slatted roof. It’s stylish and practical for daytime cooking.
- Lighting: string lights, integrated LED task lights over the prep area, and pathway lighting for safety.
- Ventilation: position the pergola so smoke drifts away from seating; consider a stainless-steel hood for heavy grilling.
- DIY tip: stain or paint the pergola to match your house trim for cohesive design.
4. Portable modular outdoor kitchen
Combines flexibility with more features than a simple cart. Think modular cabinets on wheels that can be reconfigured seasonally.
- Modules: prep counter, gas grill module, storage module, fridge module.
- Benefit: swap or upgrade modules over time without rebuilding the whole station.
Design details that make a grill station great
Small choices add up. Consider these elements when planning your grill station outdoors ideas.
Countertops and materials
Use heat-resistant materials near the grill—stainless steel, concrete, or stone. For wood tops, keep them as side prep areas and seal them for weather resistance.
Storage and organization
Pull-out drawers, magnetic tool racks, and labeled bins keep utensils, rubs, and propane organized. Protect charcoal in a sealed bin to keep it dry and critter-free.
Safety and permits
Check local codes before installing gas lines or electrical. Keep non-combustible materials within 3 feet of the grill and maintain a clear path to your home exits.
Step-by-step mini project: Build a budget-friendly outdoor grill prep station (weekend project)
- Plan: measure your grill and available space; sketch a 4-foot-wide station with one shelf and top prep area.
- Materials: 2×4 treated lumber, exterior plywood, 4 casters, stainless steel sheet for top, screws, exterior paint or stain.
- Build: cut and assemble the frame → attach plywood shelves → install caster wheels → fasten stainless top → sand, seal, and paint.
- Finish: add hooks for tools, a small paper towel holder, and a magnetic spice rack for quick access.
Lighting, seating and ambiance
Good lighting helps nighttime cooking; dimmable LEDs and task lighting are ideal. Arrange seating so guests face the grill but don’t crowd the chef. Add plants, outdoor rugs, and a sound source (weather-resistant speaker) to complete the entertaining area.
Cost breakdown and budget tips
Expect a range from under $300 for a DIY cart to $5,000+ for a mid-range built-in island. Save money by:
- Repurposing materials (old cabinets or stone pavers).
- Installing modular units in phases instead of all at once.
- Choosing a high-quality grill but lower-cost finishing materials that can be upgraded later.
Frequently Asked Questions
1. What is the best location for a grill station outdoors?
Choose a flat, stable area close to your indoor kitchen for easy food transport but far enough from house eaves and flammable materials. Consider wind direction and neighbor sightlines for smoke and privacy.
2. Can I DIY install a gas line for my built-in grill?
Gas line installation often requires a licensed professional and may need permits. For safety and code compliance, hire a plumber or gas technician unless your local regulations explicitly allow homeowner installations.
3. How do I protect my outdoor grill station from weather?
Use exterior-grade materials, waterproof sealants, and covers. Store cushions and small appliances indoors when not in use. Consider a roofed pergola or retractable canopy for extra protection.
Conclusion — ready to build your dream grill station outdoors ideas?
Whether you’re tackling a weekend DIY cart or planning a full built-in backyard kitchen, these grill station outdoors ideas will help you design a space that’s functional, safe, and inviting. Start with a clear plan, pick durable materials, and phase your project to fit your budget. Want more project plans and inspiration? Check out our DIY projects page and browse home design ideas for layout tips and finishes. If you’re thinking kitchen upgrades, consider how an outdoor station can complement your indoor flow.
Ready to get started? Grab a notepad, sketch your layout, and try a simple prep cart this weekend — then share your progress and questions in the comments to get personalized tips.