Have you ever stood at your kitchen island surrounded by half-unrolled paper, tangled ribbon, and a stack of mismatched gift boxes wondering how the pros make every present look magazine-ready? If your holiday gift station looks more chaotic than chic, you’re not alone — and you don’t need a professional to achieve elegant Christmas gift wrapping. With a few easy materials, consistent color choices, and a couple of go-to techniques, you can transform last-minute presents into beautiful, polished packages.
Why elegant gift presentation matters (and how it improves your home holiday)
Presentation sets the mood for the holiday. A coordinated stack of well-wrapped gifts elevates your mantel, complements your tree, and makes guests feel special. Beyond aesthetics, thoughtfully wrapped gifts show care and attention — a small home improvement that has big emotional returns. Whether you’re aiming for minimalist holiday wrapping, luxury holiday wrapping ideas, or sustainable options, the principles are the same: clean lines, quality textures, and purposeful embellishments.
Elegant Christmas Gift Wrapping: Materials and Color Palettes
Start by curating a small kit of reliable supplies. Keeping materials consistent is the fastest way to achieve a cohesive, elegant look across many presents.
- Paper: Kraft paper, heavyweight matte paper, or linen-textured wrapping paper in 1–2 colors.
- Ribbons & trims: Velvet ribbon, satin, grosgrain, or natural twine for a rustic-luxe feel.
- Embellishments: Dried orange slices, cinnamon sticks, small pine sprigs, metallic tags, and wax seals.
- Tools: Sharp scissors, a metal ruler, double-sided tape, a bone folder (or back of a spoon), and gift tags.
Color palettes that read as elegant: neutral + metallic (ivory + gold), deep jewel tones (emerald, navy) with matte black, or monochrome white with natural accents. Keep prints minimal — a single patterned paper among several solids creates balance without busy-ness.
Step-by-step: How to achieve elegant Christmas gift wrapping
1. Prep your workspace
Clear a flat surface, lay down a cutting mat or clean cardboard, and arrange materials within arm’s reach. Good lighting helps you see crisp edges and neat folds.
2. Measure and cut like a pro
Place the gift face-down on the paper. Pull the paper up across the longer side with about an inch overlap. Use the ruler to align and cut a single, straight piece — fewer seams equals a cleaner result.
3. Fold crisp edges
Use a bone folder or the back of a spoon along each edge to create sharp creases. Tuck the sides in with neat 45-degree folds and secure with double-sided tape so no sticky tape is visible from the outside.
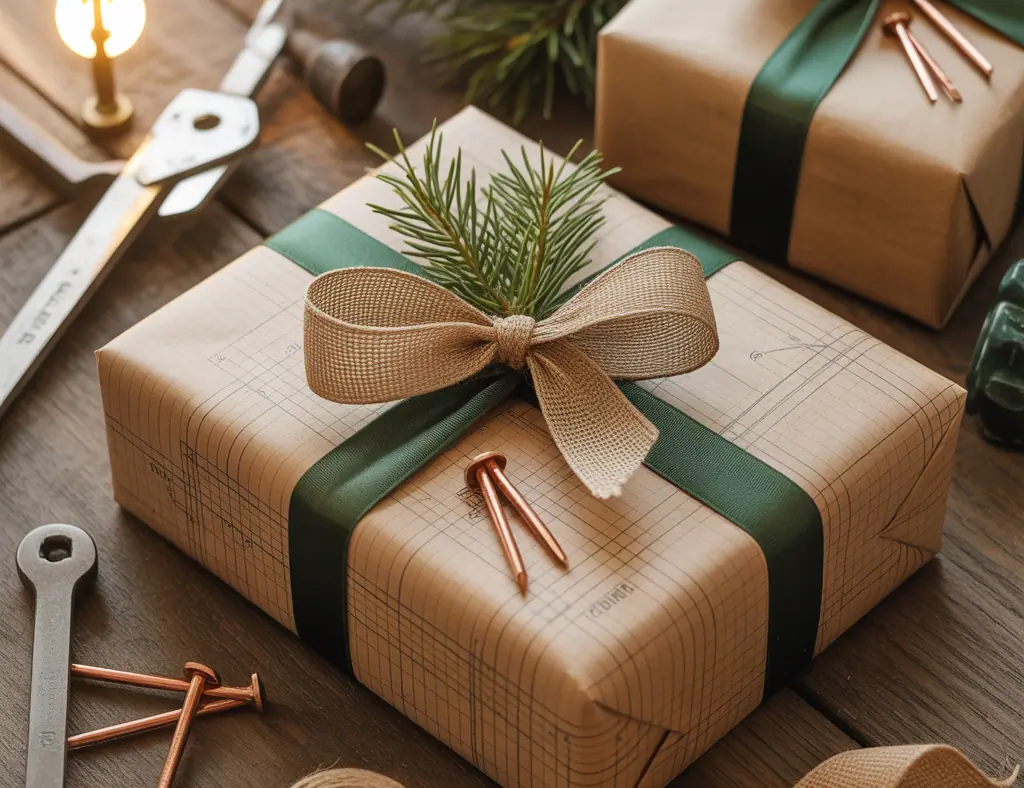
4. Add ribbon and anchors
Wrap ribbon around the box with minimal overlap. For a high-end look, use a single wide velvet ribbon or stack narrow ribbons in complementary colors. Anchor natural elements (like a sprig of fir) under the knot or secure with hot glue for heavier items.
5. Finish with a signature touch
Top each gift with a consistent embellishment — a wax seal, a stamped kraft tag, or a small ornament. When all presents share one signature element, the whole collection reads as intentional and elegant.
DIY embellishments and finishing touches
Embellishments make your wrapping memorable. Here are a few simple DIY projects you can complete in 10–30 minutes:
- Handmade gift tags: Cut kraft or heavy cardstock into tags, punch a hole, and add hand-lettered names or a stamped motif.
- Homemade wax seals: Use sealing wax and a simple brass stamp for a vintage touch — or press a pressed leaf into soft clay and paint metallic for a custom seal.
- Stamped paper: Carve a simple rubber stamp (even an eraser stamp will do) and repeat a small motif across plain paper for a bespoke patterned look.
- Fabric bows & furoshiki: For a zero-waste option, wrap gifts with scarves or cotton cloth. Learn a few furoshiki knots to secure odd shapes beautifully.
Techniques for awkward shapes and sustainable wrapping
Not every gift is a neat rectangle. Here are practical solutions:
- Pouches and boxes: Place fragile or odd-shaped items in tissue-lined boxes or fabric pouches, then wrap the box for a clean silhouette.
- Basket presentation: Arrange several small items in a woven basket, wrap the whole thing in cellophane or cloth, and decorate with a bow.
- Sustainable alternatives: Use kraft paper, reusable fabric wrap, reusable tins, or decorative tea towels. Natural twine and foraged greenery are environmentally friendly and elegant.
Design inspiration: four looks you can copy
Pick a style and repeat it across all gifts to create a striking display.
- Minimal Modern: White matte paper, black grosgrain ribbon, gold foil name tags.
- Rustic Elegance: Kraft paper, natural twine, pine sprigs, and a cinnamon stick.
- Vintage Luxe: Deep green paper, velvet ribbon, wax seal, and a small brass charm.
- Scandinavian Minimal: Neutral papers, monochrome stamped motifs, and plain cotton ribbon.
Practical tips from the DIY workshop
- Keep a “wrapping station”: a rolling cart or a drawer with paper rolls, ribbons, scissors, and tape. It saves time and keeps you organized.
- Use double-sided tape for invisible seams and a cleaner presentation.
- Measure just once and cut with confidence — shaky cuts waste paper. A sharp blade is worth the investment.
- Batch your work: cut all papers at once, fold all boxes, then add ribbons and embellishments in a final pass.
Frequently Asked Questions
Q: How can I make inexpensive wrapping look expensive?
A: Choose a limited color palette, use high-quality trims (velvet ribbon or wax seals), and apply clean folding techniques. Consistent embellishments across gifts create a luxe, curated look even with budget paper.
Q: What’s the best way to wrap odd-shaped items?
A: Place them in a sturdy box or fabric pouch first. For very irregular items, try a decorative box or basket, then wrap that container for a clean, elegant result.
Q: Are there eco-friendly alternatives that still look elegant?
A: Absolutely. Kraft paper, reusable fabric wraps (furoshiki), decorative tins, and simple natural accents like dried citrus and twine offer a refined look and reduce waste.
Final thoughts and next steps
Elegant Christmas gift wrapping is less about expensive supplies and more about consistent choices, clean technique, and thoughtful finishing touches. Set up a simple wrapping station, choose one cohesive color story, and practice a few folds and ribbon styles — you’ll be surprised how quickly your skills improve. Want more hands-on inspiration? Check out our DIY projects page for seasonal crafts and quick gift-making ideas, or browse home design ideas to coordinate your wrapping with your holiday decor.
Ready to upgrade your holiday presentation? Gather your supplies and try one new technique tonight — then share a photo of your elegant Christmas gift wrapping to inspire others. Happy wrapping!