Ever opened a cluttered cabinet and thought, “There has to be a better way”? If your pots slide, spices topple and counter space disappears, you’re not alone — a smart kitchen rack can change everything. In this article I’ll walk you through creative, practical and easy-to-build designs for kitchen rack that save space, look great, and fit any budget.
Why choosing the right kitchen rack matters
Storage in the kitchen isn’t just about making room — it’s about making daily routines smoother. The right kitchen rack improves accessibility, protects fragile items, and complements your décor (modern industrial, rustic farmhouse, minimalist or traditional). Whether you want a wall-mounted pot rack, a freestanding spice organizer or an over-the-sink shelf, the design you choose can transform how your kitchen functions.
Top designs for kitchen rack — quick overview
Below are several popular rack styles, with best uses and design inspiration:
- Wall-mounted pot rack — Great for saving cabinet space, displays cookware, works with hooks or rails.
- Over-the-sink shelf — Adds drying space and extra storage for soaps, plants, or frequently used items.
- Freestanding tiered rack — Flexible for countertops or pantries; ideal for spices, oils, and mugs.
- Pipe-and-wood industrial rack — Sturdy and stylish for hanging pans and utensils; pairs well with open shelving.
- Corner carousel or lazy susan — Maximizes awkward corners inside cabinets or on counters.
DIY plan: Build a simple wall-mounted wooden kitchen rack (Beginner)
This classic project gives you a warm, functional shelf for mugs, plates, or spices.
Materials & tools
- One 2″x10″ pine board (length to suit wall, typical 36″–48″)
- Two heavy-duty shelf brackets
- Sandpaper, wood stain or paint, clear polyurethane
- Stud finder, level, drill, screws, wall anchors
Step-by-step
- Measure and mark where the rack will go. Use a stud finder to locate studs and plan bracket placement.
- Cut the board to length if needed, sand edges, and apply stain or paint. Let dry fully, then seal with polyurethane.
- Mount brackets to studs (or use heavy-duty anchors) and attach the shelf with screws from the top.
- Optional: attach a small dowel or rail under the front edge for hanging mugs or towels.
Time: 1–3 hours. Cost: $25–$70. Difficulty: Easy.
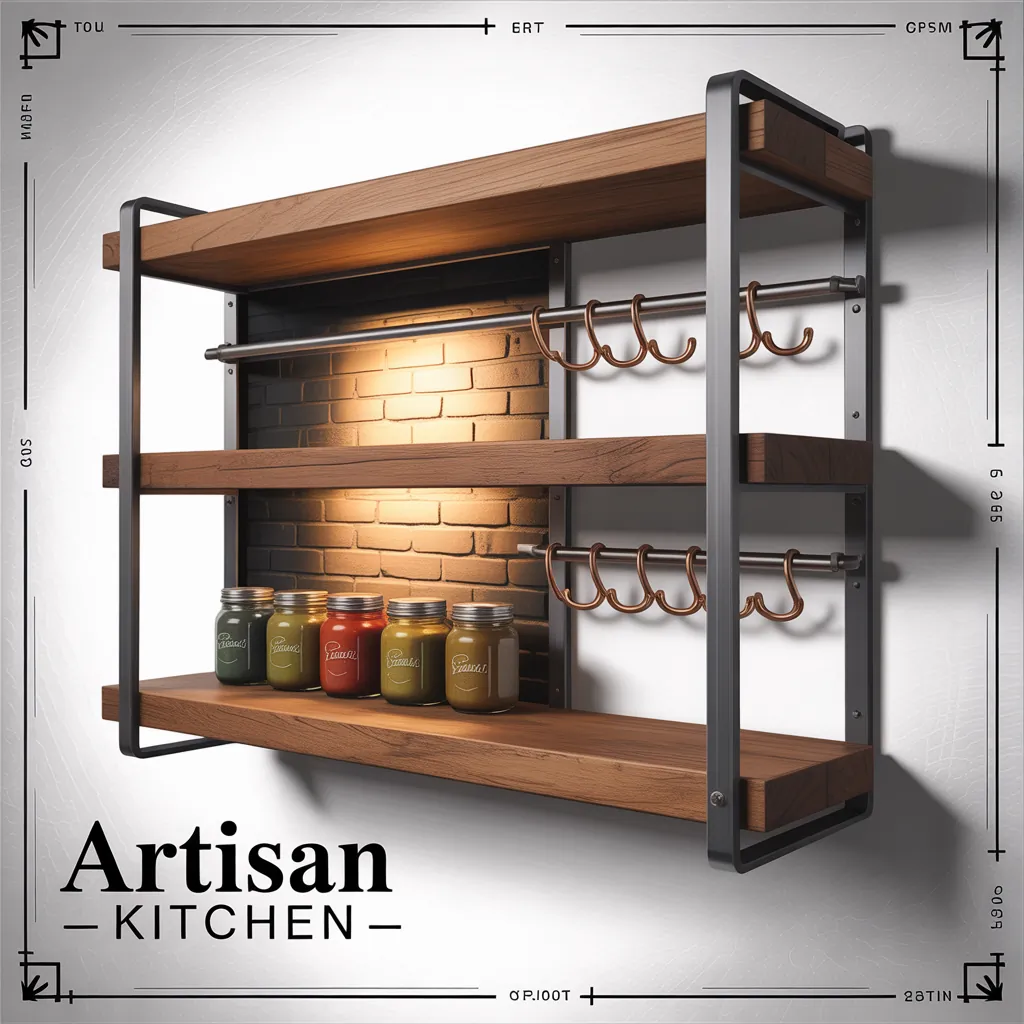
DIY plan: Industrial pipe rack for pots and pans (Intermediate)
For a modern loft look, combine black iron pipes and reclaimed wood. This design supports heavy cookware and becomes a focal point.
Materials & tools
- Reclaimed wood shelf, black iron pipe fittings (flanges, pipes, elbows)
- Heavy-duty hooks for hanging pots, wood sealer, drill and masonry anchors if mounting to brick
Step-by-step
- Assemble the pipe frame on the floor to size. Attach flanges to the wood shelf where the pipes will sit.
- Secure flanges to the underside of the shelf with bolts. Pre-drill holes in wood.
- Mount the finished unit to wall studs (or ceiling joists for a hanging rack). Use anchors rated for weight if studs aren’t available.
- Add S-hooks and hang cookware. Tip: distribute heavy items across multiple hooks to avoid overloading one anchor point.
Time: 3–6 hours. Cost: $60–$200 depending on materials. Difficulty: Medium.
Small-space solutions: Freestanding and over-the-counter racks
If drilling isn’t an option, a freestanding or clip-on rack can increase storage without permanent changes.
- Compact spice ladder: narrow, tiered shelf that fits between fridge and counter.
- Over-the-sink drying shelf: helps clear countertops and keeps dish soap accessible.
- Rolling cart with rack attachments: mobile storage that can act as extra counter space.
Practical tips for choosing and installing your kitchen rack
- Match scale to the room: oversize racks can overwhelm small kitchens; choose slim profiles for compact areas.
- Mounting matters: always anchor heavy racks to studs or use high-quality toggle anchors. For ceiling-mounted pot racks, secure to joists.
- Protect finishes: use sealants on wood near sinks; choose rust-resistant metals in humid kitchens.
- Think ergonomics: place everyday items within easy reach—reserve higher shelves for seasonal or decorative pieces.
- Weight limits: check bracket and anchor ratings. Distribute weight across multiple supports to avoid sagging.
Design inspiration: styles that work well with kitchen racks
Consider these aesthetics when planning a rack to complement your kitchen:
- Modern minimalist: sleek metal rails, slim floating shelves, neutral finishes.
- Industrial: black pipe fittings, reclaimed wood, exposed hardware.
- Farmhouse: whitewashed wood, open cubbies, enamel hooks.
- Contemporary: glass shelves with chrome brackets for a light, airy feel.
Budgeting and materials: get more for less
Repurpose materials to lower costs: old pallet boards become rustic shelves, surplus pipes from hardware stores can create a professional look for less. Shopping at thrift stores and salvage yards often yields unique brackets and hooks. Always factor in hardware, sealants and anchors when estimating costs.
Maintenance and longevity
Clean racks regularly to avoid grease build-up. For wooden racks, reapply sealant every 1–3 years depending on use. Tighten screws and check anchors seasonally. For metal racks, wipe with a damp cloth and treat minor rust spots promptly with a rust remover and protective paint.
Frequently Asked Questions
Q: What is the best material for a kitchen rack?
A: It depends on function and style. Solid hardwoods are durable and warm, metal (stainless or powder-coated) is best for heavy cookware and humid environments, and reclaimed wood gives character. Combine materials (wood + metal) for a balanced look.
Q: How do I know if my wall can support a heavy pot rack?
A: Use a stud finder to locate studs and mount flanges or brackets directly into them. If studs aren’t available where you need them, use heavy-duty toggle anchors rated for the expected weight. When in doubt, consult a professional for ceiling-mounted or very heavy installations.
Q: Can I make a kitchen rack without drilling into walls?
A: Yes. Freestanding racks, rolling carts, adhesive-mounted shelves (for light items), and over-the-sink shelves are good no-drill options. Ensure they’re stable and don’t tip when loaded.
Conclusion: start building your perfect kitchen rack today
Designs for kitchen rack range from ultra-simple floating shelves to statement-making industrial pipe systems. Choose a style that fits your storage needs, skill level and kitchen aesthetic, and follow basic mounting and maintenance tips to ensure a durable, functional result. Ready to tackle a project? Check out more ideas on our DIY projects and browse modern solutions at our kitchen upgrades and home design ideas pages to find the perfect plan.
Want a custom plan or material list for your space? Leave a comment or try one of the step-by-step projects above — then share a photo of your finished rack to inspire other readers!