Have you ever pulled into your driveway and wished arriving home felt a little more grand — or a lot easier in winter? Maybe turning around on a narrow street is a daily headache, or your curb appeal could use a boost. Designing a circular driveway can transform function and form, giving you smooth access, extra parking, and a striking first impression. In this guide you’ll find practical, step-by-step advice, design inspiration, and DIY tips to plan and install a loop or horseshoe driveway that fits your property and budget.
Why choose a circular driveway?
Circular driveways (also called loop or horseshoe driveways) are ideal for properties with enough frontage to accommodate a smooth curve. Benefits include:
- Easy vehicle entry and exit — no backing out onto busy roads.
- Improved curb appeal and a focal point for landscaping.
- Extra parking for guests without blocking the street.
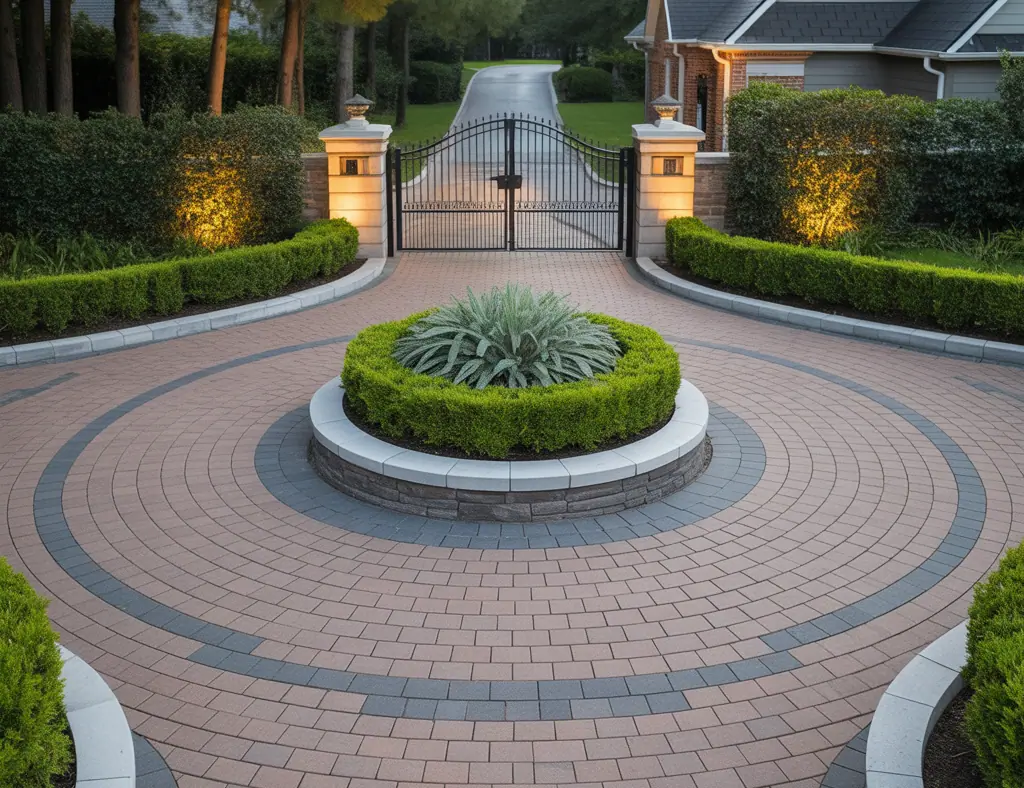
- Opportunity for a central island for plants, lighting, or a fountain.
Types of circular driveway layouts
Single-lane loop
Best for smaller lots where traffic is light. Typically 10–12 feet wide for one car to comfortably travel.
Double-lane (two-way) loop
Allows passing and comfortable two-way traffic. Plan for 20–24 feet of width (two 10–12 foot lanes).
Horseshoe with separate in/out lanes
Two distinct entrances and exits create a formal appearance and smooth traffic flow. Great for larger properties and frequent visitors.
How to design circular driveway layout ideas for your property
Use this checklist to plan your layout before switching to heavy equipment. Thoughtful planning prevents costly mistakes.
- Measure and mark: Use stakes and string or spray paint to outline the loop, driveway width, and central island. A simple method: tie a string to a center stake and walk around at the desired radius, keeping the line taut to mark a perfect curve.
- Account for turning radii: Most passenger cars need tighter turns, but allow wider radii (15–25 feet) if you expect trucks, delivery vans, or snow plows. If in doubt, test with your vehicle using cones.
- Check grades and drainage: Keep driveways sloped 1–2% away from structures to prevent ponding. Plan drainage swales, permeable pavers, or buried drains if needed.
- Verify setbacks and permits: Local codes may restrict curb cuts, distances from property lines, or require permits. Consult your municipality early.
- Choose materials: Select from asphalt, concrete, pavers, or gravel based on budget, aesthetics, and maintenance preferences (see material pros/cons below).
- Plan for maintenance: Consider snow removal access, edging for gravel, and future resurfacing needs.
Materials: pros, cons, and design tips
- Asphalt: Cost-effective and smooth for driving. Needs periodic sealing and can soften in extreme heat.
- Concrete: Durable and low-maintenance; offers stamped or stained finishes for style. Higher upfront cost.
- Pavers: Highly customizable with color and pattern; excellent for creating a formal entrance. Easier to repair but costlier to install.
- Gravel: Budget-friendly and permeable. Requires edging and periodic raking; not ideal for steep slopes.
- Permeable pavers: Environmentally friendly option for improved stormwater management.
DIY step-by-step: Installing a basic gravel or paver circular drive
- Mark the layout: Stake the center and perimeter, then spray paint the outline.
- Excavate: Remove topsoil to the depth recommended for your material (typically 8–12 inches for pavers; 6–8 inches for gravel).
- Install geotextile fabric: Lay fabric to prevent weed growth and stabilize base material.
- Add base rock: Compact a layer of crushed stone (4–8 inches), tamping with a plate compactor.
- Edge restraint: Install edging to hold pavers/gravel in place and keep crisp lines.
- Lay pavers or gravel: For pavers, set them in sand, compact, and fill joints with sand. For gravel, add a top layer (2–3 inches) and compact.
- Finish landscaping and lighting: Add plants to the central island, install low-voltage path lights, and consider reflective markers on the outer edge for night visibility.
Design inspiration: elevate your circular driveway
- Central island with native shrubs, ornamental grasses, and a low fountain for a classic look.
- Brick or contrasting stone border to frame the loop and match your home’s façade.
- Symmetrical pillars or gateposts at entrances for a formal estate style.
- Low-voltage LED uplighting on trees and island features to create a welcoming glow.
- Mix materials: pave the main driving path in concrete and use decorative pavers for the island and borders.
Real-world advice: pitfalls and practical tips
Avoid these common mistakes:
- Underestimating width — too narrow and larger vehicles can’t turn. Test with the largest vehicle you expect to use the drive.
- Skipping permits — curb cuts and drainage changes often require approvals.
- Poor drainage — ensure water won’t funnel toward your home. Install drains or use permeable surfaces if runoff is a concern.
- Ignoring maintenance — gravel shifts and pavers settle; plan for occasional upkeep.
For more hands-on projects to enhance your exterior, check out our DIY projects and home design ideas pages for inspiration and step-by-step guides.
Frequently Asked Questions
1. How much space do I need to install a circular driveway?
Space requirements vary by design. A compact single-lane loop might fit on 30–35 feet of frontage with a modest island, while a formal two-lane loop or horseshoe drive usually needs 50+ feet of width. Consider vehicle turning radius and local setback rules.
2. Which material is best for low-maintenance circular driveways?
Concrete tends to be lower-maintenance long-term compared with asphalt and gravel. Pavers are durable and easy to repair but require occasional joint maintenance. Choose based on budget, climate, and aesthetic goals.
3. Can I build a circular driveway myself?
Yes — many homeowners successfully install gravel or paver circular drives as DIY projects with proper planning, correct base preparation, and the right tools. For asphalt or paid concrete pours, hiring professionals is often more efficient. Always check local regulations and consider professional help for grading and drainage work.
Conclusion: Start designing your circular driveway today
Design circular driveway layout ideas with purpose: think about traffic flow, materials, drainage, and curb appeal. Whether you tackle a DIY gravel loop or hire pros for pavers or asphalt, the right layout will make daily life easier and elevate your home’s first impression. Ready to sketch your plan? Mark your lot, test turning radii with cones, and explore material samples — then take the next step toward a beautiful, functional driveway.
Want more renovation inspiration? Browse our DIY projects and home design ideas to pair your new driveway with landscaping, lighting, or a welcoming front entrance. If you’re thinking kitchen work next, check out our kitchen upgrades for ideas to refresh your whole home.
Call to action: Ready to plan your circular driveway? Grab a tape measure and sketch your lot — then share your layout ideas or questions in the comments so we can help you refine the plan.