Ever stood in your living room staring at the old archway between the kitchen and dining room wondering, “How can I make this look intentional and modern without gutting the space?” If you’ve inherited arches from an older home or you’ve added an arched niche and now need styling inspiration, you’re in the right place. In this article I’ll walk you through practical, budget-friendly decor ideas arch homeowners and DIYers can actually complete over a weekend.
Why arches matter in home design
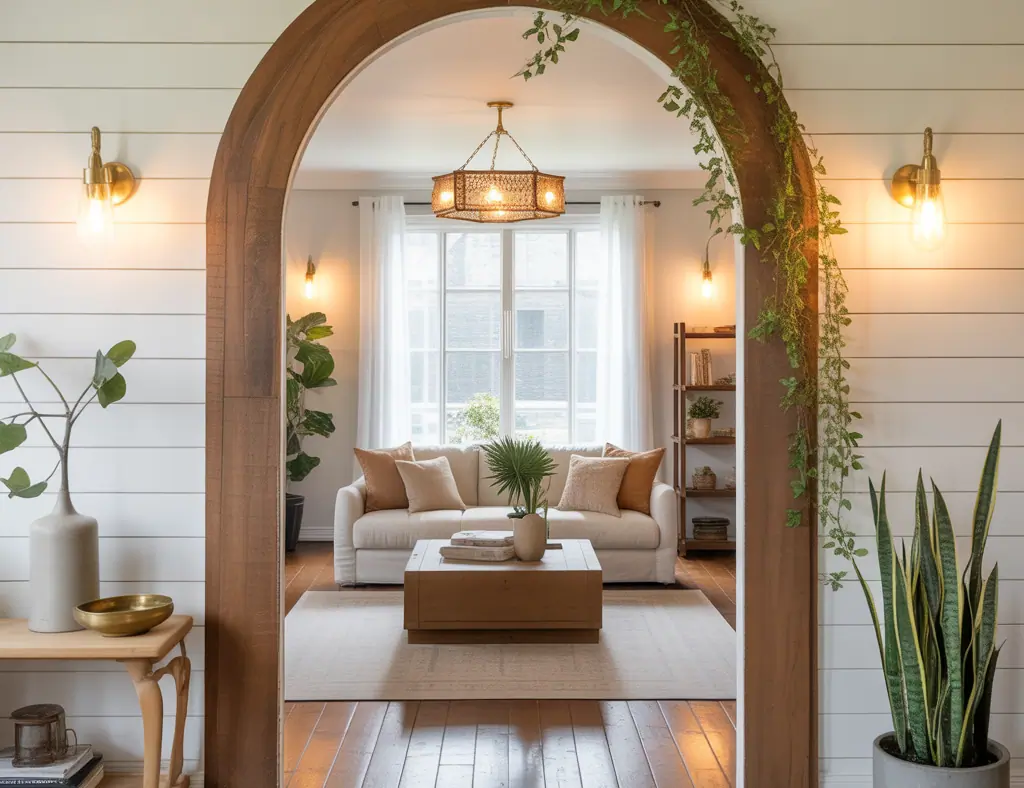
Arches are architectural features that naturally draw the eye and create soft transitions between rooms. Whether it’s an arched doorway, an interior archway, or an arched niche, the right treatments — trim, paint, lighting, or shelving — can transform a bland opening into a focal point that lifts the whole room.
Decor ideas arch: quick wins and full-makeover options
Below are a range of archway decorating ideas for living room, hallway, and kitchen openings — from subtle upgrades to full DIY makeovers.
1. Paint the arch to frame the space
- Use a contrast color or a tone-on-tone shade to highlight the curve. Darker color inside the arch gives depth; lighter color emphasizes openness.
- For a modern look, try matte charcoal inside the arch with warm white walls outside. For a softer, Mediterranean vibe, use terracotta or muted teal.
2. Add trim or molding for architectural definition
Installing simple arch trim or decorative molding instantly makes the arch look intentional and well-crafted. You can buy pre-bent arch moulding or use segmented trim for tight budgets.
3. Create an arched niche with shelves
Turn an alcove or recessed arch into a functional display shelf for books, plants, and ceramics. Paint the niche a contrasting color, add thin floating shelves, and install soft LED strip lights for an elegant effect.
4. Install accent lighting
- Small recessed downlights or puck lights in the arch can highlight artwork or plants.
- LED tape along the inner curve produces beautiful halo lighting and is low-heat and low-cost.
DIY step-by-step: How to trim and paint an archway (weekend project)
This easy project updates an existing archway with trim and a fresh paint job. It’s perfect for homeowners comfortable with basic carpentry and painting.
- Tools & materials: measuring tape, coping saw, miter saw, adhesive or small finish nails, caulk, wood filler, sandpaper, primer, paint, painter’s tape.
- Step 1 – Measure and plan: Measure the arch radius and length. Decide on trim profile (simple cove or quarter-round are forgiving choices).
- Step 2 – Cut and test-fit: Cut trim segments to fit the curve. For tight curves, use segmented trim (small straight pieces cut at slight angles) and dry-fit before fastening.
- Step 3 – Attach trim: Use adhesive for a clean look or finish nails for extra hold. Work from one side to the other, filling gaps with caulk.
- Step 4 – Fill and sand: Fill nail holes and seams with wood filler and sand smooth. Prime all raw wood edges.
- Step 5 – Paint: Paint the trim and inside the arch. Use painter’s tape on adjacent walls for crisp lines. Two coats usually give full coverage.
Expected time: 1 weekend. Typical cost: $50–$300 depending on trim quality and tools already owned.
Design inspirations for different styles
Modern minimal
Keep the arch clean and simple: thin black metal trim, white walls, and a recessed LED strip. Use monochrome art on either side to maintain a sleek, sophisticated look.
Farmhouse & rustic
Use reclaimed wood for a rustic arch surround. Whitewashed paint, shiplap inside the arch, and a woven pendant light nearby will complete the cozy feel.
Boho and eclectic
Paint the arch in a warm terracotta or deep mustard, layer with macramé hangings or rattan shelving, and add trailing plants to soften the curve.
Classic and traditional
Highlight existing plasterwork with ornate molding, soft neutral paint, and antique brass sconces flanking the arch to create a timeless entry sequence.
Practical tips & common pitfalls
- Check for wiring or plumbing before cutting into walls—especially if the arch hides an older renovation.
- Use primer designed for the surface (plaster vs. drywall) to prevent peeling.
- If the arch is load-bearing and you plan structural changes, consult a professional — decorating is safe, structural changes are not DIY territory.
- Match trim scale to the room size: too-large molding overwhelms small rooms, while tiny trim gets lost in big spaces.
How to style arched doorway decor for function and flow
Think beyond aesthetics. Use archways to control sightlines and traffic patterns. For example, place a console table or runner just beyond an arch to guide guests, or use a plant cluster to soften visual transitions between room styles.
Frequently Asked Questions
1. How do I decorate an arch without spending much?
Simple trims, paint, and lighting are the most budget-friendly options. A fresh coat of contrasting paint and an LED strip can feel like a whole new feature for under $50.
2. Can I install shelving inside an arched niche?
Yes. Use thin floating shelf brackets fixed into studs or anchors. Choose shelf materials that match your room’s style and paint the back of the niche a contrasting color to make objects stand out.
3. Is it hard to paint an arch neatly?
Not if you use the right tools. Flexible angled sash brushes, a steady hand, and painter’s tape where the curve meets flat walls will give professional-looking edges. Practicing on cardboard helps if you’re nervous.
Bring your arch to life — next steps
Ready to try one of these decor ideas arch projects? Start small with paint or lighting and scale up to trim or shelving when you’re confident. If you want more project ideas and tutorials, check out our DIY projects, browse styling tips in home design ideas, or explore how arches can enhance specific rooms like with kitchen upgrades.
Don’t let a plain arch go unnoticed — with a little creativity and elbow grease you can turn it into a signature element of your home. Try one of these archway decorating ideas this weekend, and share your before-and-after to inspire others!