Ever opened a crowded cabinet hunting for your favorite wine glass, only to pull down a stack of mismatched stems and vow to do better? If your entertaining space feels cramped or your stemware is hidden away, a creative wine glass display can turn clutter into a conversation piece. Whether you rent a small apartment or are renovating a kitchen, these stylish, practical DIY solutions will help you showcase — not stash — your wine glasses.
creative wine glass display: Why a great display matters
Beyond aesthetics, a well-planned wine glass display improves accessibility, protects fragile stemware, and maximizes vertical space. A thoughtfully designed display becomes part of your room’s decor and makes hosting easier — no more frantic shelf-scrambling when guests arrive. Below are easy-to-follow DIY wine glass rack ideas, step-by-step projects, and real-world tips to help you build the perfect stemware solution.
Quick planning tips before you start
- Measure your tallest and widest glasses (include stem and base) so the rack fits all styles.
- Decide on location: above a bar, under cabinets, inside a glass-front cabinet, or on an accent wall.
- Consider weight load: estimate full-glass weight and use proper anchors or studs for wall-mounted displays.
- Pick materials that match your decor — reclaimed wood for rustic, copper or brass for industrial, painted MDF for modern.
DIY wine glass display projects (step-by-step)
1. Under-shelf stemware rack (minimal tools)
This classic solution slides into an existing shelf and makes glasses hang upside-down so they stay dust-free.
- Materials: 1/2″ plywood or hardwood slats, router or table saw to cut slots, wood glue, screws.
- Measure the shelf depth and glass base width — cut slats with evenly spaced grooves (about 1/4″ wide).
- Attach slats to a backing board and screw the assembly into the underside of your shelf or cabinet using screws into studs or heavy-duty anchors.
- Slide glasses into grooves so rims rest securely; double-check clearance with cabinet doors.
Tip: Add a felt strip on the top edge to protect glass rims and finish with stain or paint to match cabinetry.
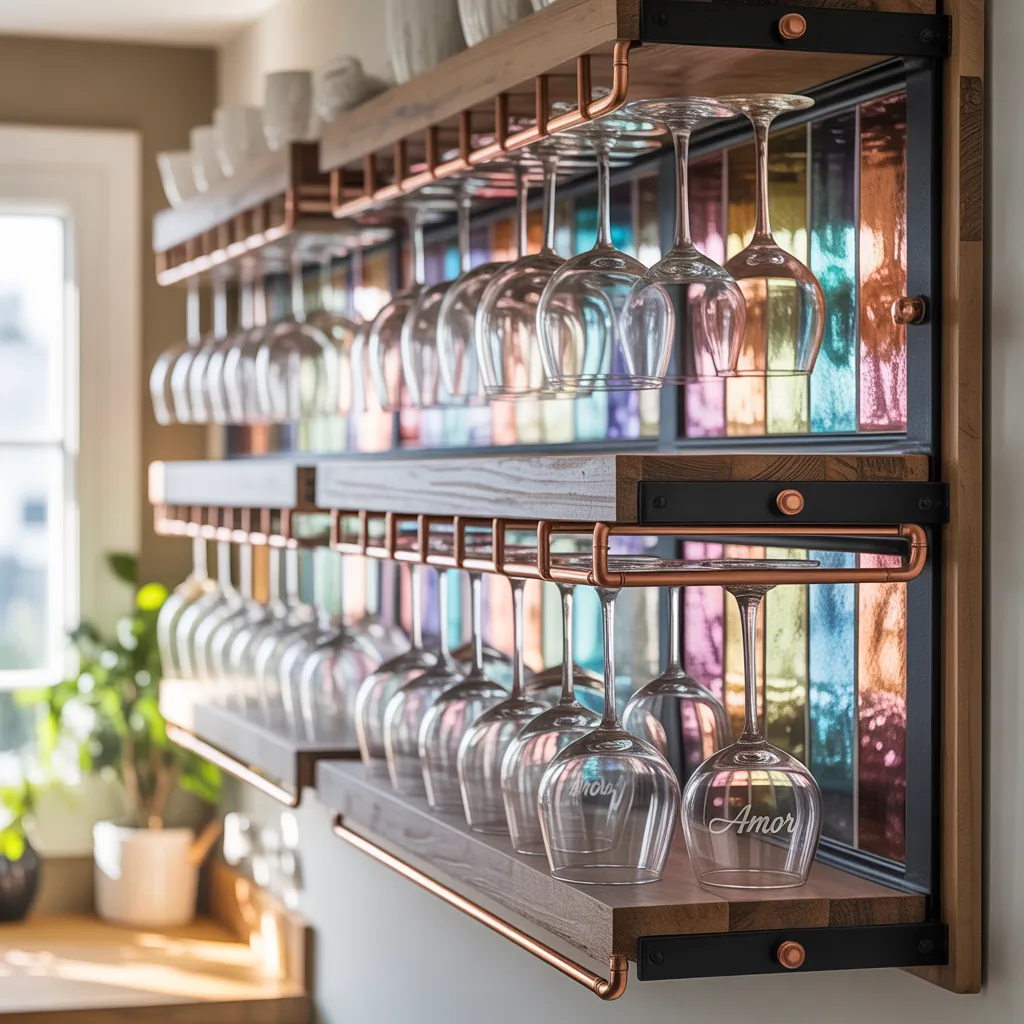
2. Floating shelf with routed glass slots (modern display)
A floating shelf with integrated slots gives a sleek, built-in appearance suitable for open-plan living areas.
- Materials: solid wood board, router bit for slots, french cleat or heavy-duty floating bracket, finish of choice.
- Mark slot spacing based on glass width (typically 2.5–3 inches center-to-center).
- Use a router to cut 3/8″ deep slots from the front of the shelf to a mid-point so stems tuck into the groove while the bowl rests on the top surface.
- Mount using a French cleat for strong, level support; place glasses into slots for a tidy row display.
Tip: Backlight the shelf with LED tape for dramatic effect and easier glass picking at night.
3. Reclaimed wood beam with hanging rails (rustic bar vibe)
Turn an old beam or butcher block into a centerpiece by adding brass rail slots or mounted runners.
- Attach metal stemware rails (or cut slots if you have a router) to the underside of the wood beam.
- Secure the beam to ceiling joists or use robust toggle anchors if ceiling joists aren’t accessible.
- Stain or oil the wood for longevity and hang glasses by their base for a warm, farmhouse look.
Tip: Add hooks on the beam ends for hanging kitchen towels or wine openers to keep everything in one place.
4. Wall-mounted grid with vintage frame and S-hooks (budget-friendly)
For renters or anyone seeking an affordable update, a framed wire grid with S-hooks is easy to install and visually interesting.
- Materials: vintage frame (or new frame), welded wire grid, S-hooks, screws or command-style picture hangers.
- Mount the grid inside the frame and secure it to the wall using appropriate hangers for weight.
- Hang stems by the base using S-hooks attached to the grid — rearrange as your collection grows.
Tip: Paint the frame to suit your palette and use small labels for different wine types to create a tasting station.
Design inspiration and styling tips
- Mix open shelving with closed cabinets for a balanced kitchen; display special stemware behind glass doors and everyday glasses on open racks.
- Coordinate metals — copper racks pair beautifully with warm wood tones while black iron complements industrial kitchens.
- Group by glass type (red, white, champagne) or design symmetry by keeping even spacing and identical racks for a gallery-like display.
- Consider portability: a freestanding wine glass caddy works well for outdoor entertaining and picnics.
Safety, maintenance, and real-world advice
- Use a stud finder or heavy-duty wall anchors for wall-mounted displays; estimate weight (full glass ~10–20 oz) and multiply by number of glasses.
- Avoid placing displays directly over heat sources (stoves) or in direct sunlight to prevent thermal shock and fading.
- Clean glass bottoms and rack grooves periodically — rotating glasses reduces dust buildup and wear.
- Test a prototype with a few glasses before committing to permanent mounts.
Frequently Asked Questions
Allow about 2.5–3 inches center-to-center for standard wine glasses. Larger goblets or balloon glasses may need 3.5–4 inches. Measure the widest point of the bowl plus a small buffer to prevent knocking.
Yes, but use heavy-duty anchors or hang from studs. For larger displays or reclaimed wood beams, mounting to joists or studs is safest. For renters, consider non-permanent options like free-standing caddies or hanging from a secure shelf instead.
Add felt or silicone strips where glass rims contact wood or metal. Ensure slots are smooth (filed and sanded) and don’t overload racks. Avoid bumping glass during cleaning and leave a little room between stems to prevent clinking.
Conclusion — Showcase your stemware with a creative wine glass display
A thoughtful, creative wine glass display transforms storage into style and makes entertaining easier. Whether you build an under-shelf rack, a floating routed shelf, or a rustic beam with rails, these DIY projects bring form and function to your home. Try one of the ideas above and adapt materials and finishes to your space — then share your finished project on social media or around the dinner table. Ready to start? Browse more DIY projects and kitchen upgrades for complementary ideas, or look through our home design ideas for broader inspiration. Happy building — and cheers to showcasing your collection!