Picture this: you crawl out of bed in your lakeside cabin, step into a chilly morning, and the bathroom is a cramped, damp afterthought. Sound familiar? Whether you own a mountain retreat or a tiny forest getaway, small cabin bathrooms often present the same challenge—limited space, moisture issues, and the desire for rustic charm. This guide is packed with creative ideas for cabin bathrooms that blend form and function so you can enjoy a warm, stylish, and practical space without blowing the budget.
Why cabin bathrooms need special attention
Cabin bathrooms differ from urban or suburban bathrooms because they face unique conditions: fluctuating temperatures, higher humidity, and sometimes limited access for contractors and materials. That means durable finishes, efficient ventilation, and space-saving solutions are essential. Add in a desire for natural, rustic aesthetics—reclaimed wood, stone accents, and vintage fixtures—and you’ve got a distinct design challenge that’s fun to solve with smart DIY strategies.
Top ideas for cabin bathrooms
1. Maximize small spaces with smart layouts
Small cabin bathroom design hinges on a thoughtful layout. Consider:
- Installing a corner sink or a compact floating vanity to free up floor space.
- Using a pocket door or barn-style sliding door to avoid door swing conflicts.
- Choosing a clear glass shower enclosure to keep the room feeling open and bright.
DIY tip: Sketch a scaled floor plan before buying fixtures. Measure clearances for doors, towel racks, and plumbing to avoid costly returns.
2. Embrace rustic materials without sacrificing durability
Reclaimed wood, cedar paneling, and stone can create that classic cabin vibe. To prevent moisture damage:
- Use engineered or treated wood for vanities and shelving, and seal surfaces with a marine-grade polyurethane or water-resistant oil.
- Install cement backer board behind tile and apply a waterproof membrane for wet zones like showers.
- Consider porcelain or natural-stone-look tiles that offer the rustic aesthetic with easy maintenance.
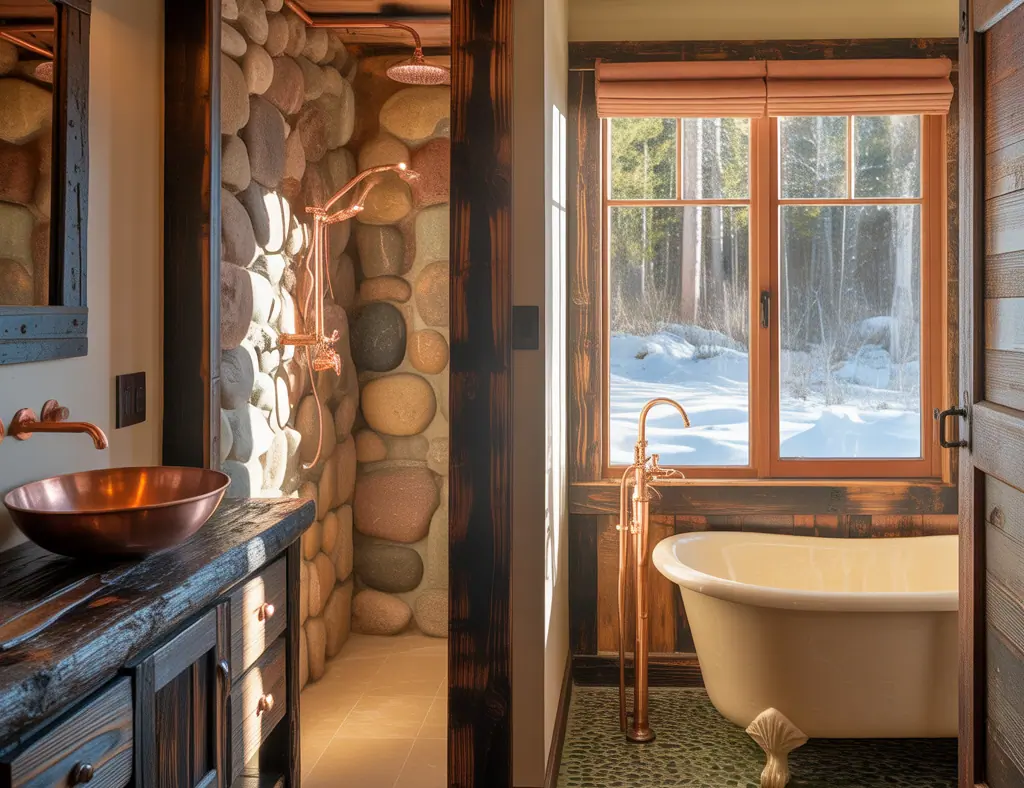
3. Shower and tub options for rustic retreats
Choose between a walk-in shower, a clawfoot tub, or a hybrid combo depending on space and plumbing:
- Walk-in showers with pebble tile floors and a built-in bench feel natural and are easy to DIY with a waterproofing kit.
- A vintage clawfoot tub becomes a centerpiece—make sure floor joists and subfloor can support its weight when filled.
- For tiny bathrooms, a tub-shower combo or a compact shower with a low-threshold base can save space.
DIY step-by-step (walk-in shower):
- Plan layout and ensure proper slope for drainage.
- Install cement board and waterproof membrane.
- Lay tile starting from the floor, grout, and seal edges with silicone for a watertight finish.
4. Durable finishes and moisture control
High humidity is a top concern in cabin bathrooms. Use these practical measures:
- Install a properly sized exhaust fan (CFM based on room size) and vent it outdoors.
- Choose mildew-resistant grout and paints labeled for bathrooms or high-humidity rooms.
- Insulate exterior walls and pipes to prevent condensation and freezing in cold climates.
5. Cozy lighting and thoughtful accessories
Lighting sets the mood. Combine ambient, task, and accent lighting for layered effects:
- Warm LED recessed lights and a vanity sconce give flattering light without harsh glare.
- Add a skylight or solar tube where possible to bring in daylight and save on wiring.
- Accessories: heated towel racks, woven baskets for storage, and a small planter or two for freshness.
Budget-friendly DIY upgrades that make a big impact
You don’t have to gut the room to get a fresh look. Try these projects:
- Refinish a wood vanity with stain and waterproof topcoat instead of replacing it.
- Apply peel-and-stick tile or beadboard to a feature wall for instant cabin charm.
- Swap hardware—faucets, drawer pulls, and towel bars—to update the style inexpensively.
Pro tip: When working with plumbing or electrical beyond simple fixture swaps, check local codes. Hiring a pro for rough-in work can save headaches down the line.
Materials & Tools Checklist
- Cement backer board and waterproof membrane
- Marine-grade polyurethane or varnish
- Mildew-resistant grout and caulk
- Compact vanity or floating shelf system
- Exhaust fan sized to room CFM
- Basic tools: level, wet saw (for tile), drill, caulk gun
Frequently Asked Questions
1. What are good space-saving fixtures for tiny cabin bathrooms?
Choose corner sinks, wall-mounted toilets, floating vanities, and frameless glass showers. These fixtures reduce visual clutter and improve traffic flow in small layouts.
2. How do I protect wood features from moisture in a cabin bathroom?
Use water-resistant or engineered wood, seal with marine-grade finishes, and keep wood elements out of direct wet zones. Proper ventilation and a waterproof membrane behind tile are also essential.
3. Can I install tile in a DIY cabin bathroom remodel?
Yes—tiling is a popular DIY project. Key steps include using cement backer board, ensuring proper slopes in shower pans, and applying a waterproof membrane. Start with a small wall or floor area if you’re new to tiling.
Conclusion: Start transforming your space with these ideas for cabin bathrooms
Whether you’re tackling a full cabin bathroom renovation or small DIY updates, these ideas for cabin bathrooms balance rustic charm, durability, and smart design. Start small—replace hardware, add a shelf, or refresh paint—and work toward bigger projects like a walk-in shower or reclaimed-wood vanity. Ready to get started? Browse more DIY projects for step-by-step inspiration, check out our home design ideas for style tips, or explore kitchen upgrades if you’re planning a whole-cabin refresh. Share your before-and-after photos and take the next step toward the cozy cabin bathroom you’ve been dreaming of.