Ever stood in your kitchen wiping spills off the wall and thought, “There has to be a better way”? If you’ve been dreaming of an update that protects your walls, ties your counters together, and adds big style without a full renovation, a countertop backsplash concept might be the perfect solution. Whether you’re a seasoned DIYer or trying your first home improvement project, this guide gives practical ideas, step-by-step tips, and design inspiration to transform your kitchen or bathroom.
Why the countertop backsplash concept matters
A well-designed backsplash protects walls from splashes and stains, hides seams where countertop meets wall, and acts as an easy way to refresh the room’s look. The countertop backsplash concept covers everything from a simple 4-inch backsplash to a full-height stone slab that visually extends your counter into the vertical plane. The right approach balances function (durability, cleanability) and form (color, texture, scale).
Popular countertop backsplash concept ideas
1. Integrated stone or quartz backsplash
Use the same material as your countertop and run it up 4–6 inches or to the full height. This creates a seamless, high-end look and minimizes grout lines. Great for modern and transitional kitchens.
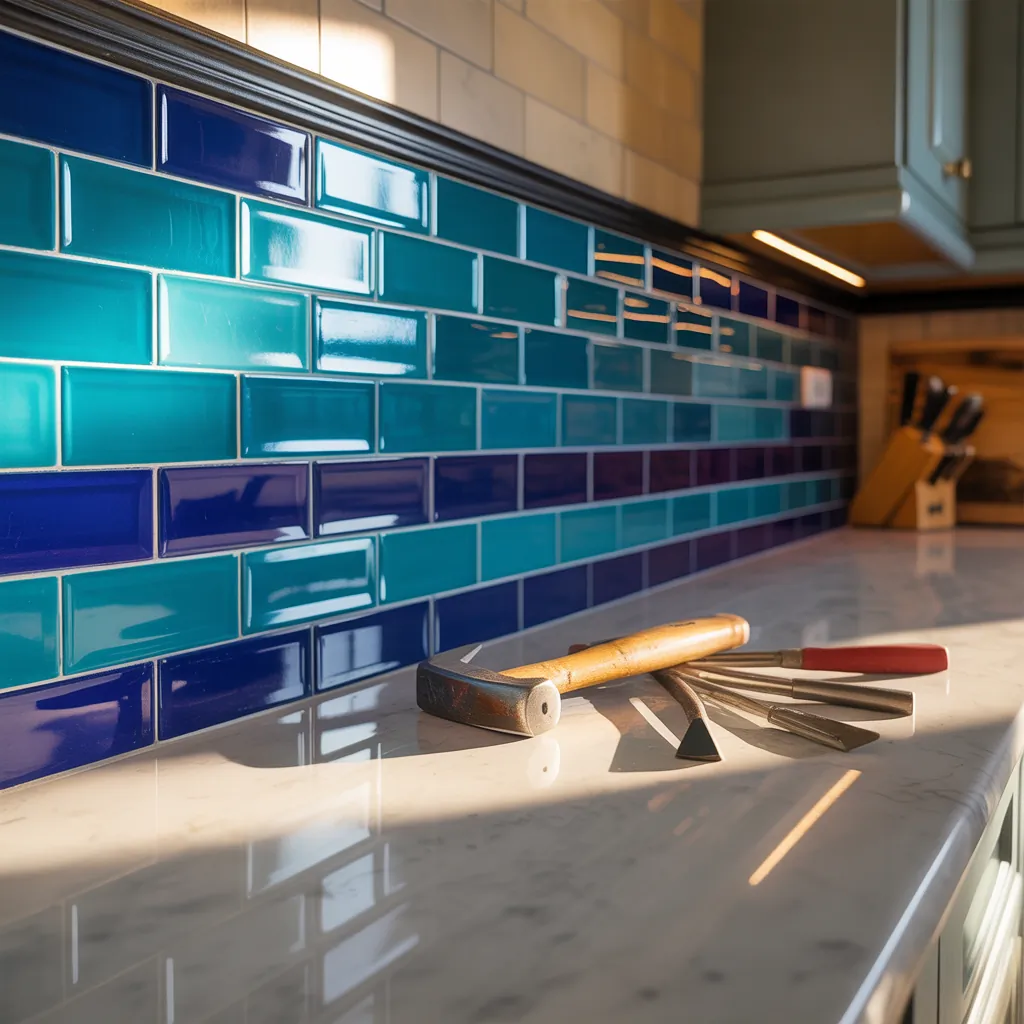
2. Classic subway tile with a twist
Subway tile is a timeless choice. Try stacked, herringbone, or vertical layouts for modern appeal. Contrasting grout can emphasize pattern; matching grout gives a softer look.
3. Full-height tile or slab backsplash
Take tile or a slab from countertop to ceiling behind a range or sink to create drama and make the space feel larger. This works well with statement ranges or open shelves.
4. Peel-and-stick backsplash for quick updates
Pain-free and budget-friendly, peel-and-stick tiles mimic ceramic, glass, and metal. Ideal for renters or quick weekend updates. They’re easy to install over smooth, clean surfaces.
5. Mixed materials and accent bands
Combine a low tile backsplash with a metallic or glass accent strip. Use reclaimed wood or butcher block as a narrow one-inch cap above the countertop for a warm contrast (seal wood thoroughly).
Design tips to match your countertop and cabinetry
- Complement, don’t match exactly: Choose a backsplash that ties in a secondary color of your countertop for depth.
- Scale matters: Large-format slabs suit big countertops; small mosaics fit compact kitchens.
- Reflect light: Glossy tiles or glass near under-cabinet lighting add brightness.
- Think about height: Standard 4″ backsplashes are practical for many counters; full-height behind a stove feels intentional.
Countertop backsplash concept: Step-by-step DIY installation
Below is a practical, beginner-friendly process for standard tile or peel-and-stick backsplashes. Adjust materials and times if you’re using stone slabs or full-height installations.
- Plan & measure. Measure length and height of the backsplash area. Add 10% for cuts and breakage.
- Choose materials. Pick tiles, adhesive, grout, and trim. For peel-and-stick, select a durable PVC or vinyl option with good reviews.
- Prepare the surface. Clean grease, repair holes, and make the wall smooth. Remove outlet covers and protect counters with painter’s tape.
- Dry layout. Lay out tiles on the counter to center patterns and minimize awkward edge cuts.
- Apply adhesive or stick tiles. For ceramic: spread thin-set mortar with a notched trowel, press tiles into place, and use spacers. For peel-and-stick: peel backing, align, press firmly, and smooth seams with a roller.
- Grout & finish. After thin-set cures (usually 24 hours), grout with a rubber float, wipe with a sponge, and seal grout if recommended. Caulk the joint between countertop and backsplash with a color-matched silicone for flexibility.
- Cleanup & reinstall. Reinstall outlets and hardware. Clean surfaces and enjoy the new look.
Tools, materials & realistic budget
- Tools: tape measure, level, notched trowel, tile cutter or wet saw (for ceramic/stone), grout float, sponge, caulk gun.
- Materials: tiles or slab, thin-set/adhesive, grout, sealer, caulk, spacers, trim pieces.
- Budget ranges: peel-and-stick $2–$10 per sq ft; ceramic tile $5–$25 per sq ft; natural stone or quartz slabs $50–$150+ per sq ft. Labor adds significantly if hiring a pro.
Real-world advice from DIYers
- Test a sample: Lay a tile or peel-and-stick sample next to your countertop in different lights before committing.
- Pick grout second: Often the grout color sets the overall tone—buy samples and test on scraps.
- Protect the range: Near cooktops, use non-porous, heat-resistant materials like ceramic, stainless steel, or tempered glass.
- Expect surprises: Walls aren’t perfectly square—use shims or trim to hide small gaps rather than forcing tiles into imperfect corners.
Maintenance and long-term care
Wipe glossy tiles daily with mild soap, clean grout lines periodically with a grout cleaner, and reseal natural stone every 1–2 years. Avoid harsh abrasives that dull finishes. Caulk joints as needed to prevent water intrusion.
Frequently Asked Questions
1. How high should a countertop backsplash be?
Common heights are 4 inches for a minimalist look, 6–8 inches to protect more of the wall, or full backsplash to the bottom of cabinets or ceiling for a dramatic effect. Choose based on style and function.
2. Can I install a backsplash myself without experience?
Yes—peel-and-stick and some ceramic tile projects are DIY-friendly. Stone slabs and intricate tile patterns may require a pro. Follow manufacturer instructions and practice a small section first.
3. What’s the best backsplash for a busy family kitchen?
Durable, low-maintenance options include glazed ceramic, porcelain, tempered glass, and quartz slabs. These resist stains and are easy to wipe clean—ideal for high-traffic kitchens.
Conclusion — Ready to try a countertop backsplash concept?
Updating your backsplash is one of the most impactful and budget-friendly ways to refresh a kitchen or bath. Whether you choose a matching stone strip, a bold tile pattern, or a quick peel-and-stick solution, the right countertop backsplash concept protects walls and elevates your space. If you’re ready to get started, gather samples, measure your area, and try a small project this weekend — and explore related ideas on our DIY projects and kitchen upgrades pages for more inspiration.
Want help choosing materials or planning a step-by-step project? Comment below with your space dimensions and photos, and I’ll offer tailored suggestions to make your countertop backsplash dream a reality.
For more inspiration on copper backsplash kitchen designs, check out this guide: Copper Backsplash Kitchen