You just finished patching that drywall and refinishing the shelf in your craft nook, and instead of diving into the next big home improvement, you want a quick, satisfying project—something small, creative, and wearable. Enter bracelet making. Whether you’re repairing a curtain cord and find leftover beads, or want a mindful break from a kitchen upgrade, bracelet ideas let you turn scraps and simple supplies into personalized accessories. Here are practical, stylish, and budget-friendly bracelet projects you can start tonight.
Why DIY Bracelets Are the Perfect Mini Project
Making bracelets is fast, low-cost, and unexpectedly therapeutic. These small craft projects fit between larger home DIY tasks, use up leftover materials (think leather offcuts, copper wire, or curtain beads), and give you beautiful, wearable results. Benefits include:
- Custom style: match colors and hardware to your home aesthetic or outfit.
- Upcycling: use materials from other projects to reduce waste.
- Gifts and décor: bracelets double as thoughtful gifts or can be displayed as mini art in a jewelry tray.
- Skill building: learn beading, knotting, and wirework that apply to other home crafts.
12 Easy Bracelet Ideas for Every Skill Level
Below are quick summaries of dozen approachable bracelet projects, each with materials, basic steps, and pro tips.
1. Elastic Beaded Bracelet (Beginner)
- Materials: elastic cord, 6–8mm beads, scissors, clear nail polish or glue.
- Steps: measure wrist + 1/2″, string beads, tie surgeon’s knot, secure with glue, trim excess.
- Tip: double-knot and dab glue for a durable finish; use bead stoppers while working.
2. Friendship (Embroidery Floss) Bracelet
- Materials: embroidery floss, tape or clipboard.
- Steps: choose pattern (diagonal stripe, chevron), knot repeating rows until length, tie off.
- Tip: practice a few rows with scrap floss to keep tension even.
3. Leather Wrap Bracelet
- Materials: leather strip, button or clasp, hole punch.
- Steps: cut length to wrap wrist 2–3 times, punch buttonhole, secure.
- Tip: edge-burn leather lightly for a polished look.
4. Wire-Wrapped Cuff (Intermediate)
- Materials: copper or brass wire, mandrel (or bottle), pliers.
- Steps: form base cuff, wire-wrap decorative stones or beads onto the cuff.
- Tip: anneal copper for easier shaping if doing multiple wraps.
5. Paracord Survival Bracelet
- Materials: paracord, buckle or shackle, lighter.
- Steps: measure wrist, weave Cobra or Solomon knot, trim and melt ends.
- Tip: perfect for outdoor enthusiasts and a practical home-stored emergency item.
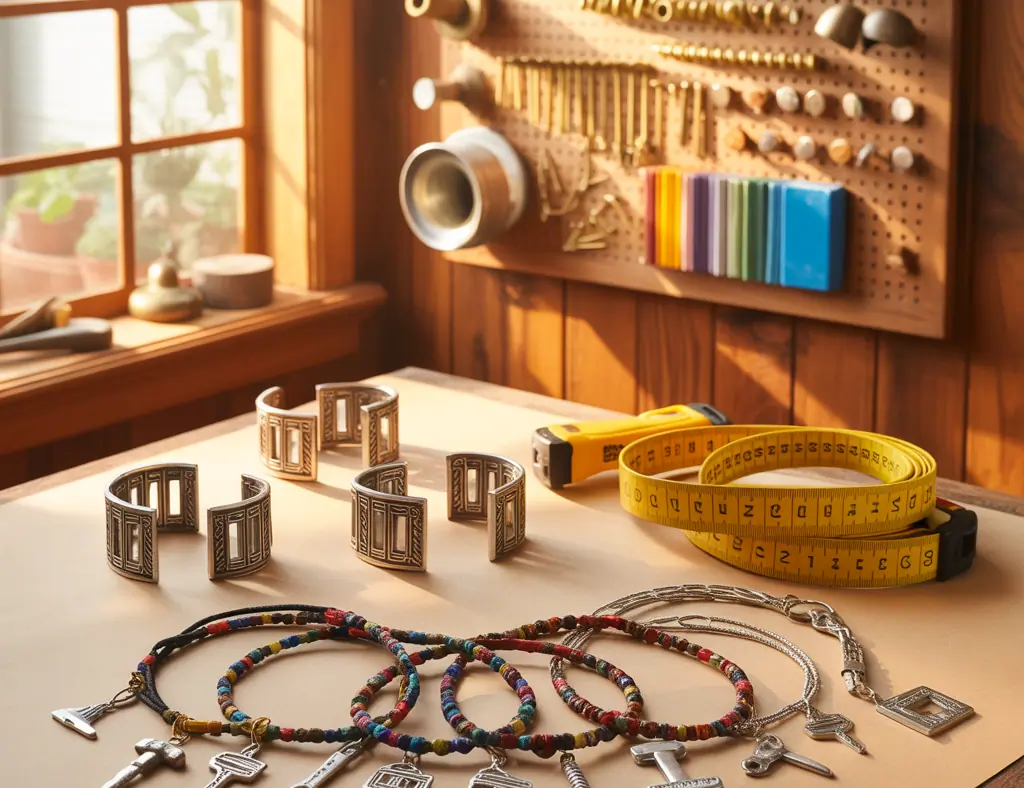
6. Charm Bracelet from Hardware Finds
- Materials: chain, jump rings, charms (mini keys, screws, washers), pliers.
- Steps: attach charms to chain with jump rings, fasten clasp.
- Tip: oxidize metal with a quick patina technique for a vintage look.
7. Braided Fabric Scrap Bracelet
- Materials: fabric strips from old shirts or curtains, scissors.
- Steps: braid three strips, tie ends, add a button or knot closure.
- Tip: add beads to braid for texture and weight.
8. Macramé Bracelet
- Materials: macramé cord, central bead or stone.
- Steps: secure cords, create square or spiral knots around centerpiece, finish with sliding knot.
- Tip: use a clipboard or tape to keep tension even while knotting.
9. Memory Wire Coil Bracelet
- Materials: memory wire, beads that fit wire hole, round-nose pliers.
- Steps: cut coil to length, thread beads, make end loops with pliers.
- Tip: this is great for quick, no-clasp designs that hold shape.
10. Stretch Gemstone Bracelet
- Materials: stretch cord, gemstone beads, crimp beads optional.
- Steps: string stones, tie secure knot, tuck knot into bead hole or use crimp.
- Tip: size the inner circumference snugly—gemstones are heavier than glass beads.
11. Pearl Knotting Bracelet (Advanced)
- Materials: silk thread, pearls, needle, clasp.
- Steps: use a knotting tool or fingers to space knots between pearls for durability and elegance.
- Tip: knotting prevents pearls from scattering if a thread breaks—use for heirloom pieces.
12. Upcycled Button Bracelet
- Materials: assorted buttons, elastic or cord, strong thread.
- Steps: stitch buttons into a chain or string through shanks, secure ends.
- Tip: sort buttons by color family for a cohesive, craft-room-friendly design.
Step-by-step: Build a Simple Beaded Bracelet
This short tutorial walks you through a classic beaded elastic bracelet—perfect for beginners and a great foundation for other projects.
- Gather materials: elastic cord (0.7–1mm), 6–8mm beads, bead stopper or tape, scissors, glue.
- Measure: wrap cord around wrist, add 1/2″ for knotting, cut length.
- Prep: secure one cord end with tape to avoid beads slipping off.
- String beads: choose a balanced pattern (symmetry makes finishing easier).
- Tie finish: tie a strong surgeon’s knot, repeat 2–3 times, add a drop of glue, let dry.
- Trim and hide knot: trim close and tuck into the nearest bead’s hole if possible.
Pro tip: use a needle for small-bead projects to make threading faster and neater.
Design Tips and Real-world Advice
A few practical ideas to elevate your bracelet projects and make them useful in daily life or small-business settings:
- Color palettes: pick a 2–3 color palette for wearable cohesion—neutral bases with one accent color work best.
- Mix metals carefully: combine only two metal finishes (e.g., brass + silver) to avoid a clashing look.
- Sizing: measure wrist snugly and allow for bead thickness; for adjustable bracelets, use sliding knots or extenders.
- Finishing touches: use high-quality clasps and crimp beads for longevity; buff metal with a soft cloth before assembly.
- Sell or gift: photograph bracelets on neutral backgrounds, and package them in small boxes or recycled materials for a polished presentation.
Frequently Asked Questions
Q: What are the best bracelet ideas for beginners?
A: Start with elastic beaded bracelets, friendship bracelets (embroidery floss), or simple braided fabric bracelets. They require minimal tools and teach basic techniques like knotting and pattern planning.
Q: How do I size a bracelet correctly?
A: Measure the wrist snugly with a flexible tape measure. For stretch bracelets add about 1/4″–1/2″ depending on bead size; for non-stretch, add 1/2″–1″ for comfort. When in doubt, make adjustable closures.
Q: Can I use leftover materials from home projects to make bracelets?
A: Absolutely. Leather offcuts, copper wire from electrical projects (cleaned and insulated), curtain beads, and fabric scraps all make great bracelet components—just ensure materials are clean and safe for skin contact.
Conclusion
Whether you need a mindful break between kitchen upgrades or a fast, rewarding project after rearranging a craft corner, these bracelet ideas offer a range of styles from beginner-friendly to more advanced. Try one tonight using materials from your home, and you’ll see how quickly small DIY projects can boost creativity and add personality to your daily look. Ready to start? Check out more DIY projects for easy weekend crafts, explore home design ideas to match accessories with your decor, or take a breather with a casual craft while planning your next kitchen upgrades. Share your finished bracelets or ask for project help—I’d love to see what you create!
For more wrist corsage ideas, check out Ideas Wrist Corsage.
For more wrist corsage ideas, check out our Ideas Wrist Corsage article.
For more home maintenance tips, check out Dont Let the Rain Catch You Off Guard Home Maintenance Tips for the Wet Season.
For more DIY projects that can be done with leftover materials from home improvement tasks, check out our guide on Company Let vs Ast for Landlords
For more DIY projects that can be started tonight, check out our Company Let vs Ast for Landlords guide.