Ever stood in your bedroom thinking the furniture looks tired, but replacing it feels expensive and wasteful? If you’ve ever eyed a dated dresser or bland nightstand and wondered, “Can I paint this myself?”—you’re not alone. Painting bedroom furniture is one of the most cost-effective ways to refresh a room, add personality, and practice sustainable upcycling.
Why Paint Your Bedroom Furniture?
Updating with paint instantly modernizes vintage pieces, repairs small surface damage, and helps you achieve cohesive bedroom color palettes without a full remodel. Whether you’re aiming for a coastal cottage vibe, luxurious moody tones, or a minimalist Scandinavian feel, paint lets you control the final look.
Top Bedroom Furniture Painting Ideas
Below are practical, stylish approaches—from full paint jobs to subtle detailing. Each idea includes materials, techniques, and quick tips so you can start your DIY project today.
1. Classic Chalk Paint for a Soft, Vintage Finish
Chalk paint is forgiving, requires minimal prep, and gives a matte, velvety texture that works on dressers, headboards, and bedside tables.
- Materials: chalk paint, wax or polycrylic topcoat, sanding block, paintbrushes.
- Steps:
- Tip: Use a fine sanding sponge and tack cloth between coats for a silky finish.
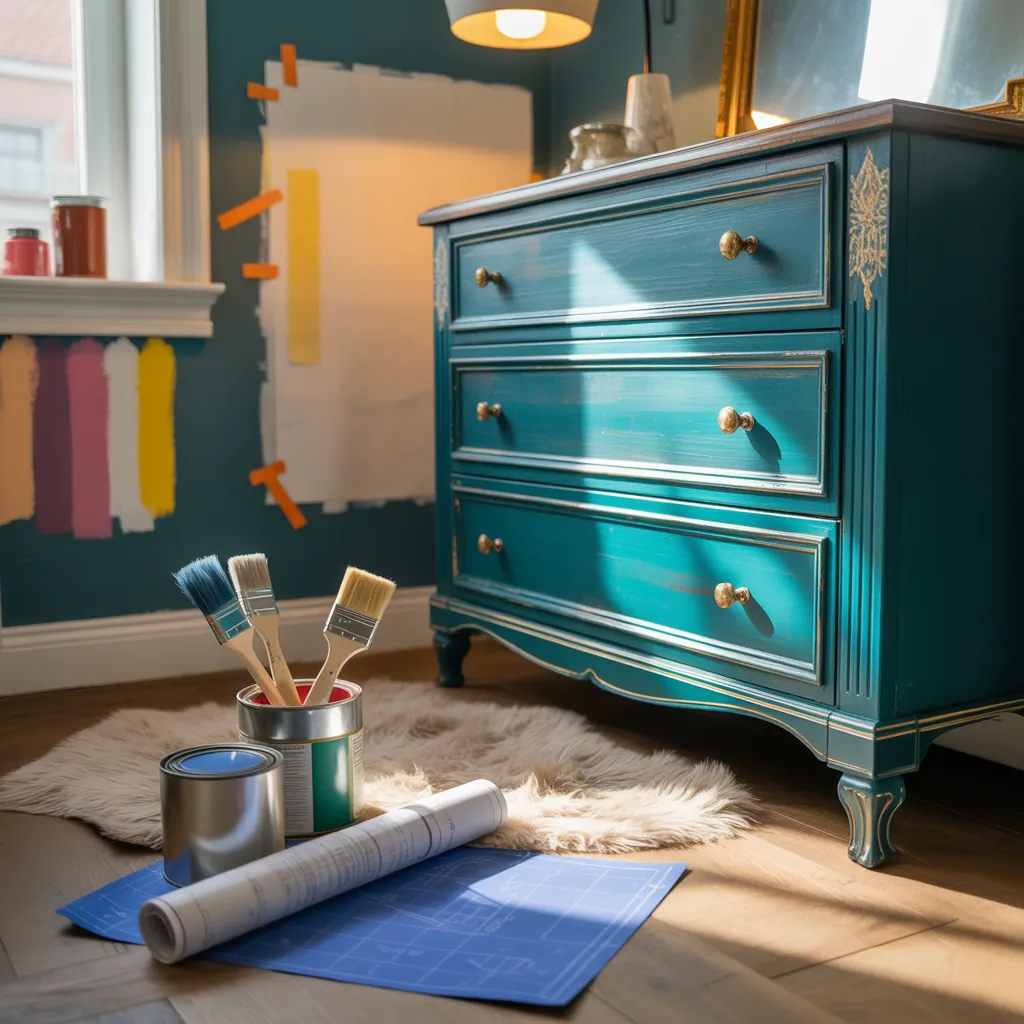
2. Bold Solid Colors for a Statement Piece
Make a dresser or wardrobe the focal point by choosing saturated colors like midnight blue, emerald green, or terracotta.
- Materials: latex or acrylic paint, primer, brush/roller, foam brush for edges.
- Steps:
- Tip: Test color on a hidden area or a paint card to see how it reads in bedroom light.
3. Two-Tone Painting: Add Depth and Design
Two-tone paint jobs balance color and proportion: paint drawers one color and the frame another, or use a lighter top with a darker base.
- Technique: Use painter’s tape to get crisp lines; sand and prime surfaces between color changes.
- Design idea: Keep hardware metallic (brass or matte black) to tie both colors together.
4. Stenciling and Decoupage for Artistic Flair
Introduce pattern without reupholstering. Stencils work well on drawer fronts, while decoupage is great for floral or map motifs.
- Materials: self-adhesive stencils, acrylic paint, foam roller, decoupage medium, patterned paper or fabric.
- Steps for stenciling:
- Tip: For a subtler look, tone-on-tone stenciling uses the same color family at different sheens.
5. Distressing and Antiquing for Character
Distressing reveals underlying wood or base colors and adds lived-in charm to bedroom furniture. Antiquing glaze can bring out molding details.
- Steps: Sand high-contact edges, apply glaze into crevices, wipe back excess with a rag.
- Tip: Practice distressing on a scrap board to avoid overdoing it on a favorite piece.
How to Paint Bedroom Furniture: A Simple Step-by-Step Guide
Follow this basic workflow for most bedroom furniture painting projects:
- Prepare the piece: remove hardware, clean with degreaser, and fill deep scratches with wood filler.
- Sand: light sanding to create a tooth for paint to stick (use 120–220 grit depending on finish).
- Prime: always prime laminate or bare wood; this prevents bleed-through and increases adhesion.
- Paint: apply thin, even coats; allow full drying time between coats.
- Seal: use polycrylic for water resistance or wax for chalk paint finishes.
- Reattach hardware and place in room after full cure time (typically 24–72 hours).
Design Inspiration & Color Palettes
Want ideas that pair well with bedroom trends?
- Calming neutrals: soft beige with whitewashed wood for a Scandinavian look.
- Moody elegance: deep charcoal or navy for a dramatic, hotel-like vibe.
- Soft pastels: blush, sage, or dove blue for a cozy cottage atmosphere.
- Mixed metals: combine matte black pulls with brass knobs for contrast.
Practical Tips for Lasting Results
- Work in a well-ventilated area and lay down drop cloths to protect floors.
- Use quality brushes and rollers—cheap tools leave brush marks or lint.
- Label and store removed hardware in zip bags so you don’t lose screws.
- If painting laminate, use a bonding primer specifically formulated for slick surfaces.
- Allow paint to cure fully before placing heavy objects on drawers to avoid dents.
Bedroom Furniture Painting Ideas for Small Spaces
Painting can make small bedrooms feel larger. Use light-reflective colors on furniture or paint the back of an open headboard to integrate it with the wall color. Mirrored or high-gloss finishes on small dressers can also bounce light and visually expand the space.
Bedroom Furniture Painting Ideas: Finish Choices and Durability
Selecting the right finish is as important as color. Satin and semi-gloss sheens are durable for high-traffic pieces like dressers and nightstands. Chalk paint with wax offers a softer finish and is easy to touch up. For kids’ furniture, consider polyurethane or water-based topcoats for stain resistance and easy cleaning.
Frequently Asked Questions
Q: Can I paint laminate bedroom furniture?
A: Yes. Clean thoroughly, sand lightly if possible, and use a high-bonding primer made for slick surfaces. Follow with acrylic or latex paint and finish with a durable topcoat.
Q: How long does painted furniture take to cure?
A: Dry time vs. cure time differs. Paint may feel dry in a few hours, but most paints need 24–72 hours to cure. Topcoats and heavy use items may require up to 7 days for full hardness.
Q: Should I strip old paint before repainting?
A: Not always. If the existing paint is in good condition, sanding and priming can suffice. Strip paint if it’s peeling, flaking, or if you need to remove lead-based paint in older pieces—consult a professional if lead is suspected.
Real-World Advice: Mistakes to Avoid
- Avoid painting too thickly to prevent drips and long cure times.
- Don’t skip primer on raw or glossy surfaces—adhesion problems are common without it.
- Test new colors in different light conditions—what looks great by day might be too intense at night.
Ready to Refresh Your Room?
Painting your furniture is a rewarding weekend project that upgrades style without breaking the bank. Whether you try chalk paint distressing, bold statement colors, or delicate stenciling, these bedroom furniture painting ideas will help you personalize your space. For more project inspiration and step-by-step guides, check out our DIY projects and home design ideas pages. If you’re also thinking about other rooms, explore our kitchen upgrades posts to carry your new palette through the house.
Call to action: Pick one piece to transform this weekend—take “before” photos, test a color, and share your results. Have questions about a specific piece? Reply below and I’ll help you plan the steps.