Ever looked at the wasted space under your staircase and wondered, “Could that become a bathroom?” If you’re tackling a home improvement project and juggling families, guests, or an awkwardly empty footprint in your floorplan, converting the under-stairs area into a compact bathroom can be one of the best DIY upgrades you make. In this guide I’ll walk you through practical, real-world bathroom ideas under stairs — from planning and plumbing to finishes and storage — so you can turn that tight space into a stylish, functional powder room or wet room.
Why convert the under-stair area into a bathroom?
Adding a half-bath or small full bathroom under stairs gives you:
- Extra convenience for guests and household members
- Increased home value and improved floorplan utility
- Efficient use of otherwise wasted cubic footage
Whether you’re aiming for a compact powder room with just a toilet and sink or a slightly larger layout with a shower, planning is key. Below are practical ideas and step-by-step tips to make the project achievable even for competent DIYers.
Top bathroom ideas under stairs
Here are high-impact concepts you can adapt to many homes, whether you prefer modern minimalism or cozy rustic charm:
1. Powder room with concealed cistern
Use a wall-hung toilet with a concealed cistern to save depth and maintain clean lines. A shallow vanity or corner sink keeps the walkable aisle clear.
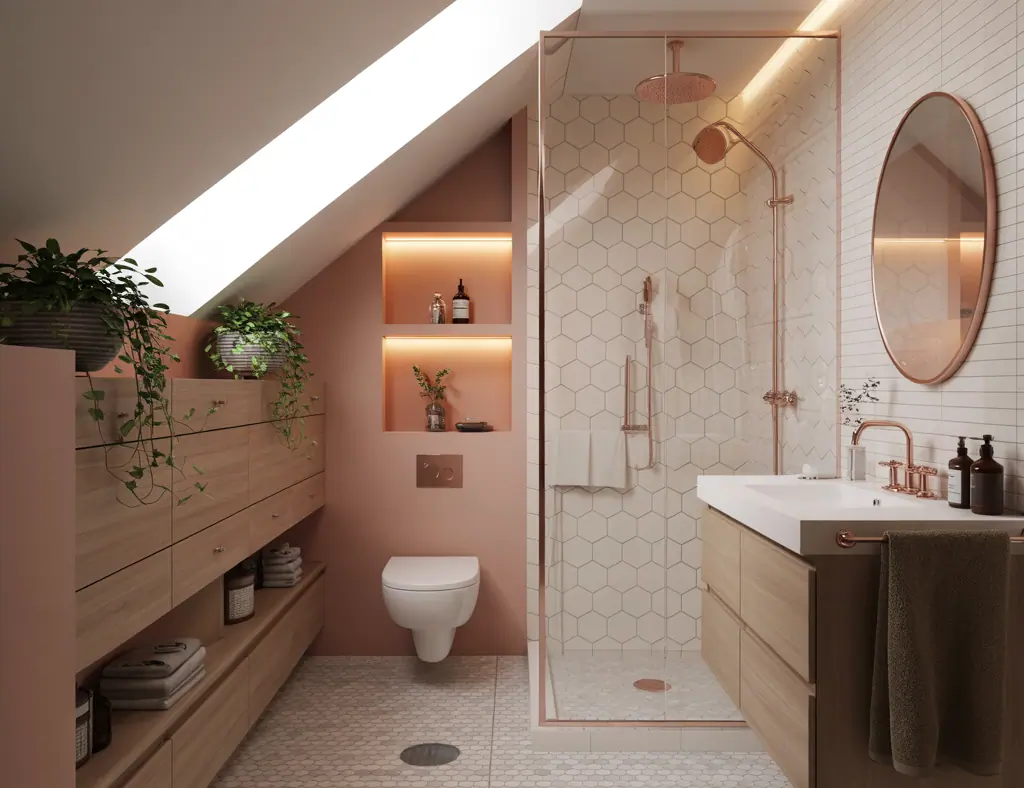
2. Walk-in wet room or corner shower
If ceiling height allows, create a small wet room with a tiled floor and linear drain. Curbless showers or a quadrant shower tray maximize space while keeping water controlled.
3. Compact laundry + half-bath combo
If your laundry space is tight, stack a washer/dryer with a sink and toilet built into the under-stair cavity — perfect for mudrooms.
4. Storage-forward design
Build shallow shelves, recessed niches, and towel racks into the triangular wall to make the most of odd angles.
Step-by-step improvement plan (DIY-friendly)
Follow these steps to take the project from idea to reality:
- Measure and sketch: Record the height at different points, depth, and width. Draw a simple plan showing plumbing risers and existing vents.
- Check codes and permits: Confirm local building codes, minimum clearances, and whether you need a permit. For drainage and vent changes, a licensed plumber may be required.
- Choose a layout: Decide if you want a toilet only, toilet + sink, or full wet room. Pick compact fixtures (corner sinks, wall-hung toilets) to save space.
- Plan plumbing and drainage: Locate the nearest soil stack or waste line. If the toilet must be more than a few feet from a soil stack, you may need an upflush macerating toilet system or a pump.
- Address ventilation and lighting: Install a ducted extractor fan to avoid moisture buildup. Use layered lighting — recessed LED downlights and a vanity light — to make the area feel larger.
- Structural considerations: Confirm stairs remain structurally sound. If you open up the riser area, add framing to support stringers and treads as needed.
- Waterproofing and tiling: Use a proper membrane on floors and wet walls. Slope the floor slightly toward the drain for wet rooms.
- Finish and accessories: Install a pocket door or sliding barn door to save clearance. Add mirrors, hooks, and built-in shelving to enhance usability.
Practical DIY tips and trade-offs
- Use shallow fixtures: A 14″ (350mm) deep vanity can work. Corner basins and tapered cisterns open the pathway.
- Consider an upflush toilet: If gravity drainage isn’t possible, macerating toilets can simplify plumbing but increase maintenance and noise considerations.
- Opt for a pocket door: Saves swing space and gives a clean look; plan framing early.
- Apply moisture-resistant drywall: Use cement board or green board and a waterproof membrane in wet zones.
- Match finishes to scale: Small tiles or vertical subway tiles can make ceilings feel higher; avoid oversized patterns that overwhelm the tiny space.
- Mind the slope: For any shower or wet room, ensure floor slopes at 1/4″ per foot toward the drain.
- DIY vs hiring pros: You can do demolition, framing, tiling, and painting yourself. Hire licensed electricians and plumbers for rough-ins and connections to meet code.
Design inspiration: styling small under-stair bathrooms
Choose a design theme that complements the rest of your house but doesn’t crowd the space:
- Minimal Modern: White tiles, black hardware, and a frameless mirror for a clean, airy feel.
- Scandinavian Cozy: Light wood tones, matte brass accents, and soft textiles for warmth.
- Bold Accent Wall: One patterned tile wall or a dark paint color behind the sink creates visual interest without overwhelming.
- Vintage Powder Room: Pedestal sink, beadboard wainscoting, and a classic mirror for charm.
Budgeting and materials — cost-saving ideas
Estimate costs by breaking down major items: plumbing, fixtures, tiling, ventilation, door, and labor. Save money by:
- Buying display or clearance fixtures
- Doing demolition and painting yourself
- Reusing reclaimed wood for shelving
- Selecting a pre-made vanity instead of custom cabinetry
Frequently Asked Questions
1. Can I put a toilet under the stairs?
Yes. Many under-stair conversions include a toilet. The main challenges are finding a route to a soil stack or using an upflush/macerating system and ensuring there’s adequate headroom and ventilation. Always check local codes.
2. How much does it cost to build a bathroom under stairs?
Costs vary widely depending on fixtures, plumbing complexity, and whether you hire contractors. A basic powder room conversion can be economical if plumbing is nearby, while a wet room with rerouted drainage and ventilation will cost more. Create a detailed materials and labor estimate to plan your budget.
3. Do I need a permit to convert space under stairs into a bathroom?
Often yes—especially when altering plumbing, electrical, or structural elements. Permitting requirements vary by location. Contact your local building department and, when necessary, work with licensed professionals to ensure inspections and compliance.
Conclusion — Try one of these bathroom ideas under stairs today
Converting under-stair space into a bathroom is one of the smartest small-space upgrades you can do: it improves daily convenience, boosts home value, and transforms wasted volume into a useful room. Start by measuring and sketching your space, then decide whether a powder room, wet room, or combo suits your needs. If you enjoy hands-on projects, many steps are DIY-friendly, but bring in pros for plumbing and electrical work to meet code. Ready to make your under-stair space work harder? Explore more DIY projects and look for layout ideas in our home design ideas section to plan your next move.
Have questions about layout or want a custom plan? Leave a comment below or start your project checklist today — and consider sharing photos when you’re done!