Ever stepped into your bathroom and wondered how a simple floor swap could completely change the room — but froze at the thought of water damage, tricky installs, or a budget blowout? You’re not alone. Whether you’re tackling a weekend DIY, updating a rental, or planning a full remodel, the right bathroom flooring can make the space safer, cozier, and much more stylish.
Why choosing the right bathroom floor matters
Bathrooms demand materials that resist water, handle humidity, and offer slip resistance while still matching your design taste. From tiny powder rooms to master retreats, the wrong floor leads to peeling, mold, or a look that feels dated. The good news: modern materials and simple DIY options let you transform your bathroom without calling a pro every step of the way.
Bathroom flooring ideas options: top choices for every budget
Below are practical, widely used flooring materials and when to choose each one. I’ll include DIY-friendly picks and pro-level options so you can match the project to your skill and budget.
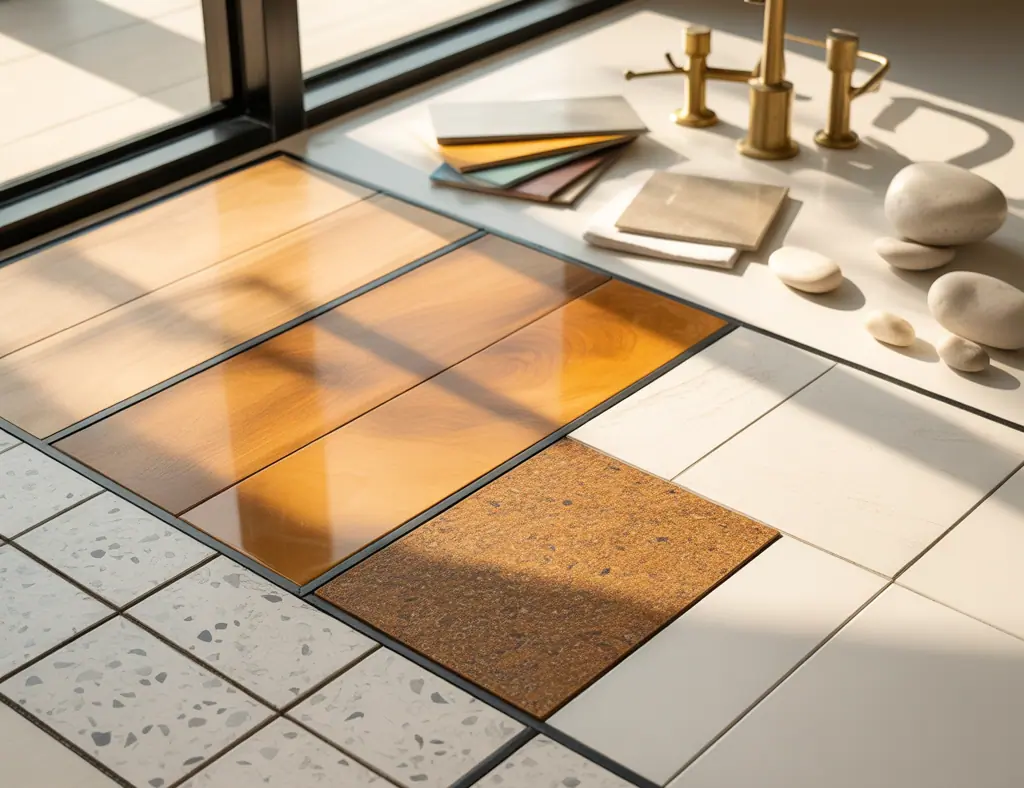
1. Luxury vinyl plank (LVP) or tile (LVT)
- Why it works: Waterproof, affordable, and available in wood-look and stone-look finishes.
- Best for: Budget bathroom remodels, renters, and DIYers who want the look of hardwood without moisture issues.
- DIY tip: Acclimate planks in the room for 48 hours, lay over a level subfloor, and use a tight-stagger pattern for a natural look.
2. Porcelain and ceramic tile
- Why it works: Extremely durable, available in endless styles, and great for heated floor systems.
- Best for: Long-term value, high-moisture areas, and custom looks like subway tile or large-format slabs.
- DIY tip: Use a cement backerboard over wooden subfloors to prevent movement and tile cracks. Buy 10% extra tile for cuts and future repairs.
3. Natural stone (marble, slate, travertine)
- Why it works: Timeless beauty and unique character; increases home value.
- Best for: High-end remodels and textured, organic styles.
- Real-world advice: Stone needs sealing and occasional resealing; expect higher installation labor costs.
4. Sheet vinyl
- Why it works: One-piece waterproof covering, good for affordable full-floor coverage with minimal seams.
- Best for: Quick upgrades, mobile homes, or rental bathrooms where cost and waterproofing are primary concerns.
- DIY tip: Smooth and level the subfloor; heat-weld seams for best waterproof performance if possible.
5. Cork and engineered wood
- Why it works: Warm underfoot and eco-friendly (cork); engineered wood can handle humidity better than solid hardwood.
- Best for: Powder rooms or low-moisture bathrooms where a warmer look is desired.
- Maintenance note: Cork requires regular sealing; choose manufacturer-rated water-resistant engineered products.
Design inspiration: pairing floors with bathroom styles
Match your floor to the overall aesthetic:
- Coastal spa: Light wood-look LVP, white hex tiles, and soft blues.
- Modern minimal: Large-format matte porcelain in charcoal or greys.
- Farmhouse: Patterned encaustic-look tiles or reclaimed-look LVP with warm tones.
- Luxury: Polished marble or dark slate with heated floor system and brass accents.
DIY step-by-step: Replace vinyl with LVP in a weekend
- Measure the room and buy 10% extra material for cuts.
- Remove baseboards and the old flooring. Clean and level the subfloor.
- Lay a thin underlayment (if recommended) and acclimate LVP planks for 48 hours.
- Start in a corner, use spacers for expansion gaps, and click-lock planks together.
- Cut planks to fit around fixtures. Reinstall baseboards or add quarter-round trim.
- Caulk seams near tubs and showers with silicone for extra water protection.
How to choose the best bathroom floor: practical checklist
Use these decision factors before buying:
- Water resistance: Is the material waterproof or water-resistant?
- Slip resistance: Look for textured finishes or safety ratings for wet floors.
- Durability: Consider foot traffic, kids, and pets.
- Maintenance: How often will you need to seal, grout, or clean?
- Budget: Factor in materials, underlayment, tools, and installation labor.
- Heated floor compatibility: If you want radiant heat, confirm material compatibility.
Maintenance and long-term care tips
Keep your floor looking great with these habits:
- Wipe up standing water quickly to prevent damage and staining.
- Use non-abrasive cleaners and avoid bleach on certain natural stones.
- Reseal grout and stone as recommended by the manufacturer.
- Place bath mats with breathable backing to prevent trapped moisture.
Budget breakdown: affordable vs investment options
If you’re on a tight budget, vinyl plank and sheet vinyl are cost-effective and quick to install. For mid-range, ceramic tile or high-quality LVT gives durability and style. If resale value matters, porcelain, natural stone, or professional-installed radiant heated floors are investment choices that pay off over time.
Frequently Asked Questions
1. What is the best bathroom flooring for small bathrooms?
Large-format porcelain tile or light-toned LVP can visually enlarge a small bathroom. Choose waterproof materials and matte finishes to reduce slip risk. Consider patterned tiles sparingly — a focal strip or backsplash can add interest without making the space feel busy.
2. Is vinyl plank flooring OK for bathrooms?
Yes — waterproof luxury vinyl plank (LVP) or tile (LVT) is an excellent bathroom flooring option. It’s durable, affordable, and available in many looks. Ensure proper installation with a level subfloor and seal edges near tubs or showers to prevent water intrusion.
3. Can I install heated floors with tile or vinyl?
Yes. Electric or hydronic radiant heating systems work with porcelain and many LVP products. Verify manufacturer guidelines — some vinyl requires specific installation methods for compatibility with electric mats. Heated floors add comfort and can help reduce moisture-related issues in colder climates.
Final tips and next steps
From waterproof vinyl plank to timeless porcelain and luxe natural stone, these bathroom flooring ideas options give you the flexibility to balance style, durability, and budget. Start by testing samples in your space, measure carefully, and decide whether this is a DIY weekend project or a job for a pro. Small changes — like a patterned tile border or a warm cork mat — can make a big visual impact without a full teardown.
Ready to pull up the old floor and start? Explore our DIY projects for tool lists and weekend plans, check complementary ideas on home design ideas, or read about matching floor choices for kitchens in our kitchen upgrades section to keep your home harmonious. Share your bathroom flooring project in the comments or try a sample installation this weekend — your next great remodel is closer than you think!
Call to action: If you want help choosing the right material for your bathroom, take measurements and pick three sample options. Post a photo and measurements, and I’ll recommend the best choice and a step-by-step plan you can follow.
For more tips on handling home renovations, especially when it comes to choosing the right flooring for your bathroom, check out 6 Methods for Reducing Moving Expenses with Removalists.