Have you ever stood in your living room, staring up at a flat, uninspired ceiling, and thought, “This space could really use something special”? Whether you’re tackling a weekend DIY project or planning a full remodel, tray ceilings are one of the highest-impact upgrades you can make. They add depth, drama, and an instant “architectural” feel without completely redoing the room. Below you’ll find practical ideas for tray ceiling design, lighting solutions, step-by-step how-tos, and real-world tips to transform your home.
Why Choose a Tray Ceiling?
Tray ceilings (also called recessed or inverted ceilings) create an elevated focal point that can make rooms feel larger and more luxurious. They work great in living rooms, master bedrooms, dining areas, and even in kitchen upgrades where an over-island ceiling treatment can define the space. Tray ceiling designs accommodate a variety of finishes—paint, wood, wallpaper, and even tile—making them flexible for modern, traditional, and transitional homes.
Top Tray Ceiling Design Ideas
1. Painted Cove with Contrast
Paint the recessed area a darker color than the surrounding ceiling to add depth. Use satin or eggshell finish for subtle sheen. This modern tray ceiling idea is inexpensive and striking.
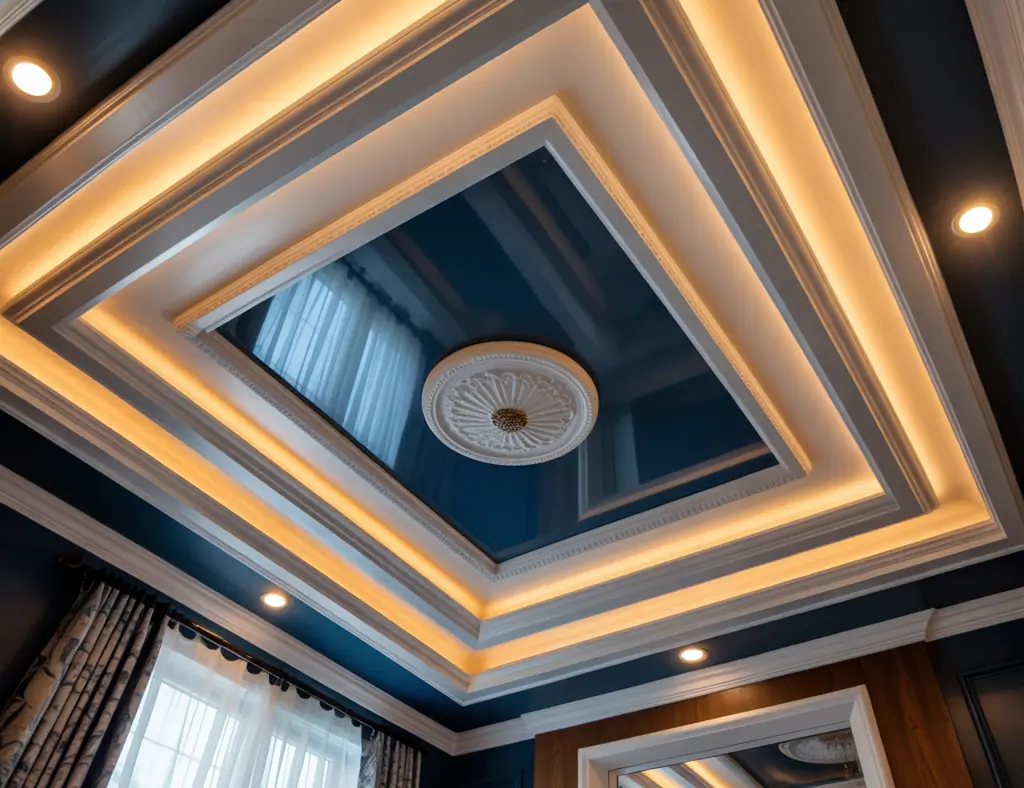
2. LED Cove Lighting for Ambient Glow
Install LED strip lights in the cove to create soft, indirect lighting. Choose tunable white or color-changing strips for mood control—perfect for living rooms and dining rooms.
3. Coffered or Multi-Level Tray
Create a coffered effect by adding beams or trim to form multiple recessed panels. This is a classic, high-end look that pairs well with crown molding and medallions.
4. Shiplap or Wood Plank Inset
Line the recessed section with shiplap or reclaimed wood for a warm, farmhouse vibe. Finish with a matte topcoat and accent lighting to highlight texture.
5. Decorative Wallpaper Accent
Use a bold patterned wallpaper inside the tray for a surprising pop. This works especially well in bedrooms and powder rooms where the scale is smaller.
6. Tray Ceiling with Chandelier Focal
Center a chandelier or pendant within the tray; the extra height makes statement lighting feel more balanced. Add a medallion or decorative plaster ring for a traditional touch.
7. Floating Tray with Hidden Hardware
Build a floating soffit that conceals speaker wires and HVAC diffusers for a clean, modern finish—great for home theaters and open-plan living rooms.
8. Painted Ombre or Two-Tone
Paint a subtle ombre from the outer edge to the center of the tray for an artistic effect that draws the eye upward.
9. Metallic or Gloss Finish
Use a metallic or high-gloss paint inside the tray to bounce light around and add a glamorous touch—ideal for formal dining rooms.
10. Small Room Solutions
In smaller rooms, keep the tray shallow and paint it the same color as the walls to avoid visually lowering the ceiling. Use edge lighting to subtly enhance the effect.
Step-by-Step DIY Tray Ceiling: Basic Build
- Plan and measure: Determine tray dimensions—common depths are 6–12 inches for a subtle look, 12–18 inches for more drama. Map lighting and wiring before framing.
- Frame the soffit: Use 2x4s or metal studs to build the tray frame secured to ceiling joists.
- Install drywall returns: Attach drywall to the frame, tape, and mud the seams. Sand smooth when dry.
- Add trim and molding: Apply crown molding or custom trim at the ledge for a finished profile.
- Wire lighting: Run conduit for recessed cans or LED strips. If unsure, hire an electrician—safety first.
- Prime and paint: Use a quality primer and 2 coats of paint. Finish with caulking along trim lines.
Practical DIY Tips and Real-World Advice
- Start small: If you’re new to drywall and trim work, try a shallow tray in a bedroom before attempting a large living room tray.
- Budget for lighting: High-quality LED tape and a dimmer add more perceived value than expensive molding.
- Mocks and mockups: Use painter’s tape to outline the tray on the ceiling to visualize scale before cutting anything.
- Masking and ventilation: Protect floors and furniture. Use an exhaust fan when sanding to reduce dust spread.
- When to hire pros: Get an electrician for wiring and a carpenter for complex framed coffers or multi-level trays.
Design Finishes and Materials to Consider
Think beyond paint. Use MDF crown molding for a cost-effective ornate look, solid wood for a premium finish, or plaster for seamless curves. For modern homes, consider drywall-only clean lines with integrated LED channels. For a rustic approach, reclaimed wood or exposed beams add character.
Tray Ceiling Design Ideas for Specific Rooms
Master Bedroom
Use soft, warm paint tones and hidden LED strips to create a relaxing retreat. Pair with recessed dimmable lights for reading nooks.
Dining Room
Add a deep tray with a bold wallpaper or metallic center and a chandelier suspended from a decorative medallion for formal elegance.
Kitchen and Over-Island
A shallow tray above the island with recessed task lighting or pendants helps visually define the cooking area—perfect for kitchen upgrades and open-plan homes.
Frequently Asked Questions
Q: How much does it cost to add a tray ceiling?
A: Costs vary widely based on size, materials, and lighting. Expect a modest DIY build with drywall and paint to be a few hundred dollars in materials, while professional installs with custom trim, lighting, and wood finishes can run into the thousands. Always get multiple quotes for contractor work.
Q: Can I install a tray ceiling myself?
A: Yes—if you have intermediate carpentry and drywall skills. Simple shallow trays are very do-able for experienced DIYers. Plan carefully, use proper tools, and hire an electrician for wiring. For complex multi-level or coffered ceilings, consider a pro.
Q: What lighting works best in a tray ceiling?
A: LED strip lighting in the cove provides soft, indirect illumination and energy efficiency. Recessed cans along the perimeter or a central pendant/chandelier work well too. Combining ambient cove lighting with task lights gives the best flexibility.
Conclusion: Bring One of These Ideas for Tray Ceiling Design to Your Home
Tray ceilings are a high-impact, flexible upgrade that can elevate any room—whether you want a modern recessed light cove or a traditional coffered centerpiece. Pick one of these ideas for tray ceiling design that fits your style and skill level, sketch the plan, and try a small DIY project to gain confidence. If you’re ready to start, gather your tools, plan the lighting, and get to work—or call in a pro for the trickier steps. Want more inspiration for the rest of your home? Check out our DIY projects, browse kitchen upgrades for complementary ideas, and explore other home design ideas to coordinate your look.
Ready to start your tray ceiling project? Save this guide, make a plan, and share your before-and-after photos to inspire others. If you need help with materials or wiring decisions, ask a question below — I’d love to help.