You’re painting the front door, pruning the shrubs, and then you notice it — the mailbox post that’s been leaning since last winter. Small details like the mailbox can make or break your home’s curb appeal, so why not turn that tired post into a charming focal point? In this post I’ll share practical, stylish, and easy-to-follow ideas for mailbox posts that any DIYer can tackle to upgrade their front yard.
Why upgrading your mailbox post matters
A fresh mailbox post is more than just decorative. It protects your mail, adds a welcoming touch, and increases perceived home value. Whether you want a rustic cedar look, sleek metal modernism, or a planter-integrated post, replacing or refinishing the mailbox is a small project with big visual payoff. Plus, many of these ideas are weekend DIY projects you can complete with basic tools and a trip to the hardware store.
Creative ideas for mailbox posts
Below are tested ideas for mailbox posts, with materials, quick steps, and design tips so you can choose what fits your home’s style.
1. Classic wooden post with decorative cap
- Materials: pressure-treated 4×4, post cap, exterior screws, stain or paint, anchor kit.
- Quick steps: cut post to height (typically 42–48″ to top of mailbox), dig 18–24″ hole, set with concrete, attach mailbox and cap, stain/seal.
- Tip: use a cedar or treated wood and apply two coats of exterior sealer for longevity.
2. Modern metal post with slim profile
- Materials: galvanized steel or aluminum post, powder-coat finish recommended, mounting bracket.
- Quick steps: anchor base to concrete or use a buried galvanized sleeve, attach mailbox with stainless hardware.
- Tip: choose finishes that match your exterior lighting or house numbers for a unified look.
3. Mailbox post with built-in planter
- Materials: wide post or box-style post, planter insert, drainage holes.
- Quick steps: construct a square post hollowed to accept a planter, line with landscape fabric, plant low-maintenance perennials.
- Tip: use drought-tolerant plants or succulents for minimal upkeep and year-round interest.
4. Faux-stone or stacked-brick column
- Materials: concrete blocks or stone veneer, mortar or adhesive, capstone, mailbox bracket.
- Quick steps: build a solid base, veneer with stone, secure mailbox bracket, seal joints.
- Tip: this sturdy option withstands impacts better and looks high-end with little maintenance.
5. Reclaimed wood or wine-barrel post
- Materials: reclaimed timbers or half wine barrel, wood sealer, mounting hardware.
- Quick steps: clean and prep wood, reinforce interior with a steel post sleeve for strength, attach mailbox.
- Tip: reclaimed wood gives a cozy, cottage vibe — add house numbers on a metal plate for contrast.
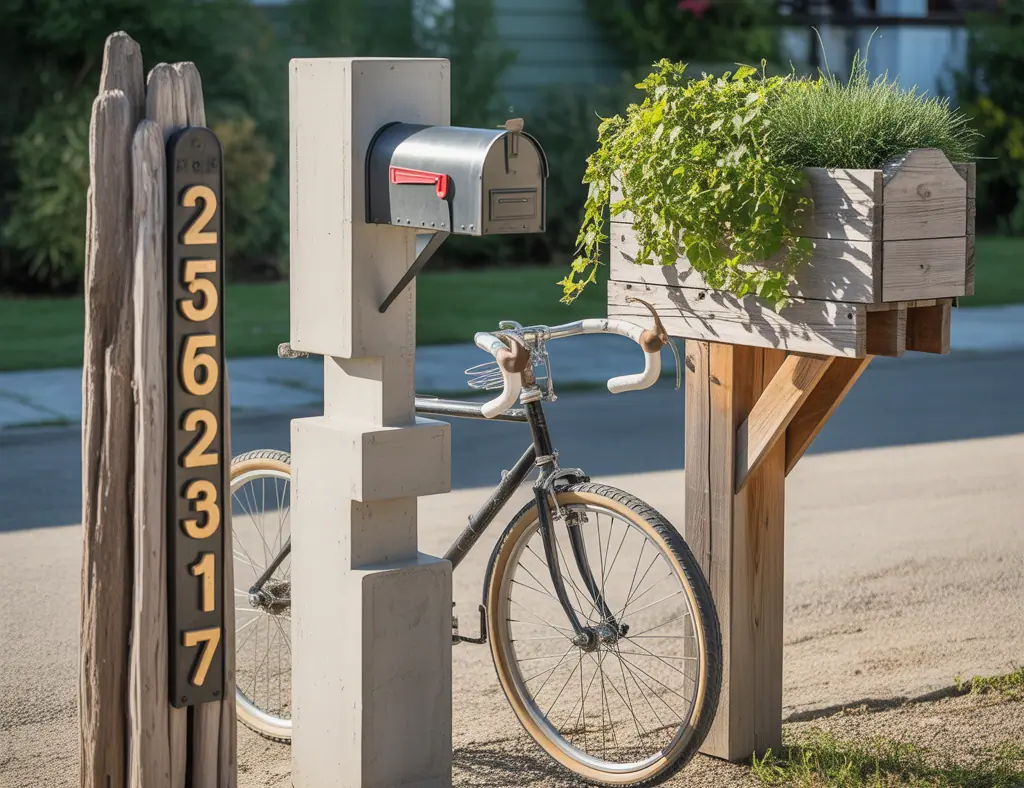
6. Post with solar lighting and house numbers
- Materials: solar path lights, acrylic or metal numbers, wiring (if hardwired), adhesive.
- Quick steps: mount light on top of post or integrate along the post, place contrasting numbers for nighttime visibility.
- Tip: solar lights increase safety and draw attention to your new mailbox installation after dark.
7. Wrought iron or decorative scrollwork post
- Materials: wrought iron post, rust-resistant paint, mounting hardware.
- Quick steps: install with anchored base, paint with rust-inhibiting primer and finish coat.
- Tip: pairs well with historic or Victorian-style homes; seal joints to prevent water ingress.
Step-by-step guide to installing a mailbox post
Here’s a basic installation workflow that works for most post types:
- Check local postal regulations and height requirements.
- Choose location: level ground, accessible for mail carrier, visible from street.
- Gather tools: post hole digger, level, gravel, quick-setting concrete, drill, screws, saw (if cutting).
- Dig hole depth: generally 18–24 inches for wood posts; deeper in freeze-prone areas.
- Add 4–6″ of gravel for drainage, position post, level, and pour concrete to secure.
- Allow concrete to cure (24–48 hours) before attaching mailbox and finishing with paint or stain.
- Add finishing touches: numbers, light, planter, or decorative trim.
Tip: use a sleeve anchor or precast concrete base if you prefer a removable post for future changes.
Design inspiration and finishing touches
Select finishing details that tie the mailbox post to your home’s aesthetic:
- Color coordination: match mailbox accents to front door, shutters, or outdoor lighting.
- Hardware: choose brass, matte black, or brushed nickel depending on your home style.
- Landscaping: add a low border of stones, hostas, or dwarf grasses to frame the post.
- Seasonal decor: swap a small wreath, flag, or changeable front-porch sign for holidays.
Maintenance tips to keep your mailbox post looking great
Routine care extends the life of your mailbox post:
- Inspect annually for rot or rust; touch up paint and sealant.
- Reapply exterior stain or sealant on wood every 2–3 years.
- Tighten screws and check the mailbox bracket after storms or icy weather.
- Clear plant growth that holds moisture against the post to prevent decay.
Frequently Asked Questions
1. How deep should a mailbox post be set in the ground?
Most mailbox posts should be set 18–24 inches deep. In colder climates, dig deeper to get below the frost line or use a concrete footing to prevent heaving during freeze-thaw cycles.
2. Can I reuse an old post or should I replace it?
If the existing post is structurally sound, you can often refurbish it by sanding, sealing, reinforcing with a steel sleeve, and repainting. Replace the post if there’s significant rot, cracks, or wobble that affects safety.
3. Do I need permission from the postal service to change my mailbox post?
You generally don’t need special permission to change the post, but you should follow postal height and placement standards to ensure mail delivery isn’t affected. If in doubt, check local guidelines before making permanent changes.
Conclusion — Ready to try new ideas for mailbox posts?
Upgrading your mailbox post is an affordable, high-impact home improvement that can be completed in a weekend and offers big curb appeal returns. Whether you prefer a rustic wooden post, a modern metal column, or a planter-integrated mailbox, these ideas for mailbox posts give you clear steps and design options to fit your home. Pick a style, gather your materials, and get started — and if you’re looking for more hands-on inspiration, check out our DIY projects gallery and home design ideas for complementary upgrades.
Ready to transform that leaning post into a standout feature? Share photos of your finished mailbox or start with a simple wooden post replacement this weekend. For step-by-step help on tools and supplies, visit our Plywood Ceiling Projects section and get the confidence to begin.