Ever been frustrated by muddy shoes after a rainstorm, a dull backyard that feels unused, or a garden route that’s more tripping hazard than charming walkway? You’re not alone. A simple, well-planned gravel walk can tame mud, guide guests, and give your landscaping instant curb appeal—without a huge budget. In this post I’ll share practical, stylish, and easy-to-build ideas for gravel pathway projects you can tackle this weekend.
Why choose a gravel path? Quick benefits
Gravel walkways are budget-friendly, permeable (good for drainage), and flexible in shape—perfect for DIYers and homeowners who want quick impact. They work well in rustic, cottage, and modern landscapes and offer options like decorative edging, stepping stones, and lighting upgrades.
When a gravel pathway is the right choice
- You need a low-cost solution for frequent foot traffic.
- Your yard has drainage issues and needs a permeable surface.
- You like a natural, informal look that blends with planting beds.
Ideas for Gravel Pathway: 10 creative ways to transform your yard
Below are practical design ideas—from classic pea gravel to chic stone-and-gravel combos—each with tips for DIY installation and maintenance.
1. Classic pea gravel curve
Soft, rounded pea gravel (1/8″–3/8″) creates a comfortable, low-cost walking surface. Lay it in a gently curving path to soften hard lines in a formal yard.
DIY tip: Install 4–6 inches of compacted crushed stone base, a geotextile fabric to stop weeds, then 1–2 inches of pea gravel. Add simple metal or timber edging to keep gravel in place.
2. Stepping stones with crushed gravel infill
Combine large stepping stones or pavers with crushed stone between them for a high-end look that’s still easy to install.
DIY tip: Space stepping stones evenly, dig 2–3 inches deep, set on sand, and fill gaps with compacted 3/8″ crushed rock. This hybrid reduces gravel migration and creates defined walking pads.
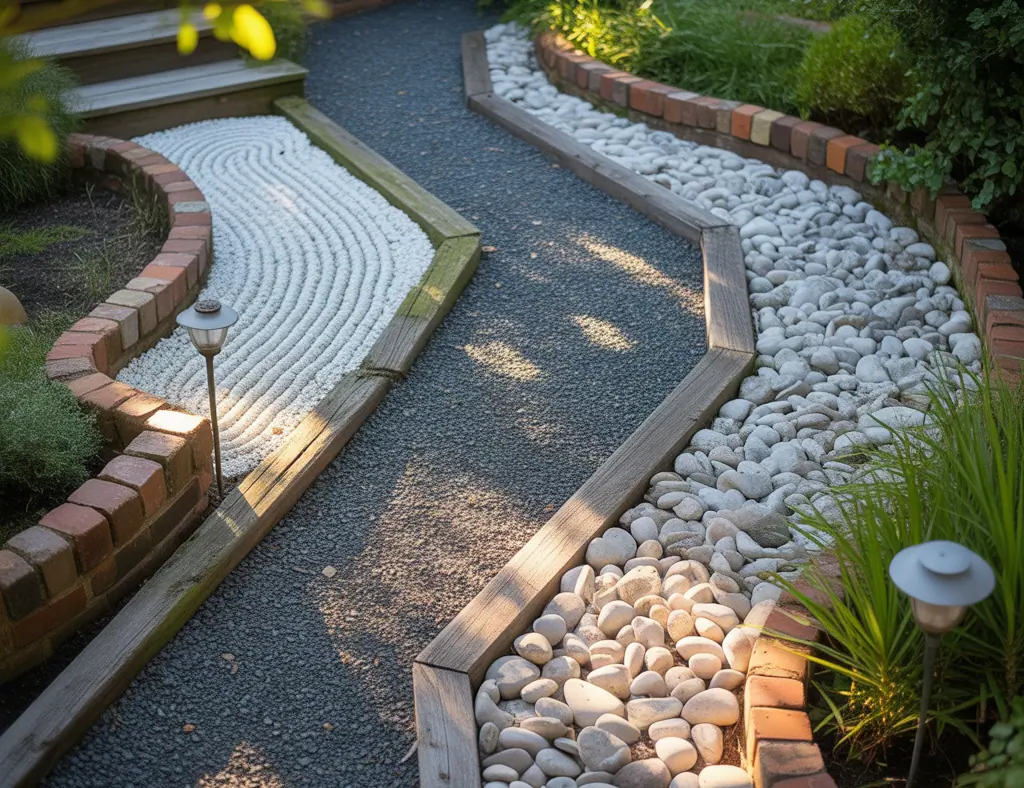
3. Recycled brick or tile border
Add a reclaimed brick or tile edge to a gravel path for an eco-friendly, visual contrast.
Design advice: Use compacted sand as a bedding for the border. The edging will keep gravel contained and add vintage character.
4. Garden path with built-in drainage
If your yard gets soggy, design a gravel channel that doubles as drainage. Lay the path on a slight crown and include perforated pipe under the base if needed.
Pro tip: Use angular crushed stone under the top layer for better compaction and drainage.
5. Colorful gravel patterns
Mix different stone sizes and colors to form stripes, chevrons, or borders. Colored gravel can define zones and add playful texture.
DIY tip: Use low-profile timber or stone edging and lay one color at a time to keep clean lines.
6. Gravel path with low-voltage lighting
Add solar or low-voltage lights along the edge for safety and ambiance. Path lights emphasize texture and make late-night garden strolls inviting.
7. Rustic wood sleepers and gravel
Place timber sleepers perpendicular to the path direction and fill between them with gravel for a strong, rustic boardwalk look.
Maintenance note: Choose pressure-treated or naturally rot-resistant wood and ensure good drainage to lengthen life.
8. Gravel patio connector
Use a wider gravel pathway as a connector between outdoor living areas. Consider 3–4 inches depth of pea gravel over compacted base and anchor with stone pavers near seating zones.
9. Plant-friendly gravel borders
Edge the path with low-growing perennials, thyme between pavers, or ornamental grasses for a soft, cottage-style route.
10. Modern minimal gravel path
For a contemporary look, pair monochrome crushed stone with concrete pads and clean metal edging. Keep lines simple and plantings sparse.
Step-by-step: How to build a basic DIY gravel pathway
- Plan your route and mark it with spray paint or stakes and string.
- Excavate the area 6–8 inches deep for high-traffic paths (4–6 inches for lighter use).
- Lay landscape fabric to suppress weeds (optional but recommended).
- Add 3–4 inches of crushed stone base (angular) and compact with a plate compactor.
- Install edging (metal, stone, timber) to hold shape.
- Spread 1–2 inches of top gravel (pea gravel or crushed rock) and compact lightly.
- Water and tamp the surface; add more gravel where needed.
Materials, tools, and cost-saving tips
Essential materials: crushed stone base, top gravel (pea or crushed), landscape fabric, edging, and compacting equipment. Tools: shovel, rake, wheelbarrow, plate compactor (rental), and level.
Cost-saving tips: Buy gravel by the yard, reuse bricks or pavers for edging, and rent a compactor instead of buying one. Calculate volume: Path area (sq ft) × depth (ft) = cubic feet; divide by 27 for cubic yards.
Maintenance and longevity: Keep your path looking fresh
- Top up gravel annually where it thins out.
- Pull weeds or use a flame weeder for small growths—avoid broad chemical use near beds.
- Re-compact areas that loosen after heavy use or freeze/thaw cycles.
- Replace or repair edging to stop migration.
Design inspiration and placement ideas
Use gravel pathways to lead visitors to focal points—like a bench, fire pit, or garden gate. Mix textures and materials (stone, wood, gravel) to create visual interest. For a small yard, narrow gravel routes with stepping stones save space and convey depth.
Frequently Asked Questions
Q: What is the best gravel for pathways?
A: For a stable, durable surface, use angular crushed stone (like 3/4″ minus) as a base and top it with pea gravel for comfort, or use crushed stone top layer for a firmer finish. The right choice depends on desired look and traffic level.
Q: Do I need landscape fabric under a gravel path?
A: Landscape fabric helps reduce weeds and prevents mixing of soil and gravel. It’s not mandatory, but it improves longevity—especially in gardens prone to weed growth.
Q: How much gravel will I need for a path?
A: Calculate the area (length × width) and multiply by desired depth. Convert cubic feet to cubic yards by dividing by 27. As a rule of thumb, a 3-foot wide path 10 feet long at 2 inches deep needs about 0.6 cubic yards of gravel—buy a bit extra for settling and compaction.
Conclusion: Start your gravel pathway project today
Whether you want a quaint garden lane, a modern walkway, or a drainage-friendly route, these ideas for gravel pathway give you practical design inspiration and clear DIY steps. Pick one concept, gather materials, and try a small section first—gravel paths are forgiving and easy to expand.
Ready to transform your yard? Browse more DIY projects for weekend builds, get style ideas from our home design ideas gallery, or pair your new path with outdoor kitchen updates from our kitchen upgrades guide. Share your results and questions in the comments below—let’s build something great together.
For more ideas on transforming your space, check out our Ultimate Guide to Bathroom Posters.
For more home improvement ideas, check out Transform Your Bathroom: 10 Tips for a Functional and Stylish Space.